One of the most common mistakes photographers make when sharing HDR is to ignore how your image will look on someone else’s monitor. It’s easy to manage once you understand you should always export HDR images with a “gain map“ (even when encoding as AVIF).
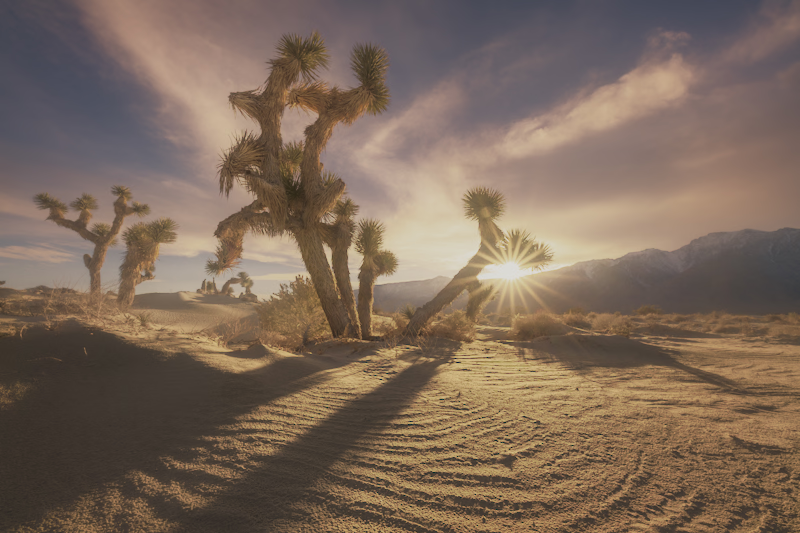
The image below is encoded two different ways, the left side is a simple HDR image (has no gain map). The right side has a gain map. When you view them on a highly capable HDR monitor (one with 4 stops of headroom), they will look nearly identical. Which means you probably wouldn’t notice the difference on the monitor you use to edit HDR.
However, if you view them on a less capable monitor, the gain map on the right will look MUCH better:
- The AVIF with a gain map (right side) will look great on any display – even if it only supports SDR or has limited HDR.
- The simple AVIF (left side) will show a number of different issues and varies by browser:
- in Chrome, the image shows a loss of contrast and detail, unexpected boosts in saturation, and a result that looks almost fake.
- in Safari, the tone mapped results are quite different. The sand loses detail, the edges of clouds look flat / unnatural, and there is a significant increase in saturation (even if you like the color boost this is a bad result as it does not match the result I intended as the creator).
- in FireFox, the image on the left will look almost black. This shows the backwards compatibility of gain maps.
- The gain map result on the right is superior in all browsers. While the Safari tone map is better than Chrome on this image, the reverse is often true. It varies by browser, and the automatic tone mapping is nearly always visibly inferior to an image with a gain map created by a photographer.
- Note: The buttons below the image may be used to limit HDR (assuming you have a supporting HDR display).
- The red SDR only button will show the SDR result (0 headroom). This button is active by default on this post, so you’ll need to click the other buttons to see HDR in this example.
- The green button will show the best possible result on your display. If you have 4 stops of headroom, both versions of the image will look the same. This highlights why the value of gain maps isn’t obvious to many creators – the problem shows up on other people’s displays when they don’t have as much HDR support as you!
- The yellow “limited HDR” button is not supported yet on all browsers and may look the same as the default (full HDR). On Chrome, it seems to limit headroom to 1 stop. This helps to show that gain maps not only improve results for SDR, but also on HDR monitors (anything with less headroom than the image requires).
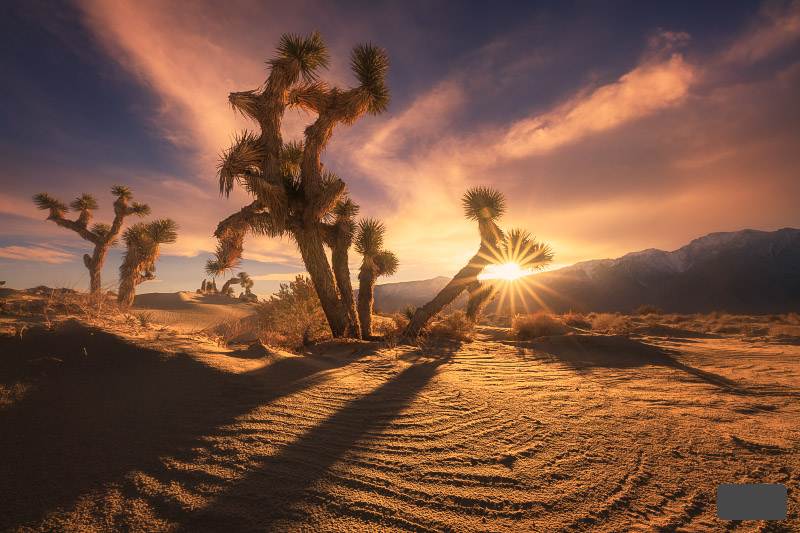
The key lesson here is that gain maps are critical for best results, even with 10+ bit depth formats that natively support HDR (the image on the left is a 10-bit AVIF).
There is a common misperception that the purpose of gain maps is just to add HDR support for the 8-bit JPG format. They serve a much more important role – they ensure your HDR image looks great on any display less capable than yours (higher bit depth does nothing help browser adapt the image).
To learn more about how gain map work, see great HDR requires a great SDR base image and gain maps make HDR look great on any screen.
To summarize:
- Always export your HDR images with a gain map (even when using AVIF, JXL, etc) to ensure they look great on any display.
- A simple HDR image (with no gain map) will almost always look great on your display because you have a great monitor and likely did not edit beyond its capabilities. But this simple image will often look inferior on less capable monitors, and will definitely not be consistent with the version you would print.
If you want to take full control of your gain map to get the best possible result, see the various HDR workflows for exporting via Web Sharp Pro. All of them ensure you control the base SDR in the image for an optimal result on any display.
More information on gain maps:

