I get a lot of questions about what gear I use, so I’ve create this page as a central place for recommendations and reviews.
Special Offers:
- HIGHLY RECOMMENDED: Save $1,000 off the incredible Mavic Pro 4 creator combo! Grab it while you can, inventory has been hard to find in the US.
- HIGHLY RECOMMENDED: $800 off the ASUS PA32UCXR monitor, which is the best overall HDR monitor short of the Pro Display XDR. See my full review.
- B&H “One Crazy Deal” (every day)
- Weekly B&H Specials
Quick links:
- HDR monitors (for vastly improved image quality, learn more here)
- Lenses
- Tripods
- Cameras, drones, and accessories
- Software
- Hardware
- Color Management
- External storage
Note that many of the links below are affiliate links, which helps support all the free content I post on this website and YouTube. Using these links (even buying other products from Amazon after clicking the link) helps to support this site, and it does not cost you anything. I only write reviews for equipment I personally use and recommend. More importantly, I try to explain why I use this equipment, so that you can decide if it is also right for you. For my absolute favorite equipment, I’ve added a “highly recommended” comment. For any questions or concerns about potential conflicts of interest in these reviews, please see my Ethics & Privacy page.
Lenses
Wait, what camera do you use? I’m sure that’ll be pretty obvious in a second, but my personal opinion is that the camera is the least important part of the process. That’s not at all to say that cameras aren’t important to me, just that other pieces of the puzzle are more important. First, there’s your subject and composition – the photo starts there. Second, there’s your light – it needs to be good to be interesting (whether natural or flash). Third is your lens – everything passes through the lens before the camera, so a photo can’t be any better than the lens. And then there’s the camera. If you don’t have good subject/composition, in good light, passing through a decent lens; the camera won’t matter. I use a variety of lenses, depending on a number of factors (typically subject and whether I’m traveling). I’m a huge fan of Nikon glass, most of their lineup is excellent. Sigma has been putting out some very well reviewed lenses, and that’s where I’d look next for budget options with a Nikon mount. There’s absolutely no reason not to use Canon, Sony, etc. My comments on “best” ways to use certain focal lengths would still apply, but I can’t really comment on the quality of the specific equivalents for other camera systems. And all of my lens recommendations assume a full-frame Nikon camera. Many of these lenses are either heavier or pricier than the “DX equivalents, and the DX sensor effectively magnifies all focal lengths.
Nikon 16-35mm f/4G VR (check the latest prices on Amazon or B&H) – HIGHLY RECOMMENDED for landscapes!
Wait, d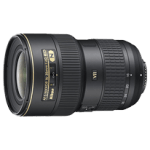 idn’t you just say you had the 14-24mm? Dude, that’s overkill! Well, not really – I’m focused on landscapes and I need a variety of tools to get the job done. The 14-24 is awesome for super wide shots, focusing in low light, and astrophotography – but it is not small and light for travel (especially if you need another lens to cover the 35mm range). The 16-35 produces great images, is easy to use with polarizers and ND filters, and can often be handheld due to the vibration reduction feature. When I’m traveling to shoot cities, I often like to bring the 16-35, 50mm, and 85mm. If I don’t expect portraits or midrange shots, I might drop one or both of the primes. If I had to pick either this lens or the 14-24, I’d lean towards the 14-24, but it depends on what/how you shoot.
Best for: Landscape/cityscape, interiors, group portraits, lightweight travel.
Nikon 24mm PC-E (check the latest prices on Amazon or B&H)
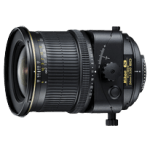 Nikon makes several incredible tilt-shift lenses. These are the perfect tool to get straight lines in camera and critical for serious architecture and cityscape work. The 24mm is great when your vantage point is slightly further back, and can easily accept threaded filters. The 45mm version of this lens is excellent lens for shooting specific parts of the skyline or from a further vantage point. The 19mm is an awesome lens for sweeping cityscapes and interiors (though using a filter on the 19mm isn’t much of an option).
Best for: Architecture, Cityscapes.
Nikon 70-200mm f/2.8G VR-II (check the latest prices on Amazon or B&H)
 Hands down, this is the lens I use the most for sports and family portraits. I’ll use the 85mm f/1.4 when I want the absolute minimal depth of field, but the versatility and long reach of this lens keeps me using it over and over. You can still get the old VR version of this lens, I strongly recommend you get the VR-II. I upgraded from the old design (for an total net cost of $1000 after selling the old lens and paying the $400 higher price tag) and it was absolutely worth every penny. The new lens is dramatically sharper. Note that the new version exhibits “focus breathing”. This means that when you’re within about 10-15 feet of your subject, you won’t be able to zoom in quite as close as you could with the old design. This has never been a concern for me, but you may be shooting different subjects.
Best for: Portraits, weddings, landscape details, sports.
Nikon TC20-E III (check the latest prices on Amazon or B&H)
 If you want to get even more reach (140-200mm), I recommend the Nikon TC20-E III 2X teleconverter. This gives you the equivalent of a much longer lens, but turns the maximum aperture from 2.8 to 5.6. This is a great option for closeup sports shot in bright light (or if you’re willing to give up some ISO). Be sure to get the III, not the II (the new version is substantially more sharp). You might also consider a monopod to provide stability and help manage the weight of the total setup (gets hard to hand hold after 10-20 minutes). Very long lenses are often overlooked as a great way to create stunning landscape images.
Best for: Sports, landscape details (if you already have the 70-200).
Nikon 80-400mm f/4.5-5.6 G ED VR (check the latest prices on Amazon or B&H)
Long telephoto lenses are incredible for landscape photography. If you shoot sports and family portraits, you may be best served to get the 70-200mm and pick up a 2X teleconverter to be able to shoot longer. But the 80-400mm offers the potential for better image quality, and a shorter combined lens length that is easier to pack in your travel bag. With the excellent VR on this lens, you can still handhold many shots, even at relatively slow shutter speeds (1/60 or even slower with careful technique).
Best for: Landscape details/abstracts.
Tripod
We still aren’t at cameras yet? Nope! Think of it this way, if you use an inferior tripod that blurs each pixel by a single pixel, you lose half the linear resolution. If you assume you lose those pixels in both the horizontal and vertical dimensions, a 36 mega-pixel Nikon D810 basically becomes just a 9 mega-pixel camera! That resolution is worthless if you aren’t shooting on a stable tripod or at a relatively fast shutter speed. Almost all cameras are good these days and tripod technology doesn’t change much over time, so I’d get the right tripod first if budget is a concern. Over time, I’ve been traveling lighter and lighter. I find that smaller cameras, fewer lenses, and more compact tripods give me nearly everything I want – but keep travel much simpler.
Really Right stuff TVC-33 legs (buy at B&H)
 If you’re serious about landscapes, get a serious tripod. Really Right Stuff probably has the best reputation in the business, they absolutely make awesome gear. I love these legs because I get tack-sharp images in nearly all conditions, are built with lightweight carbon fiber, and they’ve got great height (I’m 6’2″ and the camera is just above my eye height when fully extended). They’re also built like a tank. Unless mine gets lost or stolen, I expect I’ll still be using this in 20 years. I can pack these (without a ball head) in my checked luggage. But this one is probably not going to fit in a carry-on suitcase.
I bought a couple “cheap” tripods before I finally got here. If you’re serious, I recommend looking past the price tag, the cheap tripod will cost more than you think in the long run (even if you don’t later upgrade, an inferior tripod may well cause you to lose noticeable image quality – especially with longer focal lengths or when shooting in wind). If you opt for a cheaper alternative, I recommend getting something that does not have a center column. You might as well get some little kid to come kick your tripod if you get the center column. Ok, that’s a little over the top, but even if you shoot with the column down it will rob you of image quality. If you do get a center column, hang some weight from the bottom of that column to minimize vibration.
Note that the legs on RRS tripods eventually get a little loose (meaning that the legs open and close more easily than desired). The included Allen wrenches are great to tighten things up, but Loctite Blue 242 is generally recommended to help the screw threads stay tight longer.
Really Right stuff TVC-24 legs (buy at B&H)
 I got this smaller pair of legs so that I have something that easily fits in my carry-on luggage. That’s it. With 4 sections, it isn’t quite as stable as the 33. And it isn’t as tall, which means that it’s hard to shoot over some railings and my back can get tired if I’m bending down too long to look through the eyepiece. All minor tradeoffs, and I’m glad I’ve got this for many trips. If I had to pick one and I was tall or worried about maximum sharpness, I’d just get the 33.
Really Right stuff BH-40 ball head (buy at B&H)
 There are three major RRS ballheads. The 55 is too heavy for my travels (though I own it too and use it close to home). The 30 looks too fiddly to use (I haven’t tried it). The 40 is the “Goldilocks” option for me. I LOVE the L-plates. Being able to quickly switch from landscape to portrait is really nice. I got the PC-PRO version. I love the built-in level. It makes it incredibly easy to level your camera (and more accurate than the built-in level in my camera). It also makes it incredibly easy to level and pan for horizontal panos.
Arca-Swiss C1 Cube Geared Head (buy at B&H)
Geared heads offer the ultimate precision to adjust your camera’s level and tilt independently. They make it a snap to get rid of alignment issues in architectural and cityscape images. And they are incredible for shooting panoramas because you get perfect alignment for any vertical movement. I’ve tried cheaper options before, but found the Arca Swiss “Cube” is absolutely worth its hefty price tag. Using a ball head feels fiddly without it now. Of course, it isn’t the perfect tool for every shoot. It’s a bit larger/heavier than my BH-40. And I wouldn’t want to bring this head into salt water or sandy conditions that might gum up the gears. But for many shots, it’s a dream to use.
Cameras, drones, and accessories
Finally! Yes, I’ve downplayed cameras, but I definitely have my preferences. I wouldn’t trade my D850 for anything else currently on the market.
Nikon D850 (check the latest prices on Amazon or B&H) – HIGHLY RECOMMENDED!
 The D850 is the best 35mm DSLR I have ever used, period. If you shoot landscapes, it’s probably the best camera on the market. Why? Beyond the obvious pixel-awesomeness, it has two critical qualities. First, it has incredible dynamic range. That means that you can capture a lot more highlight and shadow detail, and is much more important to me than the number of pixels. I have not shot seriously with Canon cameras, but I know many professional Canon shooters who will tell you that Nikon offers a better chance these days of letting you capture a shot with extreme range (such as a sunset). Second, it has a world-class auto-focus system. Compared to the D810, it offers a vastly improved autofocus, better live view and focus peaking for manual focus, better shadow color, a touch screen, increased resolution, focus stacking, tilt-LCD, and AF auto-tuning.
See my list of recommended settings to make the most of the D850.
The D850 replaces Compact Flash with XQD for the 2nd slot. I recommend getting a couple 128GB Sony XQD cards. This is a cost effective way to get some fast cards that can back up numerous SD cards.
For budget alternatives on new cameras, see the Nikon D7200, D610 and D750. Although I do not personally own them, I have heard from sources I trust that they are all great options.
DJI Mavic 4 Pro (check the latest prices on Amazon or B&H)- HIGHLY RECOMMENDED!

Capture incredible new angles or otherwise impossible shots with this drone. The new 4 Pro Creator Combo is unreal. The camera is a massive leap forward in image quality. The RC2 Pro remote now offers a much larger / brighter screen, improves range, and eliminates the fiddly screw-in control sticks. The drone is more rock solid than ever and notably more quiet. With flight time extended to 51 minutes, 3 batteries, and max speed increased to 56 MPH – it’s never been easier to catch fast moving light or capture multiple compositions as the light moves from sunset to blue hour.
Neutral Density Filters
If you want to capture beautifully simple shots of clouds and water, you should absolutely get some ND (neutral density) filters. Be sure to checkout my tutorial on how to properly use them.
I’ve recently started using (and love) Breakthrough Photography‘s X4 10-stop ND filter. It has the least color cast of any ND filter I’ve ever tried and thin enough to avoid vignetting. It also has a nice grip that makes it easy to unscrew from your lens (handy when working fast and you want to avoid dropping the filter). I also plan to order the X4 6-stop filter. If you’re on a budget, you might wish to try their lower-tier X2 filters. I can’t speak to how much of a quality difference there is, but I assume the X2 is still a pretty impressive filter.
I have used B+W multi-coated screw-on filters for years. I have both the 1.8 (6 stop) and 3.0 (10 stop) versions. They are good filters, but exhibit a strong brown cast. You can color correct the 6 stop filter, but I always convert the 10-stop images to black and white. I frequently stack these together for 16-stop reduction, which is perfect for 5 minute exposures in the middle of the day.
I love Lee‘s George Lepp 77mm thin 4-stop filter. It’s perfect for shooting speeds I need to capture ocean waves at sunset with my preferred apertures. I imagine I could get away with the 3-stop options from other vendors, but 4-stops is perfect for me. I also like the Lee Big Stopper, which is a drop-in style 10-stop filter that can be used on a variety of lens sizes for a small investment in the appropriate adapters. These are awesome tools for making super long exposures to blur water, clouds, etc. This can really add a sense of drama and art to a lot of situations with water and clouds.
I’ve also tried the Singh-Ray Variable neutral density filter, but can’t recommend it. I’m sure its a fine filter for many uses (especially for achieving wide apertures with video in daylight), but it didn’t suit me. When pushed beyond a certain point creates some awful results (that can look like the Batman symbol in your photo, no joke). The variable nature of the filter also makes it impossible do any calculations (if that’s the way you work, doesn’t matter to me personally using my ISO6400 metering technique).
Most of my ND filters are 77mm, as that fits most of the lenses I use for long exposures.
Nikon MC-36 Remote Shutter Release / Intervalometer (check the latest prices on Amazon or B&H) – HIGHLY RECOMMENDED!
 Long exposures open up amazing opportunities – blur water/clouds, create star trails, etc. To do this, you’ll often need a neutral density filter (unless it’s dark) and you’ll definitely need something to control exposures longer than 30 seconds. While you can save a little money getting a manual trigger and timing with a watch/phone, I find it dramatically easier to use Nikon’s MC36 remote shutter release. You can program in any exposure length (to the nearest second). You can also use it to take multiple exposures to create time lapse videos. There’s a newer / more expensive MC-36a, but I use the MC-36 with no issues on the D850. My only gripe with this product is that the battery door comes off way too easily in the field. Consider wrapping some gaffer’s tape around it.
Petzl Headlamp (check the latest prices on Amazon)
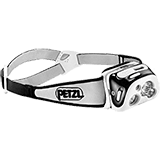 The Petzl Reactik+ has been a total game changer for my night shots. With 300 lumens, I can accurately focus on subjects more than 30ft (10m) away at night with f/2.8 or faster lenses. And its an excellent headlamp for looking through your camera bag at night or hiking back after sunset. However, it has a few weaknesses. I find that I only ever use the constant and red lighting modes because the reactive lighting mode is somewhat frustrating when trying to focus, and downright annoying when hiking through the woods (as the light frequently dims automatically as the light reflects off nearby trees). The control buttons can be a little confusing. And I don’t see much value in the Bluetooth app (other than predicting remaining battery life), which can also be hard to connect. So, even though I have not had the chance to personally use it, I would actually recommend the Petzl Actik Core. It costs half as much, offers a slightly brighter max 350 lumens, offers a simpler interface that eliminates the reactive mode (but still includes the red light), and offers compatibility with rechargeable AAA batteries (making it easy to carry spare batteries). As far as I can tell, it is better in every way, and I’m already very happy with the Reactik+. Both of these headlamps feature rechargeable batteries with anywhere from 2 hours at max brightness to well over 24 hours at low brightness, and a reserve power mode that tries to give you an hour or two of dim light backup after you run the battery down to low power.
Software (post-processing)
Adobe Lightroom (Adobe) – HIGHLY RECOMMENDED!
If I were going to get just one piece of software, this would be it. Lightroom keeps it very easy to organize and manage a huge collection of photos. And it has incredibly powerful and easy to use tools to process your RAW files. Much of my finished work never even leaves Lightroom. Be sure to check out “smart previews” in Lightroom. These make it super easy to work with a catalog stored on an external hard drive (you can do a lot of what you need without even connecting the drive!)
Adobe Photoshop (Adobe) – HIGHLY RECOMMENDED!
The ultimate photography tool. There is nothing more powerful out there, period. If you want to do luminosity masking work, I strongly recommend Photoshop. You can get both Photoshop and Lightroom from Adobe for $9.99 per month as part of the Creative Cloud Photography plan. If you have an older version of Photoshop and are considering upgrading, I have created a detailed list of all the CC upgrades for photographers in Photoshop and Lightroom. Alternatively, you can pick up the boxed current version of Lightroom and the older Photoshop CS6 for reasonable prices.
Nik Collection (download from DXO) – HIGHLY RECOMMENDED!
Incredibly powerful plugins (can also run standalone). I use ColorEfex Pro a lot for finishing steps (especially the Pro Contrast and Tonal Contrast filters), SilverEfex Pro for black and white images, Dfine for noise reduction, and Sharpener Pro for getting canvases ready for print. They also have Perspective Efex for fixing lens distortion in your images. I find all of these are very complimentary tools for my luminosity masking work. Note that they even offer a free 30-day trial.
Be sure to see my tutorial for creating perfect finishing touches with ColorEfex Pro, as well as how to leverage luminosity masks with any software.
PureRAW 2 with “DeepPRIME” (download from DXO) – HIGHLY RECOMMENDED for printing ISO800+ images or ISO3200+ images in general
This incredible software can make dramatic improvements to noise and detail in high ISO images. It processes on your RAW file and outputs an improved RAW file, so you can continue to work with it in Lightroom, ACR, or CaptureONE with all the RAW benefits. This offers substantial quality improvements over using noise reduction after RAW processing. I find it does an incredible job on a wide range of images including night skies, indoor events like weddings, etc. It’s incredibly easy to use and can even process your images in batch right from inside Lightoom. Nothing is perfect when it comes to noisy images, but this is the best tool I’ve ever seen. See this tutorial where I show how powerful it is, how it works, and how to get optimal results for the most demanding images.
![]()
Gigapixel AI (download from Topaz) – HIGHLY RECOMMENDED for printing
Topaz now offers an artificial intelligence-based option for making massive enlargements. The quality of the results are AMAZING! Both this and ON1 Resize are great. Resize offers canvas wraps, Photoshop integration, and much faster processing (Gigapixel v5.3 takes about 5x longer than Resize 2019 in my testing). However, and Gigapixel AI generally wins on quality when you need to make extreme enlargements. I would say the different is pretty dramatic if you zoom in too much on screen, whereas the reality for the final print is less dramatic for 2x enlargements. In general, the greater the enlargement, the greater the benefit to Gigapixel. Use discount code gbenz15 during checkout for 15% off.
Carbon Copy Cloner (download from Bombich)
Time Machine is good to use, but it is no where near 100% reliable. And even when it works, restoring a computer from it can literally take days. So for a more reliable backup and one that lets you keep working even when your computer crashes, you should absolutely have a bootable clone drive. There are various options out there to create one, but I cannot recommend Carbon Copy Cloner enough for those of you using Apple computers. It is simple to use, full-featured, and very well supported. The support is so good that they helped me resolve an issue with my RAID drive that LaCie couldn’t figure out. They were happy to help with a fairly unrelated issue, knew the problem better than the company that makes the drive, and responded within a few hours of my request. Unreal. And the clones have saved me countless hours. When my laptop recently failed, I was able to boot from my Sandisk SSD (above) and be running with all my software and files in less than 5 minutes.
 SmugMug photo websites
Want a quick and easy way to get a great looking website? Sell prints? Share collections of photos with friends or clients? SmugMug is perfect for all of that. I use it for sharing my portfolio when clients are looking for a simple way to review the prints I sell. Get a free trial and 15% off a new subscription.
iPhone apps
A smart phone is a critical photography tool. Not only can you use it to shoot and edit professional quality photos these days, it is also an indispensable tool for planning, navigating, and even shooting your DSLR. I recommend the following apps:
- Project Indigo from Adobe. I’ve never seen such good photos from my iPhone. It’s free and highly recommended!
- PhotoPills: Critical tool for determining timing and direction of sun and stars, depth of field, and much more. Highly recommended! Check out their YouTube channel for tutorials.
- GPS Tracks: Navigate offline while hiking, evaluate topography, and save GPS data for DSLR images. Highly recommended!
- Light pollution map: Very handy for trip planning or figuring out where to go quickly if the aurora is expected.
- Good to Stargaze: Quickly check all the critical things you need to see stars or the Milky Way (clouds, smoke visibility, moon, light pollution, etc)
- Windy: Great weather app with visual prediction of low/high clouds and loads of other high quality weather information.
- The Photographer’s Ephemeris (aka TPE): This is an alternative to PhotoPills, but what’s really interesting about it is the ability to get a SkyFire subscription to get a prediction for the quality of sunrise/sunset. It’s by no means a completely perfect prediction, but it is very helpful to quickly assess a large area to figure out where you should dig further into other weather apps.
- Mark II Viewfinder: Use your iPhone camera to decide which lens you’ll need with your DSLR.
Hardware (post-processing)
Wacom tablet (Medium or small option) – HIGHLY RECOMMENDED!
 A Wacom tablet is an absolute MUST for any serious luminosity masking, dodging/burning, or cloning work. It gives you a pen interface to make much more natural changes than you can with a mouse. See my post on how to process better photos with a pen tablet.
I personally use the Wacom Intuous 4 medium and 5 medium. Both have been replaced by newer models. I recommend the small BlueTooth for laptop users. If you have a desktop and want a larger input surface or custom buttons, check out the Intuous Pro (medium size). The cheaper/smaller entry-level tablets are great (and preferable if you plan to travel with the tablet). Ultimately, all that matters is that you’re using a pen in your fingers – the size, pressure sensitivity, and other flashy features don’t matter for photography.
While Wacom tablets are AMAZING for painting on masks in Photoshop, they no longer offer a mouse option. This does not matter if you have access to a trackpad on your laptop. For desktop users or docked laptops, take a look at the following mouse (which you can easily use right on top of your medium tablet):
Logitech MX Anywhere 2 Mouse (Amazon)
This is the wireless mouse that I use on top of my Wacom tablet (it works great on a wide variety of surfaces). It has a very nice ergonomic design. It connects to your computer via BlueTooth, and lasts a very long time before needing to plug it in (via micro USB cable) to recharge the batteries. Very helpful for desktop use with Wacom tablet. Probably the best mouse I’ve ever used.
M4 MacBook Pro (check the latest prices on B&H)
While PCs are great too, I have been using Apple MacBook Pros for over a decade and have been extremely happy with them. And the M1 and later MacBook Pros are a complete game changer. I upgrade every year and have full reviews of the M1, M2, M3, M4 and M5.
My computer rarely crashes and TimeMachine backups are a much simpler way to help ensure my photos are backed up. It’s all about simplicity, Photoshop and Lightroom are the same on either platform. I recommend maxing out the RAM (you’ll quickly need it with luminosity masking and complex layered files) and a solid state boot drive (loads faster, you can get a small SSD and use a larger external spinning drive). Go for a fast processor if you want to speed up Photoshop, but I wouldn’t worry about the number of cores unless you do gaming or video (Photoshop isn’t yet optimized for multiple cores).
External Storage
Hard drives fail. It’s happened to me at least 5 times in the past 20 years, and that’s not including several times when I had minor loss of files or the need to reinstall Windows. So backup is critical. See my post on how to create a bulletproof backup plan, as well as my article on what to do if your computer does crash. There are many good choices for backup drives, and you should consider a mix of different drives for different purposes. These days, I absolutely love using an SSD to backup my laptop when traveling. And no matter what drive you use for backing up, I cannot recommend Carbon Copy Cloner enough, both the software and support are incredible for making backups on a Mac.
Sandisk Extreme Portable SSD (check the latest prices at Amazon and B&H)
I absolutely love this little drive. I never thought I would ever say that about any piece of backup equipment. It’s tiny and incredibly fast. And these days the price has become extremely reasonable too. I can download images from a days shoot on the road and update a clone of the 2TB on my laptop in about 20 minutes. And if your computer ever crashes, you can boot right from this drive with incredible speed. Restoring a Time Machine backup could create a full day’s delay and booting from a spinning clone would slow down the machine substantially.
Note that I also have a Glyph Atom 4TB SSD. However, I hesitate to recommend this drive for most photographers for several reasons. First, because it is internally constructed as a RAID0 drive, you cannot boot from it (it will show up as an option, but simply does not work). To me, that dramatically reduces its value as a backup device. You can restore from it, but that would mean losing a day waiting. Also due to its RAID construction, it is somewhat thick. Not a large device, but much bigger than the Sandisk Extreme Portable SSD. Lastly, this device is promoted on the speed its RAID configuration offers, but Sandisk now has a lineup of Extreme Portable Pro devices that offer comparably fast speed and pricing, while offering the ability to boot from the drive and a much smaller size. If Sandisk offered a 4TB Extreme Portable Pro SSD, I’d buy it immediately, as it would be a much better way to backup my 4TB laptop.
If you are using a laptop, you will inevitably need an external hard drive to store all your photos. On top of the 2TB of data I have on my laptop, I have about 8TB (and growing) on my external “RAID” drive. It’ll probably be another 5-10 years before I can buy a laptop with an SSD that can hold all my data internally. RAID combines multiple spinning disks to offer speed and reliability with much larger storage capacities and better prices than SSD can now and likely for years to come. I recommend using a RAID5 with a 4-drive array if you’re on a budget or RAID6 with a 6-drive array if you’re willing to pay a premium for the best. Both offer greatly increased speed compared to a single hard drive, as well as redundancy to protect against the risk of hard drive failure (any spinning hard drive has a reasonable risk of failure eventually). RAID5 offers protection against a single drive failure, and RAID 6 offers protection against two drives failing. Note that none of the various RAID options can be used as a bootable clone.
Pegasus3 RAID drive (check the latest prices at B&H and Amazon)
I had a first generation Pegasus Thunderbolt that performed great for nearly 7 years before the drive enclosure failed. I routinely backup, and the drive gave me a couple years of warning of potential issues before it lost any data. So while I wish it would have lasted forever, I was satisfied with the quality of the device. I’d call that a decent run. I replaced it with a Pegasus3 R6 with 36TB of total storage. I have it configured in the same RAID6 configuration as the LaCie, and it runs circles around it (roughly 5-6X faster). The enclosure is gorgeous and quiet. The software interface feels dated, but isn’t too difficult and runs fine. The product support is unfortunately probably no better than LaCie. You really get the feeling that these companies know expensive hard drives are a dying business and no one thinks about service when they buy them. It is unfortunate. But overall, I’ve been very happy with both of my Pegasus RAID drives and would definitely recommend the Pegasus 3 lineup. They are offered in both PC and Mac editions, but as far as I can tell the hardware is the same. Given that they are sold at different price points (with the PC currently being higher), you may want to consider looking into the other platform. According to their support article, the only difference I can see is that the PC edition has weekday support instead of 24/7 support and comes formatted for PC (easy enough to re-format). They also mention the “Promise Utility” only for PC, but it looks identical to the software I downloaded from them for my Mac. I suspect that this these two versions are simply offered to create confusion to enable the company to charge different customers different prices. Amazon doesn’t even bother listing the difference. But check into it or at least ask about return shipping on a heavy device before ordering. I strongly prefer this Pegasus drive over my Lacie 6Big RAID.
Printing
Unless you deal in very heavy volume, outsourcing your printing is probably your best bet for quality. Printing on your own may save some costs (depending on media, size, and quantity of your work), though you can typically wait for sales or negotiate savings for larger print jobs from pro labs. And if you are flexible on when you print, the various national labs often run sales of 20-50% or more at various times of the year. I use the following labs:
Widely recognized as one of the top labs for outstanding prints by landscape artists. Robert Park is a wizard and the team there is happy to help work with you on the digital files.
White House Custom Color (WHCC)
White House is one of the pioneers of digital printing and one of the largest pro labs in the US (I believe Miller’s Lab is the only one that’s larger than WHCC). I love their luster and metallic prints, cards, and broad range of products for family photographers. Their service is also excellent. I’ve been to their lab in Minnesota, and can attest that they are a truly professional outfit – with a highly skilled team, state of the art equipment, and very good control of their process and operations. While they ship internationally, I don’t know how they compare on shipping time and costs compared to other international options.
There are many options for wedding and family albums, but I’ve always been very happy with GraphiStudio. They make a great product at a reasonable cost. Unfortunately, their website is an overwhelming list of options. I recommend calling them for sample books, and visiting them at a tradeshow (WPPI, Imaging USA, etc) to see their products. They are an Italian company that ships globally.

