SALE: save $800 off the ASUS PA32UCXR 32″ 4K HDR monitor, which is a stunning 1600 nits HDR monitor with 2304 local dimming zones (4x the Pro Display XDR), automated calibration, and single cable charging/pass-through. See my full review or full list of other recommended HDR monitors.
Note: “HDR” on this page refers to new display hardware which enables truly higher dynamic range display (not the old “HDR” tone mapping software from 10-20 years ago). This is very confusing at first – they have the exact same name, but are completely unrelated technologies. The old HDR was an attempt to fake a better result on old monitors, now we have new HDR monitors which can truly show photos that look more like real life.
There’s a reason people often say, “The picture doesn’t do it justice — you had to be there.” Until recently, our monitors simply couldn’t display what we saw with our eyes or even what was captured in our RAW files. That’s all changing now thanks to HDR (“high dynamic range”) display technology.
Cameras have long been able to capture 14+ stops of dynamic range, which compares very well with static human vision. But old SDR (“standard dynamic range”) monitors have historically only been able to display about 8 stops of dynamic range. That’s why photos often looked dull or flat compared to the original scene. HDR displays can now show 12-14 stops of dynamic range for images that look much more like real life.
This isn’t just a small improvement—it’s the most significant leap in image quality in decades. And it’s not some distant promise: 85% of your audience on on Instagram and Threads can already see the benefit of HDR images (you’ll see the benefit when clicking those links on most modern smart phones in the IG / Threads apps). On this page, you’ll learn how you can start to explore this incredible world of HDR.
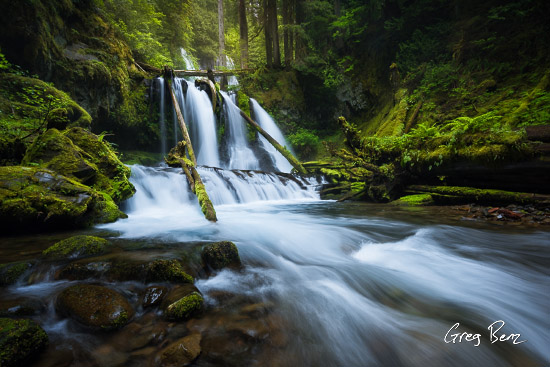
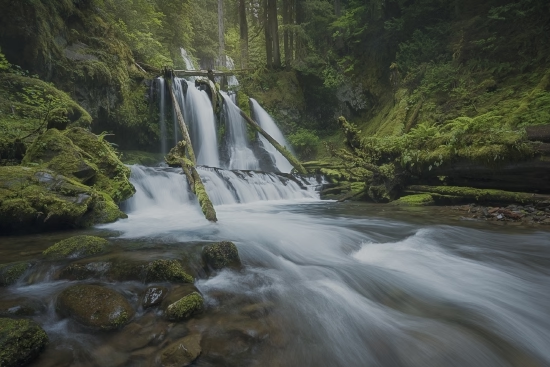
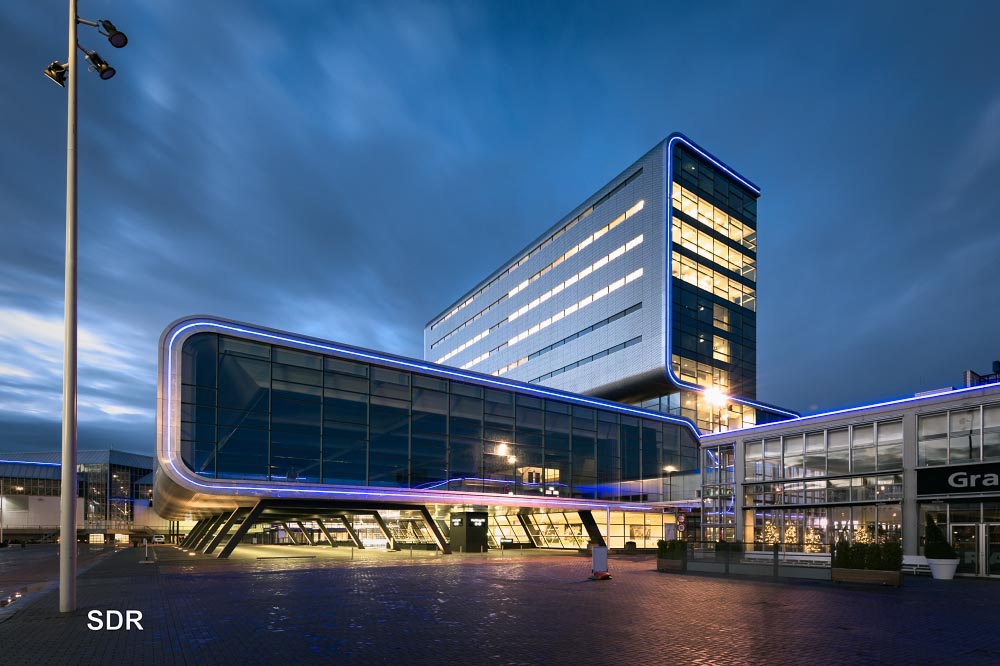
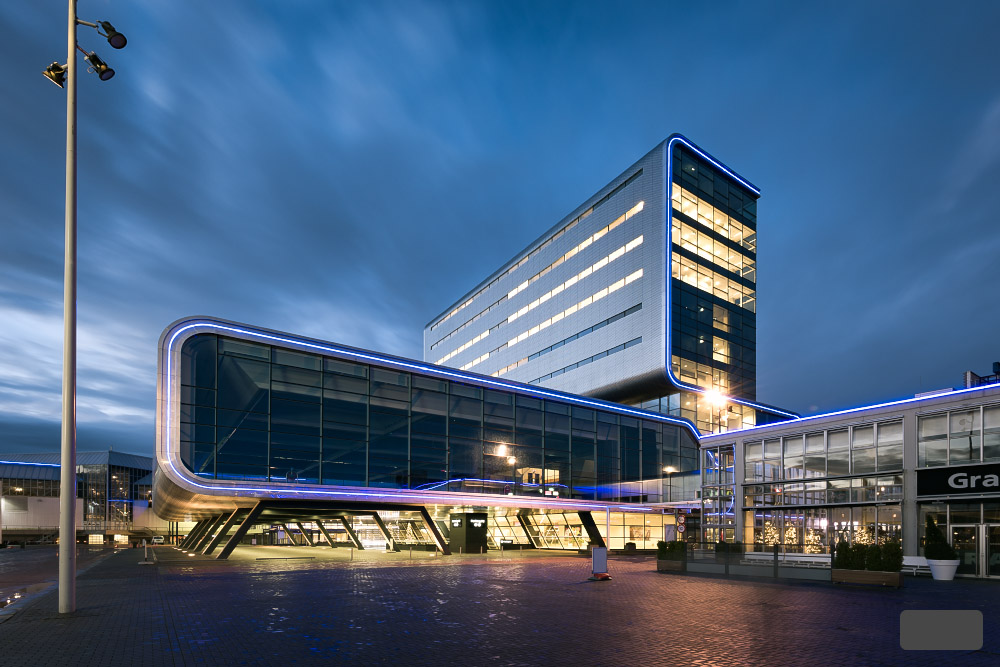
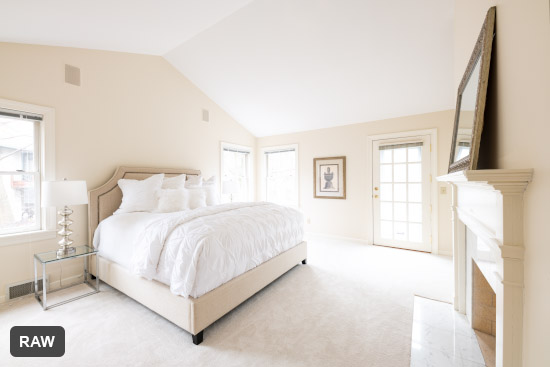
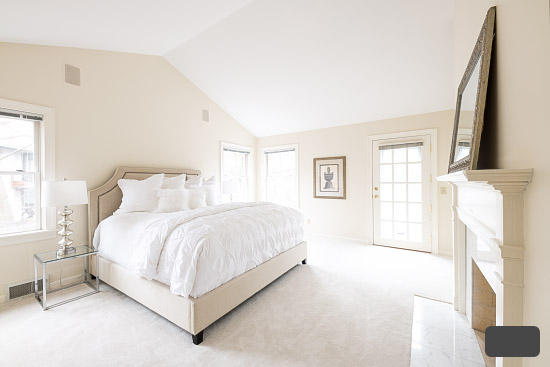
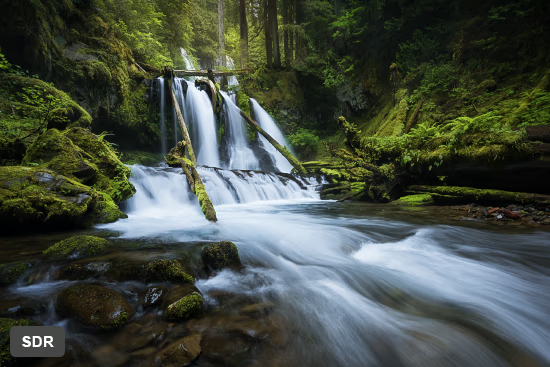
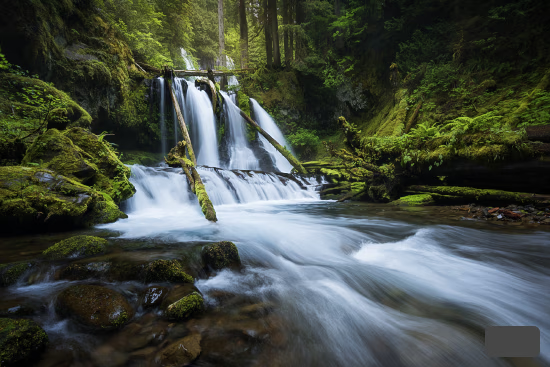
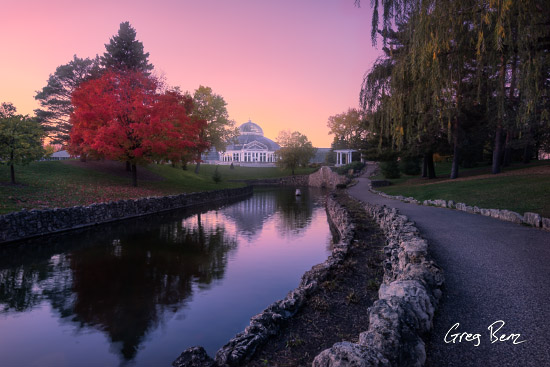
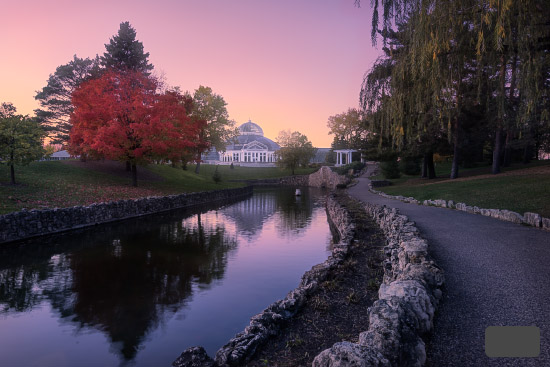
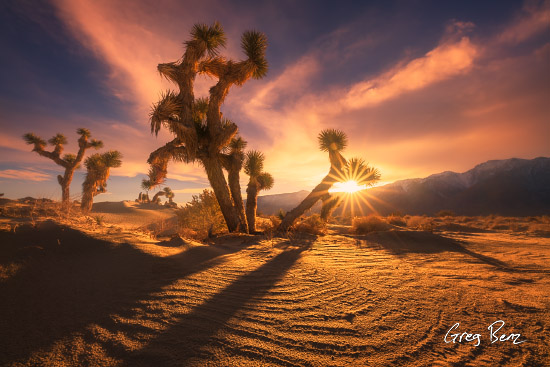
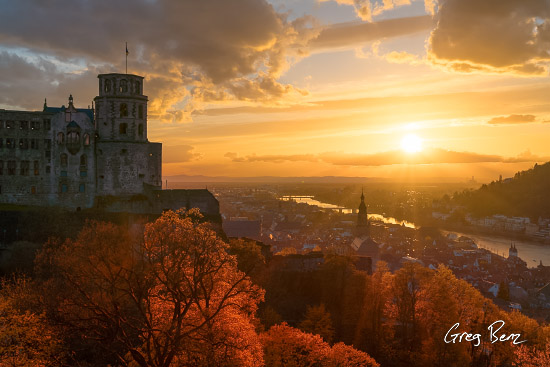
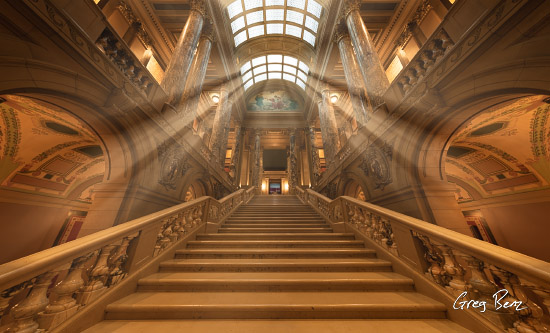
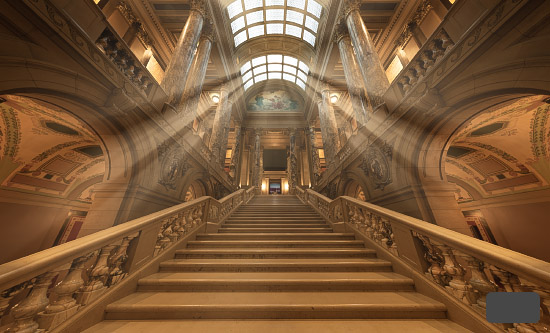
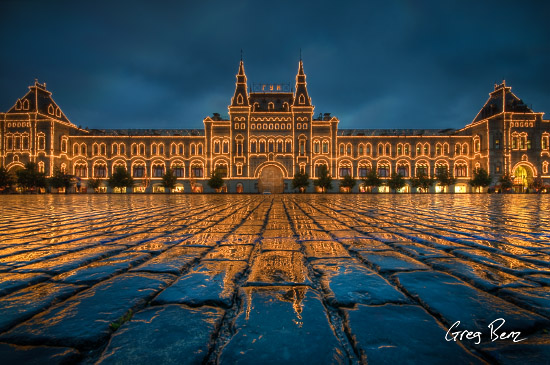
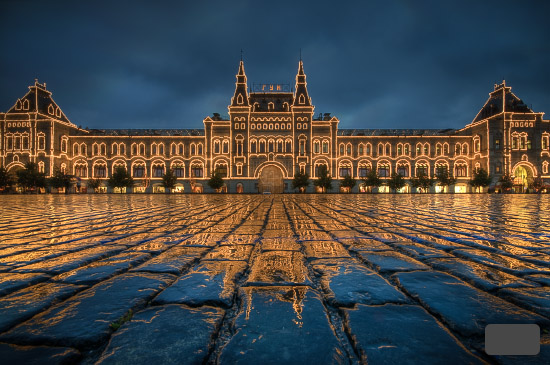
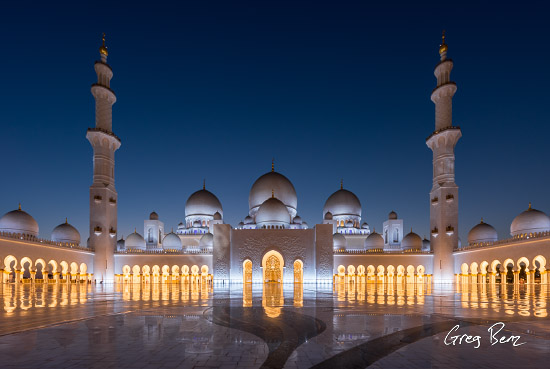
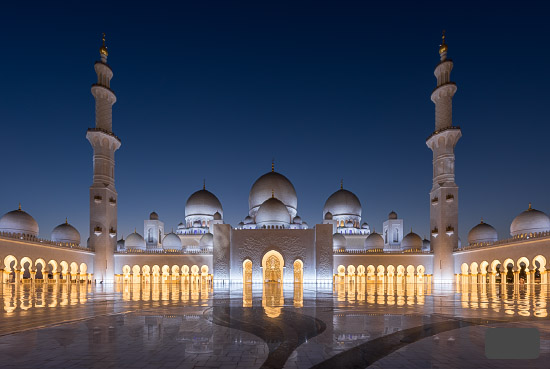
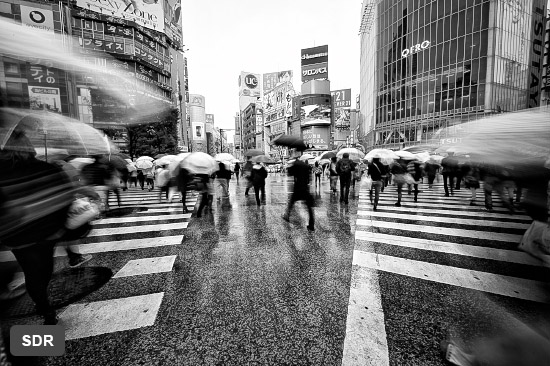
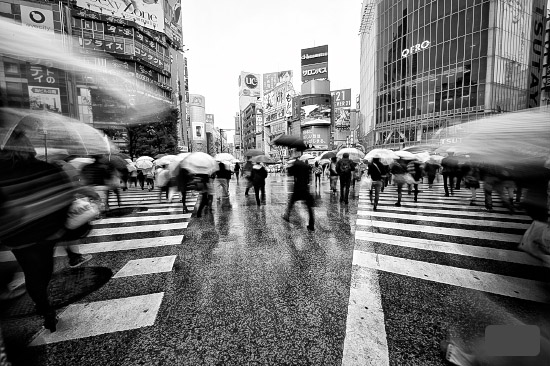
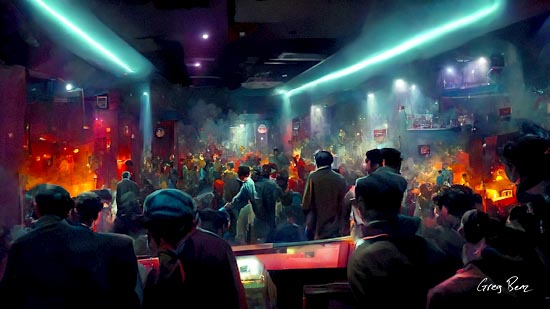
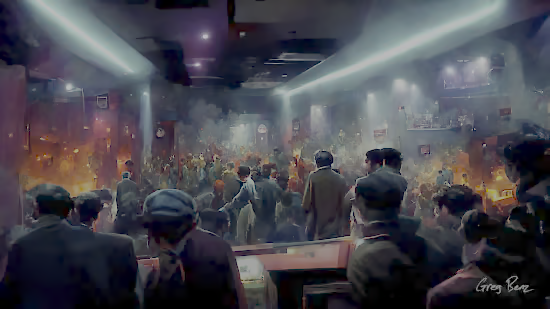
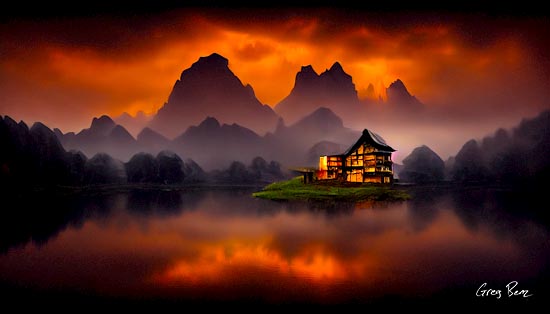
The photograph on the left below is a standard image and on the right is an HDR version of it (which will look substantially on an HDR display, but may look identical if you lack support). If the right image is missing or not clearly better, see the tests and troubleshooting sections below to see what you’re missing.
Note:
- For the best HDR experience: view the images on this page on an M1+ MacBook Pro using Google Chrome.
- If you’re trying to view this page on a PC or external monitor, make sure System Settings / Display shows HDR mode enabled.
Links for this page:
- What is HDR and why is it so important?
- HDR image gallery
- The “old” vs “new” HDR (same name, totally different)
- Best ways to get started
- Testing your display for HDR support (including quality tests to help shop for monitors)
- Which monitors are best for HDR?
- How do I capture an HDR image? Do I need to bracket?
- HDR in Lightroom
- HDR in ACR (Adobe Camera RAW)
- HDR with Web Sharp Pro
- HDR in Photoshop
- Common misperceptions / fallacies about HDR
- JPG Gain Maps (share great images with everyone)
- AVIF: the future of HDR
- Sharing HDR photos on the web
- Sharing on mobile devices (Android, iPhone, iPad)
- HDR conversions from 8-bit JPG (MidJourney, etc)
- HDR technologies
- How many bits are required for HDR?
- What is the dynamic range of HDR?
- What supports HDR, what doesn’t?
- What does HDR content look like an SDR display?
- Can I print HDR?
- What are the implications for exposure blending?
- HDR Standards
- HDR Video
- Further learning & podcasts
- Standards, libraries and other info for developers
- Troubleshooting display issues
- Acknowledgements
To learn more, be sure to get the FREE HDR e-book.
Note: Everything on this page is subject to change in the coming months and years, as support for HDR is rapidly evolving. Please come back for the latest information and be sure to leave a comment if anything seems out of date.
What is "HDR" display and why is it so amazing?
The most beautiful and dramatic light we experience has a vastly greater range of contrast and dynamic range than standard monitors. Digital cameras have captured RAW images with around 14 stops of dynamic range for decades now. However, until recently our monitors could only show about 8 stops of that dynamic range. However, that is quickly changing.
The latest generation of HDR (“high dynamic range”) monitors now support vastly improved recreations of real world lighting through greater peak brightness, richer blacks for improved contrast, and support for new standards such as HDR10+ and DolbyVision. The benefits of HDR over what I’ll call “standard dynamic range” (SDR) monitors are enormous.
Benefits of HDR display for photography include:
- Vastly greater dynamic range (up to 5 extra stops on the 14-16″ M1 or later MacBook Pro, depending on brightness and settings)
- Make bright lights truly glow
- Improved highlight detail in clouds, water, etc
- Boost the brightness of bright colors without losing saturation for gorgeous sunrises and sunsets, etc
- Better understanding of the data in our RAW files (for example, you can more accurate set white balance in HDR mode).
- Brightness relationships are faithful to the scene. HDR offers a scene-referred workflow where the final display doesn’t require highlight compression (just exposure scaling). This is much better than SDR editing, where you are compromising the image right from the start (either using a “display-referred” workflow or at least a display-referred preview). In other words, HDR lets us finally share images which are true to real-world light.
It’s impossible to truly appreciate how much better a true HDR display is without seeing it yourself. There’s a very good chance you already have an HDR-capable display. You can see examples in my Instagram and Threads on most modern phones.
The majority of Apple monitors/laptops, smartphones, and TVs already support HDR. There are several PC laptops, monitors, and tablets which support it (and the list is rapidly expanding). This technology has been around for several years now but gone relatively unnoticed because software support has only arrived recently now that the hardware is widely available.
Things are moving quickly now with native HDR support from Photoshop, Lightroom, Adobe Camera RAW, Affinity, and numerous other popular tools for creating and viewing images. Nearly all modern web browsers can display HDR (including the latest versions of Safari, Chrome, Edge, Brave, ChatGPT Atlas, Perplexity Comet, Opera, Vivaldi, Dia, and Arc), and the images will look great even on browsers/displays which lack support (JPG gain maps are 100% safe – and AVIF gain maps are already safe and well supported on all modern browsers). The only browser gap is FireFox, and images will still look great there thanks to gain map encoding of HDR images.
Note: If the HDR images (right side of each slider) aren’t clearly better, see the tests and troubleshooting sections below to help see what you’re missing.
HDR image gallery
In addition to the standard SDR and HDR images I have here for side by side comparison, I have a Lightroom web gallery (you can simply drag HDR images to a shared album in Lightroom to have them immediately published like this on the web) and an HDR JPG gain map gallery page which uses the WordPress media library. See my FREE HDR e-book for more details on both of those options.
All HDR images in section were derived from already-finished SDR images, so you can compare an optimal SDR edit to an HDR upgrade (in many cases an even better HDR could be created from the RAW, but I have skipped that in order to keep things more directly comparable).


The "old" vs "new" HDR
When many people hear the term “HDR”, they probably think back to old tone mapping techniques from software like Photomatix. It was wildly popular for a time, and then it fell out of failure. That older type of HDR was focused on trying to find a better compromise to deal with the limits of old SDR (standard dynamic range) displays. It did not do anything to improve actual display technology.
We’re now using that same HDR name, but for something completely different. The new HDR refers to new display technology (and supporting software) which offers truly greater dynamic range. This is completely different. We now have the ability to properly display the full dynamic range captured in our RAW files without compromise.
Learn more about the differences in this tutorial. Note that the videos on this page are HDR videos, but you can watch them on any display. If you only have an SDR display, the video will be tone mapped to fit the limits of your display. It will lack any “wow” factor because it will look dark and lack contrast, but you’ll at least be able to get a relative idea. Be sure to watch on a proper HDR display like any of the M1 or later MacBook Pros to see the true difference.
Best ways to get started
We’ll get into much more detail below, but here is what most people need to get started:
- An HDR display (see tests and recommended HDR displays below).
- Any camera or photo will work great, no special requirements (see details below for ideal source content).
- Adobe Lightroom (or ACR). Editing is very simple and well supported (see tutorials below).
- Web Sharp Pro (plugin for Photoshop) is built for HDR and highly recommended:
- Supports sharing high quality HDR on Instagram / Threads
- Supports print + HDR (just use the “enhance SDR to HDR” option)
- Gives you complete control of the SDR gain map to ensure superior results on any display less capable than yours (see details below).
- And much more (superior sharpening, social templates, borders, etc)
Testing your display for HDR support:
In order to view HDR images, you’ll need an HDR capable monitor and proper settings. You should view this page using the latest versions of Safari (v26+), Chrome, Edge, Brave, Opera, Vivaldi, or Arc. Comet likely works. FireFox (or outdated browsers) do not support the HDR test content on this page.
The tests below are broken into 3 sections:
- Key tests – if you cannot pass any of these, you do are not set up for HDR (wrong settings, browser, or monitor)
- Encoding tests – these helps determine how well your browser can manage optional HDR formats (ie to maximize compatibility).
- Quality tests – these help assess the final quality, which may be used to compare different monitors and whether you are getting optimal results from your browser/settings.
If you cannot pass the key tests, please see the the troubleshooting info below as well as the extra detail in my FREE HDR e-book.
Key test #1a (HDR headroom):
Key test #1b – (visual HDR headroom):
Key test #1c – (visual HDR headroom):
![[ JPG gain map: visual HDR headroom test ]](https://gregbenzphotography.com/assets/hdr/tests/visualHeadroomTest.jpg)
FAIL: This browser/display does not support or is not configured for HDR (SDR only)
Key test #1d (HDR spectrum)
![[ Your browser is not displaying this JPN gain map, see the troubleshooting section below ]](https://gregbenzphotography.com/assets/hdr/tests/hdr-gradient-absolute-p3-greg-benz.jpg)
Key test #2 (CSS HDR limits):
Key test #3a (ISO JPG gain maps):

Key test #3b (ISO AVIF gain maps):

Key test #3c (AVIF support):
![[ Your browser does not support AVIF images, see the troubleshooting section below ]](https://gregbenzphotography.com/assets/hdr/tests/browserImageTestAVIF-untagged.avif)
Key test #4 (CSS media query):
Expected results for key tests above:
- Key test #1a (HDR headroom) – This is the most definitive test. A value greater than 0 indicates HDR support at the current brightness (2+ stops of headroom is where HDR really starts to look amazing).
- Use Chrome, Opera, or Edge for this test.
- Safari and ChatGPT Atlas do not support this test, but do support HDR (so use the visual tests below).
- If you are using Brave with multiple monitors: you will see an error for all monitors other than the one used to view this page (due to anti-fingerprinting privacy protections in Brave). Just drag this browser tab to each monitor you want to test and the value will update automatically (no need to reload the page).
- FireFox does not support this test nor any HDR photo formats at this time.
- If you see 0 stops / SDR support only, this indicates one of the following issues:
- you have a limited HDR and the brightness is set too high (try 50-80% brightness).
- you have not enabled HDR mode (under System Settings / Display).
- To adjust brightness:
- Windows: go to System Settings / Display / HDR and adjust the “SDR Brightness” (external monitors) or “HDR Brightness” (laptops) to increase headroom. The test values above will update when you switch to another application and back to this browser.
- MacOS: System Settings / Display and adjust brightness (you will need to be in HDR mode to see a slider for external monitors), or use the keyboard. Note that the brightness slider for 3rd-party monitors was first added in MacOS 15 (Sequoia).
- This test is a helpful way to better understand the relationship between screen brightness and HDR headroom.
- You may be unable to turn on HDR mode if:
- your refresh rate is set too high for your hardware and selected resolution.
- you are using Windows with multiple monitors set to mirroring (just switch to extended).
- your monitor is incapable of HDR.
- If you pass this test but fail the bright white text or spectrum tests below, you have one of the following issues:
- You are using a custom ICC profile (which breaks HDR display currently due to a lack of support/standards). See troubleshooting for more info.
- You are using Chrome or a derivative browser like Edge/Brave and have run into a known bug where HDR may stop working. Just change brightness significantly or restart the browser to get HDR working again.
- If you are on a mobile device, you cannot run this test and should instead use:
- Lightroom for iOS / Android is a great alternative way to test the HDR headroom.
- Open an image for editing, enable HDR mode on it, and view the HDR histogram (use a two-finger tap twice on the image to cycle the info overlay).
- The red area of the histogram shows what is above your headroom and the lines show the number of stops above SDR white.
- Note: You may add a query parameter named “peakNits” to predict the target SDR (diffuse) white point if you can provide a known HDR peak. The rated monitor peak will often be correct, but Apple will use a lower HDR peak when brightness gets too low (when you get to the point where headroom does not increase as you reduce brightness, the peak HDR is decreasing and this calculation becomes useless without measuring the screen). So you could test your 1,600 nits XDR monitor by loading this page as https://gregbenzphotography.com/hdr/?peakNits=1600#tests. When you load the page this way, you’ll see the estimated SDR value in test #1.
- To run this test for Chrome: copy this to the URL bar chrome://flags/#enable-experimental-web-platform-features and change the value to Enabled. If you are using MS Edge, you should copy and paste edge://flags/#enable-experimental-web-platform-features
- Use Chrome, Opera, or Edge for this test.
- Key test #1b (cats vs dogs)
- If you see a dog, you have at least some HDR and gain map support.
- If you see a cat, you’re seeing SDR (or have insufficient HDR support).
- Key test #1c (visual HDR headroom)
- This is an alternative test which may be used where the first test is not available (it also helps confirm if your browser uses gain maps properly).
- Look for the bar which best matches the background (ie the bar that best blends into the background: not much brighter or darker). This indicates how much headroom you have.
- If the value indicated by this image matches the actual system headroom (as confirmed in test #1a in a supporting browser), you are getting the highest image quality possible. However, you may see a browser show a different value where 1b shows a constant value regardless of actual headroom (ie changing brightness shows no change in the relative brightness for this test image). This is not the correct / intended use of a gain map. The greater the disagreement between test 1b and actual headroom, the greater the loss of image quality. Its subtle enough under most conditions that most people won’t notice, but this non-standard use of the mage degrades image quality and should be avoided.
- Key test #1d (visual spectrum – absolute values HDR spectrum).
- This test provides an alternative way to assess headroom visually (with absolute HDR stops, no tone mapping). Each row is labeled for its brightness. Actual headroom will be near the brightest level where you can see a difference. Note that +0.25 stop patches are shown as small squares on the left of each row for more precise evaluation.
- A best in class display (such as any XDR-branded Apple display) should support up to 4 stops when ambient light allows you set a lower brightness. A few displays (such as 10,000 nit TVs or the Pro Display XDR) are capable of up to 6.5 stops.
- This test helps also assess color volume, or the ability to show wide gamut (P3) even at higher brightness. Some display technologies (such as WOLED, which uses a white sub-pixel to boost brightness) show very limited saturation and gamut coverage in the brightest HDR values (but you can ignore any hue shift in top rows where the headroom exceeds the value reported by your system from test #1a, as clipping of color channel may cause that).
- This test is not valid if you don’t pass test #1b (see the dog).
- If you pass test #1 but not this one, that generally indicates that an unsupported ICC profile has been applied in the operating system settings. Go to System / Display on Windows to reset to sRGB or a canned profile, or ColorSync Utility in MacOS to reset to the factory profile. Watch out for add-on software from your computer vendor which may cause this.
- Key test #2 (CSS limits)
- This isn’t really an important test, just more of a way to help compare SDR vs HDR if your display supports HDR.
- This test is only relevant if the above tests show you have sufficient headroom.
- If you have 2+ stops of HDR headroom, clicking the buttons should affect the visual look of all images on this page. The visual headroom image above indicates what level of reduced headroom you are seeing.
- “SDR only” should eliminate all HDR (ie, SDR result).
- “Limit HDR” should reduce the headroom used. The target is not standardized. Chrome seems to limit to about 1 stop, which is unfortunately as 1.5 would be a better default compromise for mixed SDR + HDR (the next button tests mixing, but it’s complicated and probably won’t be used as much).
- “Limit HDR +” should be halfway between Limited HDR and Full. This test uses an experimental property (mixing of limits) which probably does not work yet in any browser – you you are likely to see the “full” result as the browser will default to that if it does not understand the requested mix.
- “Full HDR” is the default, images should render up the limits of your headroom.
- Support of these limits is not necessary, but are part of an emerging standard which gives websites some control to manage mixed content. For example, it may not be ideal to show a grid with a large difference in the appearance of SDR and HDR content.
- Key test #3 (critical file formats):
- The first two tests are only valid if you have HDR headroom (ie pass test #1)
- #3a is the critical JPG + gain map format. This is the most widely used format today (as it offers 100% compatibility with any browser).
- #3b is the extremely important AVIF + gain map format. This will soon start to replace JPG as it offers 50% size reduction, higher quality, and support for transparency (can replace PNG).
- The third test (#3c) confirms basic support for AVIF. This ensures that AVIF gain maps safely fall back to an SDR image no matter what display you have or whether your browser can handle gain maps.
- If you fail any of these tests and have HDR support, your browser is obsolete and should be updated or replaced to enjoy HDR.
- The first two tests are only valid if you have HDR headroom (ie pass test #1)
- Key test #4 (CSS media query for “dynamic-range: high”) green text saying “PASS”
- If you toggle HDR settings in the operating system, you probably need to refresh the page (this media query seems does not seem to dynamically update).
- This test is accurate on all modern browsers, but not perfect for some edge cases (outdated versions of Safari which didn’t support HDR photos will show a passing result because they supported HDR video first). See developer info below if you need a way to test a browser for support on your site.
Encoding tests (optional formats):
The key formats for HDR are in the section above (and JPG gain maps and AVIF gain maps are far more widely supported and therefore most relevant). This next set of tests covers a more expansive set of less important file formats. It would be ideal to have support for JXL (as its a great format) and HEIF (as it’s the default format for iPhone HDR) to share in your preferred format, but they aren’t necessary to either share or experience great HDR experience.
Encoding test #1 (Adobe JPG gain maps):

Encoding test #2a (JXL support):
Encoding test #3b (ISO JXL gain maps):
Encoding test #4 (HEIF / HEIC support):
![[ Your browser does not support HEIC / HEIF images, see the troubleshooting section below ]](https://gregbenzphotography.com/assets/hdr/tests/browserImageTestHEIC.heic)
Encoding test #5 (HDR metadata):

Expected results for the secondary (file format) tests above:
- Test #1 (legacy Adobe JPG gain maps)
- Support is optional, but nice to help display old HDR images.
- This test shows support for the legacy Adobe encoding. (this test is not valid if you do not have HDR support).
- Passing this should indicates likely support for the legacy UltraHDR JPG (ie the Android spec, aka “Super HDR”), but it is not guaranteed (as Adobe uses the full color encoding, whereas some Android implementations don’t support it even though it’s in the spec).
- Test #2 (JXL support).
- Test #2a is successful if you see an image and indicates support for basic JXL (which is capable of HDR, though a gain map is always ideal).
- You will likely fail this test due to limited browser support for JXL. That’s ok, as AVIF with gain maps is very well supported and just as good for HDR on the web. Still, it would be ideal to support this excellent format (JXL has significant benefits over AVIF outside of web use, including higher resolution for print and 32-bit to support further editing).
- Support may expand significantly by late 2026. Chrome Canary v146 has support for JXL (SDR and HDR, but not HDR gain maps as of v146.0.7640.0). Currently, support requires enabling a developer flag (chrome://flags/#enable-jxl-image-format).
- Test #3b determines if your browser supports JXL gain maps (for highest image quality on limited displays).
- PASS: you will see bright green text confirming success.
- If you have HDR headroom and do not see green text, you do not have gain map support.
- Test #2a is successful if you see an image and indicates support for basic JXL (which is capable of HDR, though a gain map is always ideal).
- Test #4 (HEIC support) green text saying “PASS”.
- If you see an image (green text with PASS), you have support – which may be ideal for showing images captured with an iPhone (though you can always convert those images to JPG or AVIF).
- You are likely to fail this test if you are not using Safari, as support is limited elsewhere. This is not important as use of this format online is very limited and is not likely to grow significantly any time soon.
- Test #5 (HDR metadata):
- This tests metadata (ISO 22028-5) which helps support optimal rendering of standalone HDR images (including gain maps where the base image is encoded as HDR). This is rare today, but we are likely to encode gain maps that way in the future.
- If you have HDR headroom and see an image here without a grey background around the text, your browser this optional metadata (if your display lacks headroom, this test is not valid).
Quality tests:
Quality test #1 (10-bit support)
INCOMPLETE: Unable to determine if your browser / monitor supports HDR
Quality test #2 (mini-LED halos):


Quality test #3 (OLED dimming):
Quality test #4 (dark shadow detail)
Quality test #5 (HDR clipping, EOTF tracking):
Quality test #6 (smooth gradient)

Quality test #7 (map resampling):

Quality test #8 (wide gamut):


Quality test #9a (SDR-only: P3):
![[ SDR P3 JPG failed to load ]](https://gregbenzphotography.com/assets/hdr/tests/p3Test_SDR.jpg)
Quality test #9b (SDR-only: Rec 2020):
![[ SDR Rec2020 JPG failed to load ]](https://gregbenzphotography.com/assets/hdr/tests/rec2020Test_SDR.jpg)
Quality test #9c (gain map: sRGB SDR + P3 HDR):
![[ mixed gamut gain map JPG failed to load ]](https://gregbenzphotography.com/assets/hdr/tests/p3Test_gainMapISO.jpg)
Quality test #9d (gain map: sRGB SDR + Rec2020 HDR):
![[ mixed gamut Rec2020 gain map JPG failed to load ]](https://gregbenzphotography.com/assets/hdr/tests/rec2020Test_gainMapISO.jpg)
Expected results for the secondary (file format) tests above:
- Quality test #1 (JavaScript)
- This helps test for 10-bit display support in the browser / operating system (not necessarily the monitor).
- This is ideal to avoid banding which may be possible at 8-bits (including 8+2 FRC or “frame rate control”), especially with bright HDR gradients.
- True 10 bit support should avoid banding for HDR gradients (note that theoretically 12 bits may be needed to avoid banding for displays supporting >1000-2000 nits, but you would even a 4000-10,000 nit TV can probably get away with 10-bit support for most real content – if you see banding there, it’s probably much more likely streaming compression than a bit-depth issue).
- Quality test #2 (mini-LED halos)
- This test is designed to help catch some issues mini-LED displays.
- Click each image (separately) to view full screen in a room which is relatively dark. View the area around the static text, as well as around the cursor while moving it.
- “bright halos” are common with nearly all mini-LED and are caused by light bleeding through the LCD layer if the zone is not completely off.
- “dark halos” are more of a niche issue may show in the dark grey as a result of excessive dimming of local backlights (ie, over-compensation trying to avoid bright halos).
- If you see dark halos around the text or around the cursor as you move it around, raising the minimum backlight level to mitigate the issue (though this raises the minimum black).
- Another great way to test and compare mini-LED halos to OLED is with HDR fireworks (look for glow around trails) or star fields (notice depth of black in areas of dense vs sparse stars, and changes as the stars move across dimming zones on mini-LED). View both full screen.
- Quality test #3 (OLED dimming):
- This test is designed to evaluate the ABL (automatic brightness limiter) dimming which may cause loss of accuracy and contrast (particularly on OLED monitors).
- This test will show a button near the bottom left. When you click it will toggle the background to black (left click to hold, right for only while holding). Scroll to the image gallery above and toggle this button to see if the HDR images are visibly dimmer when the page background is white.
- As this page is overall mostly SDR white, it may trigger the ABL (automatic brightness limiter) on an OLED display. This is a form of tone mapping in the display itself which you cannot control. It is typically done to manage power or prevent burn in on OLED displays (mini-LED are typically not affected much, if at all).
- Do not zoom in, as creating a lot of large/bright content will likely trigger the ABL even when the background is set to black.
- If the images are completely unchanged, then the ABL is not reducing image quality. But if the images get brighter, the ABL is a factor (note that the shift in the surroundings can trick your eyes, so be careful as you assess for a real change).
- Quality test #4 (dark shadow detail)
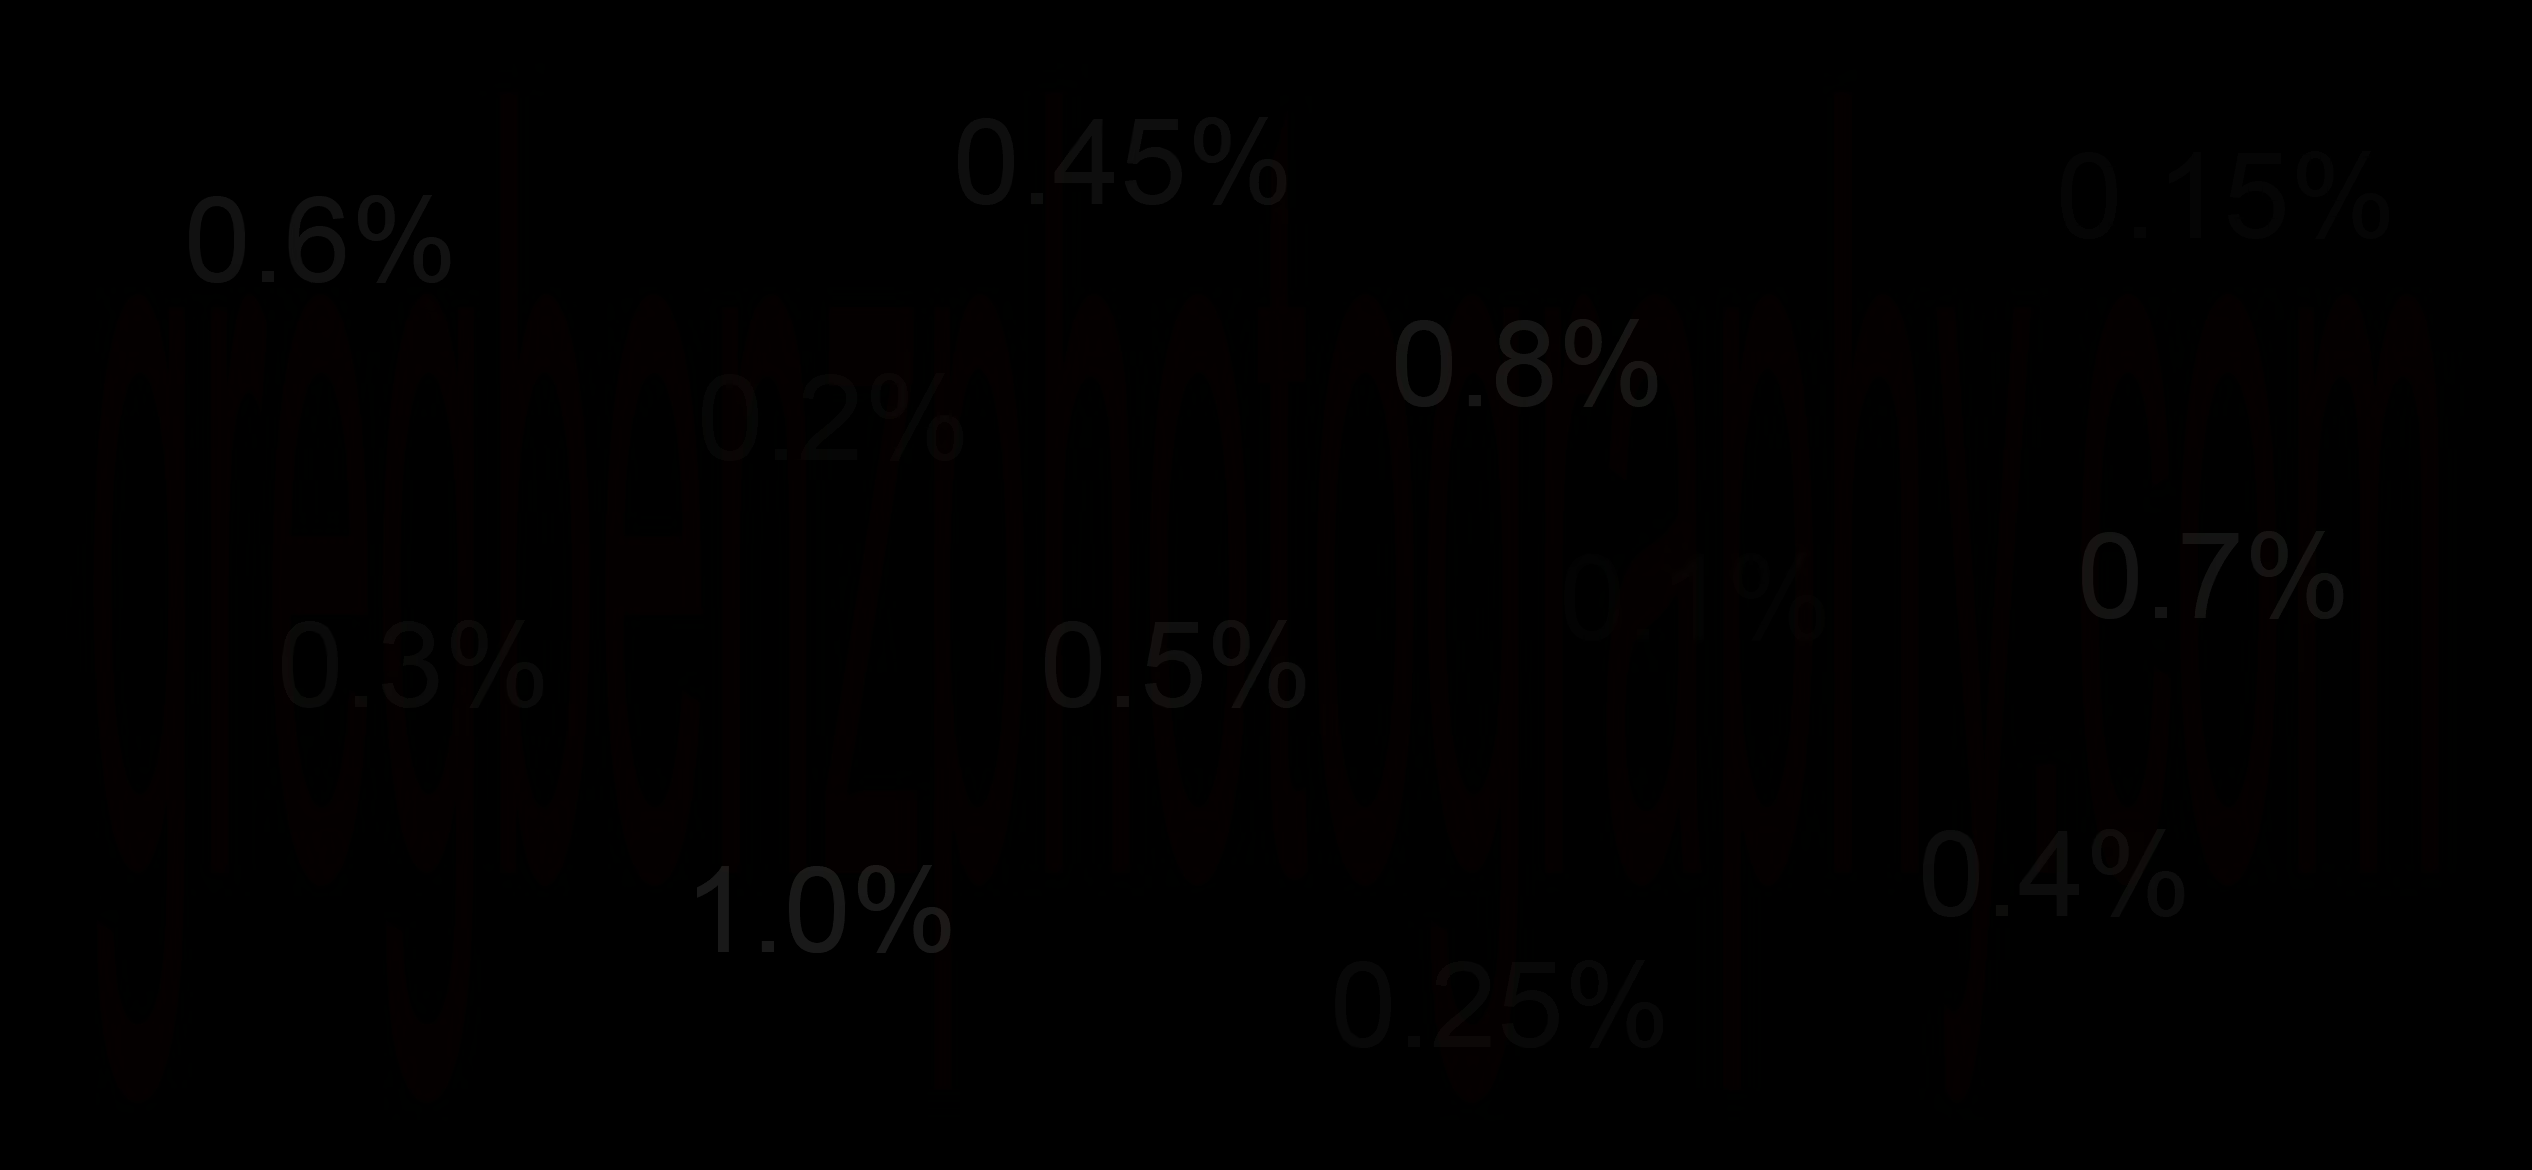
- This test must be conducted FULL screen (click on the image to do this) and in a very dark room. The goal is to see how clearly very dark test is legible against a pure black background, and it will be difficult to assess otherwise.
- This test is not strictly speaking a test of HDR (as SDR images are able to encode pure back too), but an ideal HDR displays should offer excellent blacks (ie dark shadow detail).
- There is no pass or fail here. The more clearly you can see the text, the higher quality the display. This is a very useful test to demonstrate the benefit of OLED vs mini-LEDs (especially cheap ones), or to appreciate how ambient light or improper monitor brightness may significantly impact your ability to appreciate dark shadow detail.
- The numbers show the 32-bit linear gray value as a percentage of SDR white. The darkest value shown is 0.1%. There is also dark red text in the background which will be impossible to see on many displays (note that the test is extreme enough to expose a bug in Chrome where faint green artifacts may show around the text – Safari does not show this).
- A mini-LED will show haloing around the text, and may be unable to show the darkest numbers.
- An OLED in a black room should show nearly perfect results: very clean edges for the text all the way down to 0.1%. The M4 iPad Pro is capable of such a result (especially when Settings / Display / Advanced / Reference Mode is enabled).
- This test is naturally sensitive to EOTF. For example – when you enable reference mode on an M4 iPad, the dark red text will be much more clearly visible than when you otherwise have the display set to full brightness..
- This test is very sensitive to ambient / surrounding light. Even a good display will be hard to read in a brighter environment. For example, in a fairly dark room I can read 0.1% on Pro Display XDR when full screen, but only down to 0.4% when the image is shown against the white background of this page.
- Key test #5 (HDR clipping, EOTF tracking)
- Click this pattern to view full screen and perform the tests.
- This optional test pattern is designed to show fixed stops. Unlike images, it will not tone map in the browser (but dimming in the monitor cannot be prevented and will be common for OLED).
- You make click the button to show a peak white stripe and compare to the test swatches to find the peak headroom in stops (the darkest test patch where the test stripe is not visible is roughly the actual headroom).
- You may also use it to test EOTF tracking. Click for the single test swatch and with the slider set for 0 (SDR), use a colorimeter / spectro to measure its brightness in nits. Then enter that value into the input box. You may then slide through the other test values and measure them to see how closely they match the predicted values. For example, if SDR white measures 97 nits, then 4.0 stops should be close to 1552.
- I have seen these values fail to track properly under Windows when a display driver had invalid peak nits data (resulting in the display being half as bright as expected and the reported HDR headroom being 1 stop lower than actual capability).
- The brightest swatch (6.6 stops) allows for a 10,000 nits reference if your SDR / reference white is set for 100 nits. This is effectively the maximum headroom supported under the HDR specs (setting a lower reference white is not advisable in this scenario, and 10k nits is the full PQ range).
- Quality test #6 (smooth gradient):
- The gradient should look neutral grey and be free from visible banding.
- Quality test #7 (map resampling):
- This test is designed to help catch browser quality issues with image resizing. This occurs due to an order of operations problem where the base image and gain map are resampled first and then combined (resulting in a degree of misalignment / error), rather than generating the HDR rendition first and then resampling it. This problem only occurs when the gain map is not viewed without any image scaling.
- Pass: Solid grey rectangle with no detail (even if you zoom in / out, such as via cmd/ctrl +/-).
- Fail: visible outline of text / line where everything is fairly light.
- Inconclusive: Dark text in the grey box, or a note that the text cannot be run.
- This test is only valid if your browser supports both HDR & gain maps (see tests above), as the SDR rendering of this image does not show anything useful by itself.
- Quality test #8 (HDR wide gamut)
- Each row is a different color gamut as labeled. The label and left of each section uses CSS color for the most saturated red, green, blue for that gamut. Right of that is an image with the pure color as maximum SDR, +2 stops HDR and +4 stops HDR. The image is a gain map and will only show the correct luminosity if you have 4 stops of headroom.
- The CSS and first image patch should match, but do not in this current experimental setup.
- On a very wide gamut monitor with a browser supporting proper color management, each square should look more saturated than the one above it.
- Despite the caveats here for accuracy, this provides some visual confirmation that a monitor supports wide gamut (and desaturation of brighter squares would indicate limited color volume in brightest values – such as may be expected with a “WOLED” panel where a white sub-pixel helps boost brightness).
- Quality test #9 (SDR wide gamut):
- This test is designed to help determine if the display supports wide gamut (specifically P3). Each image has the most saturated sRGB colors in the background and text with the name of a wide gamut color on top (P3 or Rec2020). If the text is readable in any color, there is support. The degree to which wide gamut is supported will affect how visible any particular color of text is.
- Test 9a is a simple SDR image with text using maximum P3 colors, while 9b does the same thing in the wider Rec2020 space. If you cannot see any text here, the display most likely does not support wide gamut. It is also possible that this test could fail on a P3-capable monitor if the browser is not configured to show wide gamut.
- Test 9c and 9d uses an ISO gain map where the base image is SDR in sRGB only and the HDR gain map includes text in wide gamut. This test may not show text for a variety of reasons (lack of support for wide gamut, HDR, or ISO gain maps). So a failure is an ambiguous result. But if you can read the wide gamut here, then your display supports wide gamut, HDR, and gain maps where the base and alternative image use different color gamuts. This is a niche use case, but may be useful in the future for advanced applications such as encoding sRGB in the base (to be defend against risk of a profile being stripped when uploaded) while allowing wide gamut in the gain map.
- These tests surface some strange behaviors which vary by browser. These images are completely encoded in the SDR range (even the HDR gain maps). However, the Rec2020 content is clearly more vibrant in an HDR mode (in Chrome on Android or MacOS, but not on iOS nor any version of Safari). You can confirm this by taking a screenshot (which will clip values to SDR, so the Rec2020 content may be limited). This is because the 3d color volume has a greater peak luminance for SDR red in Rec2020 than P3 (try comparing them viewing Yuv in ColorSync Utility). So you may see the Rec2020 SDR shows much brighter on an HDR-enabled monitor, even though the image content is just SDR.
Which monitors are best for HDR?
This is a very detailed topic, so I’ve created a separate page guides for evaluating options and reviews for recommended HDR monitors. The short answer is that most Apple displays have support (the M1+ MacBook Pros are all outstanding) and there are many PC laptop and external monitor options (with support quickly expanding).
If you don’t already have support in your monitor, there are likely a few ways you can experience HDR without buying anything new:
- Nearly all mobile phones sold after late 2020 have support.
- The M4+ iPad Pro has the best in class XDR display, with support for HDR browsing, Instagram, and editing Lightroom. There are a number of other tablets which also support HDR.
- Nearly all big screen TVs offer great performance for you to get started without any expense.
How do I capture an HDR image? Do I need to bracket?
You can approach HDR photography with the same best practices you use normally, such as shooting RAW and exposing to the right. But even that is not required. You can even use an 8-bit JPG (which I show in the AI-generated MidJourney images below). It’s very flexible and you can get great results from a wide range of images.
If you like, you can bracket and combine several exposures, such as by using Lightroom’s “merge to HDR” feature. This was a commonly used practice for the old “HDR” tone mapping workflows. You can use it with true HDR displays, but you do not need to bracket for HDR (I almost never do).
A properly exposed RAW image from a modern camera still has slightly more dynamic range than the best HDR monitors available, and would be suitable for even 4000 nit monitors. It’s only beneficial in a small number of cases, and it should generally be avoided in order to simplify your workflow and let you focus on composition or other aspects of the art which are much more important than any potential bracketing benefits.
There are a rapidly growing number of cameras can save images in an HDR native format (such as 10-bit HEIF or JPG with a gain map), such as:
- iPhone, Android smartphones
- Canon EOS-1D X III, EOS R5, R6, R3, R7, etc.
- Fuji GFX100 II and X-H2/S
- Hasselblad X2D II (including a 1400 nits HDR OLED display and 15.3 stops of dynamic range)
- Nikon Z7 II, Z6 II, Z9, Z8, etc.
- Olympus OM-1
- Sigma BF
- Sony α1, α7 IV, α7R V, α9 III, ZV-E1, FX series, etc.
This growing range of HDR support is great to generate awareness and excitement for HDR. However, RAW is a much better option if you want highest quality. Saving directly to JPG/HEIF is a great option for HDR if you’re a photographer who has always used JPG to capture SDR images (such as sports photographers who upload images directly from a camera to the web without any editing).
Creating HDR images with Lightroom
Every version of Lightroom (LR) now supports HDR editing – Mac or PC via both Classic and the cloud version, LR iOS, LR Android, and even the website version. This includes editing and exporting, as well as an option to share HDR images in an online gallery.
Note: Be sure to enable LR preferences / Presets / “Enable HDR editing by default for HDR photos”. This will turn on HDR mode in the develop panel automatically when you import an existing HDR edit (such as a TIF you edit in Photoshop), otherwise your HDR will show as clipped to SDR.
Creating HDR images with ACR
ACR (Adobe Camera RAW) v15 added support for proper display and editing of HDR images (which they call HDRO or “High Dynamic Range Output”).
ACR also is a critical tool for opening HDR AVIF or “gain map” JPG images in Photoshop (PS). If you open direct into PS, the gain map will just render as an 8-bit SDR image. To open these images properly as HDR into PS (via ACR):
- PS Prefs / File Handling / Camera RAW Preferences / File Handling and set the JPEG/HEIC support to “automatically open all supported JPEGS and HEICS“.
- PS Prefs / File Handling / Camera RAW Preferences / Defaults / “Enable HDR editing by default for HDR photos”
Once you’ve enabled it, you can use ACR to create HDR versions from any source image (or any layer when using Filter / Camera RAW Filter). You’ll see the most benefit when working on a RAW image, but you can use this HDR editing even on something like an 8-bit JPG and get incredible results (see my HDR conversions of 8-bit JPGs from generative AI).
To process as HDR, you need to click the “HDR” button just below the histogram. Once you do, you’ll find the following:
- All the editing controls look exactly the same. There is no learning curve. But as you increase brightness (through exposure, highlights, whites, curves, etc), you will find the image simply gets brighter and more beautiful – rather than clipping to white. It’s very intuitive.
- The histogram will change and show both SDR (standard dynamic range) and HDR. The SDR range is what you’ve always had and the HDR range is the extra stops of brightness above it. The HDR range will show yellow (HDR pixels your monitor can handle) and red areas (pixels which are clipped / beyond the limits of your display at its current brightness).
- The highlight clipping triangle will also show the same yellow/red coloration to let you know which pixels are in the HDR range and which are clipped on your monitor. There is no fixed upper limit like we have with SDR white.
- The bottom of the Basic panel includes a “High Dynamic Range” section. If you click the triangle, you’ll see a couple things appear:
- “Visualize HDR Ranges“. This shows the HDR values color coded various shades of blue/purple for the number of stops over SDR white (note that this does not indicate clipping, which might be in any of the blue/purple areas depending on your display).
- “Preview for SDR Display“. The only use I have found for this for using ACR to save the image in an SDR format. Most people can ignore this section. See my HDR e-book for more details.
- The curves will be labeled with SDR and HDR regions and shows a smaller grid spacing.
If you proceed to open your HDR image in Photoshop (whether as a Smart Object or regular layer), you should open it as a 32-bit document to preserve the HDR content.
Creating HDR images with Photoshop
32-bit editing in Photoshop is substantially different 8/16-bit editing, including the several differences:
- 32-bit mode supports much brighter pixels (and negative values for some bright colors). This is what gives you HDR support in 32-bit images. This means your pixels can go way above “255” max you’re probably used to for 8/16-bit editing. That numbering system is not used for HDR though. Instead, 32-bit numbers are measured on a floating-point scale where 0.000 is the same as 0 in 8/16-bit measurements and 1.000 is the same as 255 in 8/16-bit measurements. HDR values are those above 1.0, with each stop being double. So 2.0 is 1-stop above standard white, 4.0 is 2-stops above standard white, and so on. Individual RGB channels may also show as negative for bright HDR colors (you would only see this as a result from an adjustment, you cannot request such colors directly).
- 32-bit mode works with a linear (1.0) gamma at all times. This provides more accurate blending of color, but also has some confusing and sometimes unwanted side effects. For example, you’ll find that curves work substantially differently.
- Some tools are not yet available in 32-bit mode. You won’t be able to use Liquify or blend modes like overlay. See my free HDR e-book for more details and suggested workarounds / alternatives.
- Layer masks for 32-bit images are encoded as 0-1 because you cannot have >100% opacity for a pixel.
- The Lumenzia v11 luminosity masking panel for Photoshop offers extensive support for 32-bit workflows. This includes not just full support for luminosity masks in 32-bit images but also the ability to create 16-bit HDR images so that you can use missing tools such as Liquify or Adaptive Wide Angle.
Creating HDR images with Web Sharp Pro
My Web Sharp Pro plugin for Photoshop offers numerous unique HDR capabilities, including:
- Share HDR on Instagram or Threads with the highest quality possible (it gives you full control of the SDR version, and avoids degradation of the SDR base image which will occur if you upload an image without a gain map).
- enhance SDR to HDR: this enables you to create HDR from any existing image, which is ideal if you also wish to print the same image, prefer to stick with SDR editing workflows, or want to upgrade existing images.
- 100% control of the SDR / gain map: this allow for much better results when your images are displayed on screen’s less capable than yours.
- Numerous other enhancements such as automations for batch processing and faster workflows, optimizations for HDR astro images, templates and guidance for social media, etc.
Other tools for creating HDR:
The following tools also support HDR editing:
- See this page for a complete listing of HDR software (and links to request HDR support where missing).
- Affinity provides support for viewing and editing HDR images as 32-bit RGB, as well as support to edit the RAW as HDR (see my e-book for problematic settings which can clip the results to SDR).
- Use the 32-bit Preview panel to help control visualization. Change the limits under the histogram to see HDR values, and use the interactive color sampler to see actual values (the info panel only shows clipped SDR readings).
- Affinity does not support gain maps, which are important for viewing HDR images captured with a phone or sharing images edited with Affinity. You may let the Affinity team know you would like to see support by adding a polite comment in this support request.
- Pixelmator Pro for MacOS supports both HDR photos and HDR video.
- Click the HDR button at top right to enable HDR photo editing. Support includes a wide range of file formats.
The following tools do not support HDR display and editing currently:
- CaptureOne has a “High Dynamic Range” section right under exposure, but this is just tone-mapping (the “old” HDR) to help better convert RAW images to
How to profile / calibration an HDR monitor?
I’ve had great success just profiling normally on Windows using an i1Studio like I always have. Apple displays tend to be quite accurate and the default might be your best option for now if you run into any challenges with HDR calibration.
Calibrite (associated with X-Rite) has released a few colorimeters designed to handle brighter HDR displays, including:
- Display Plus HL (highly recommended)
- Designed to handle up to 10,000 nits, which vastly exceeds the capabilities of any consumer HDR display.
- This is the only consumer colorimeter Apple lists as supporting their very useful XDR “full” calibration workflow.
- This is supported by ASUS for calibrating ProArt monitors which do not come with a colorimeter.
- Display Pro HL.
- Designed to handle up to 3,000 nits. This is the ideal level to support HDR monitors for years to come, but is not sufficient for best in class TVs (which are targeting 4-10,000 nits).
- Can be used for ASUS calibration and Apple’s simple “fine tune” calibration (but you’ll need the Plus model for “full” calibration).
If you have an Apple display, the color is quite accurate from the factory. Using an Apple display without profiling is perfectly fine for most photographers exploring HDR. With calibration in my laptop’s internal display, I was able to reduce a max deltaE 2000 from 2.7 to 1.4 and average error from 0.9 to 0.3. The primary benefit of calibrating Apple displays is to improve accuracy of neutrals (where deltaE was reduced from a detectable 2-2.5 across midtones and highlights down to well under 0.5).
Be careful (for now) with custom profiles on HDR machines, but you can use custom profiles in SDR mode – just avoid them in HDR mode.
If you wish to toggle between SDR with a custom profile and un-profiled HDR:
- When you toggle HDR mode in Windows 11 or MacOS Tahoe, the color profile is sticky to that mode. So you just set each mode once and then can safely toggle HDR mode.
- For older versions of MacOS, you will need to manually switch the profile too, or consider using BetterDisplay as noted here.
Common misperceptions / fallacies
There are a number of common misperceptions about HDR display. The confusion tends to stem from a lack of significant experience editing HDR images. There are things that work and things that don’t work (yet). If you try a couple things and they fail, it’s easy to assume HDR isn’t ready. But there are good solutions to nearly every concern I’ve heard raised about HDR.
A few common misperceptions / concerns:
- Misperception: HDR looks blah / terrible.
- Anyone who says this very likely is confusing the old HDR (tone mapping, Photomatix, etc) and doesn’t understand that we are referring to a completely new display technology.
- Of course, it’s also possible they saw a badly encoded / edited image. I’ve seen many people make technical mistakes and questionable editing choices. That’s inevitable with a new technology. Never assume you cannot succeed where others have failed.
- Concern: It isn’t worth it because there aren’t enough people with HDR displays.
- Reality: Nearly all Apple laptops/displays, smart phones, and TVs sold in the past several years have support (though not all software on those devices supports it yet). The range of options continues to expand.
- Concern: HDR monitors are too expensive
- Reality: Large, high-quality HDR monitors can be quite expensive, but there are other ways to get started (and those monitors are getting cheaper all the time). Apple M1 and later MacBook Pros offer stunning HDR displays, a TV can be quite cheap, your phone likely has support, and you can find some great deals on used equipment. So there’s a very good chance you can start playing with HDR right now without additional cost.
- Concern: People without an HDR display will see something that looks terrible.
- Reality: if you encode the image correctly, you can ensure that the worst possible experience is a standard version of your image.
- Concern: I can’t share my images online
- Reality: There is social media support on Instagram and Threads. You can see several examples on my IG account.
- You can post to a professional portfolio page directly from Lightroom.
- And you can post directly on your site (I’ve done so through WordPress).
- Concern: I can’t print HDR
- Reality: It is very easy to support both HDR and print with minimal work (but no, you should not send your HDR file directly to the printer).
JPG Gain Maps: Share great images with everyone
One of the fundamental challenges of HDR photography is that the images will ultimately be viewed on both HDR and SDR displays. They will also often be viewed in-between – that is on HDR monitors are aren’t as capable as the one used to create the image.
When HDR is displayed on a less capable monitor, the content must either be compressed into the dynamic range of the display or it will clip. This process of compressing the dynamic range is known as “tone mapping”. It can produce an acceptable and sometimes very good result, but is never as good as the result you could create by simply editing the image for SDR. So this creates a tradeoff the for photographer – do you enable the benefit of HDR if it risks many people seeing a degraded result? Thankfully, that tradeoff is no longer an issue.
A new standard called a “gain map” allows a range of file formats (including JPG) to effectively includes both the SDR and HDR version of the image. JPG gain maps are backwards compatible with both SDR displays with browsers that don’t understand gain maps at all. So if the viewer doesn’t have the right monitor, browser, or settings – they will see a great-looking SDR image. But if they have proper HDR support, they will see your vastly improved image. And if they have limited HDR, their display will look much better than tone mapping of a simple HDR without a gain map. This ensures everyone sees a gorgeous version of your image, even if they don’t have an HDR monitor. While you might think gain maps are not important for high bit-depth formats like AVIF, they are still critical if you want everyone to see consistently high quality.
See my HDR soft proofing page in Chrome or a related browser to see exactly how a gain map will adapt to displays with less HDR support than yours.
ISO 21496-1 is the official standard for gain maps (Apple calls this “Adaptive HDR“). This spec is well supported nearly everywhere, other than on Instagram / Threads (which still use the legacy Android XMP spec, so you should avoid uploading HDR from an iPhone for now).
A few notes on legacy formats (which may be helpful for troubleshooting in rare cases):
- Prior to the ISO standard, Apple, Adobe, and Google (Android) all created gain map formats. Support for decoding is likely to remain for a long time in order to ensure old photos (those captured or exported prior to 2025).
- The legacy Android XMP spec is commonly called “Ultra HDR” by Google or “Super HDR” by Samsung. Old Google developer docs reference reference to “JpegR” (where the R is for “recovery” map). These are all the same thing.
- The Android and Adobe specs are nearly identical (the Android spec adds a redundant GContainer header in addition to the MPF header used by both).
- New images are often encoded with ISO plus one of the legacy XMP formats to ensure compatibility even with old viewers (though the XMP is of little value now and it will soon be better to encode ISO only to save ~2KB file size).
If you do not use a gain maps, the image will be adapted to less capable displays using “tone mapping“. The result is often low quality and varies by browser. Gain maps are critical for achieving consistently high quality on any display (even when working with high bit-depth formats like AVIF or JXL).
See my HDR JPG gain map gallery for an example of how these images look. You might try viewing the page with an HDR monitor using Chrome vs another browser which does not support gain maps to see how it automatically adapts.
There are some minor caveats with gain maps at this time:
- Adobe LR / ACR have a very nice and simple way to create the SDR base image when exporting gain maps
- If you wish to have full control of the base SDR image for highest quality, you should use Web Sharp Pro v6.
- To share HDR images on Instagram or Threads, you should also use Web Sharp Pro (as it is optimized around the specifications that Meta will accept).
- The JPG gain map files are slightly bigger (about 30%), though future support for AVIF gain maps could help offset that.
- Once you have a valid gain map, you also need to ensure that it gets shared without being adversely changed. Most websites will transcode the image in a way that strips the gain map (and therefore breaks the HDR image). Be sure to send a request to your favorite platforms to add support for HDR JPG gain maps. If you have your own website, just upload to your server in a way that avoids transcoding and you’ll be able to share the image (in WordPress, just pick the “full” size option in the media library).
- See here for more details on gain maps.
AVIF: the future of HDR
The image formats we’ve used on the internet for decades (JPG, PNG, GIF) are pretty limiting and will soon start to be (slowly) replaced by AVIF. This is especially true for HDR.
AVIF is a file format developed by Alliance for Open Media. It’s an open standard which already enjoys fairly broad support in major web browsers for standard images. And it supports gain maps (which is critical for high quality adaptation to less capable displays – never share an image without a gain map).
AVIF offers numerous advantages over JPG, including:
- Higher quality. AVIF supports higher bit depths (10-12 vs 8 for JPG) and produces fewer artifacts.
- Vastly smaller file sizes than JPG, PNG, and webP at similar or even better quality. An AVIF is often 25% smaller than a comparable JPG, and I’ve several images shrink by 85%. The results are about 10% smaller than webP as well. These ultimately means websites load faster, reduced bandwidth costs, faster uploads, smaller email inboxes, etc.
- Transparency. This makes AVIF an ideal replacement for PNG, as the files are much smaller.
- Lossless encoding. These files are of course not nearly as small when encoded this way, but this offers a great way to archive in full quality with a file smaller than a TIF.
- Support for animation (AVIF is based on a video format). This offers vastly better quality than an animated GIF.
What’s the downside for AVIF? It is supported by the latest version of all browsers, but a small percentage devices are still using old versions. Additionally, some websites won’t accept images uploaded as AVIF yet. It won’t be long before AVIF starts to replace JPG, it’s already very well supported and better in nearly every way.
You can export HDR images as AVIF (including with a gain map) using Lightroom or ACR.
You can use Web Sharp Pro to help export AVIF as shown in the video below. In addition to facilitating AVIF exports, WSP offers batch processing, sharpening, borders, custom cropping, social media templates, watermarks, and much more. Learn about its AVIF support here.
If you wish to optimize your website to show HDR image for HDR monitors and SDR versions of your work otherwise, that can be done with methods I describe in my free e-book and shown in my HDR gallery test page. It will automatically detect your display and render the most appropriate image, but you can click the green button to toggle (so you can see what an HDR image looks like on an SDR screen).
There are alternatives to AVIF or JPG for HDR, but they are not well supported on the web:
- HEIF (“HEIC”) is a native capture format in iPhone and supported by Safari v26. However, support is very limited elsewhere and unlikely to grow.
- JXL offers some nice advantages over AVIF for uses other than HDR (particularly higher resolution for print and higher bit depth to support subsequent editing), but Google Chrome removed support.
- JXR supports HDR and has been used for Xbox and Windows Game screenshots, but it not compatible with any major web browsers and was even removed from MS Edge. This format is unlikely to gain support.
Sharing HDR images for the web
Native support to share HDR photos is the main challenge these days. It isn’t as simple as it should be. But if you use the right approach, you can share HDR in a wide variety of ways.
Tip: To test that a given website, CDN, plugin, etc properly handles HDR, use the test image included with the FREE HDR e-book.
There are several options for sharing your images directly on the web (see my how to share HDR photos page for workflow details for each):
- AppleTV – export an HDR video slideshow from Web Sharp Pro and sync via iCloud or use my free HDR Cast iOS app for AirPlay.
- Discord supports HDRD PNG images exported from Web Sharp Pro (this includes the desktop app / website, mobile Discord does not show images as HDR yet).
- Facebook has native support for HDR video slideshows exported from Web Sharp Pro.
- iMessage – export photos from Web Sharp Pro with the “Apple map” option.
- Lightroom web albums show HDR versions of your image.
- See the video below for a full demo.
- This is a very nice feature built right into the cloud and mobile versions of LR (and may be integrated with LR Classic with a little more setup).
- See my demo LR gallery. If you view on a supporting HDR display/browser, you’ll see an HDR for the large view of the image (grid view is currently not HDR).
- Note that this feature was added before gain maps were finalized, so it will serve AVIF for HDR support (ie some tone mapping on less capable displays) or JPG if the browser/display lacks support for HDR (so no extreme tone mapping).
- Instagram
- IG has native support in posts for HDR photos exported from Web Sharp Pro when following this workflow.
- Reels and Stories support HDR video slideshows exported from Web Sharp Pro too (mobile has full support – computers can upload but do not playback as HDR yet).
- Adobe Portfolio (myportfolio.com) is a website builder which supports HDR.
- This included at no additional cost for Lightroom subscribers and integrates directly with Lightroom so you can easily publish new images.
- Self-hosted WordPress
- You can share HDR images on WordPress now using the “full” size version in the media library (as this avoids transcoding). Full native support of HDR photos is planned for WordPress v7.1 (scheduled for Aug 18 release).
- This website is built with WordPress (and Elementor, as plugins like that are perfectly fine too). See my HDR gain map gallery for another example using WordPress + Elementor.
- SquareSpace / Wix
- The media libraries on these sites do not yet support HDR photos, but you can easily work around that using Web Sharp Pro v7 (click “tutorials” in the panel for details).
- See gbenz.com for an example of HDR photo support on SquareSpace.
- Threads has has native support like Instagram, with some minor differences.
- YouTube supports HDR video slideshows exported from Web Sharp Pro.
- zonerama.com supports HDR display.
==> Be sure to request HDR support for full support on your favorite sites (customer demand is a key driver of support).
Sharing HDR images on mobile devices (Android, iPhone, iPad)
Mobile device support is very good in the latest operating systems.
As of Apple’s iOS / iPadOS v26, the following are supported:
- native Camera & Photos apps
- all browsers (Safari, Chrome, Firefox, etc)
- iMessage when using Web Sharp Pro’s “Apple map” encoding or sharing an image captured on iPhone.
- AVIF (with an ISO gain map, or as a simple HDR)
- HEIF (with an ISO or Apple gain map)
- JPEG (with an ISO or Apple gain map)
- JXL (simple HDR)
As of Android v16, the following are supported:
- native Camera & Photos apps
- all modern browsers other than FireFox
HDR conversions from 8-bit JPG: (MidJourney, stock, etc)
Up-converting to HDR can add great impact even to 8-bit source images such as stock photography or AI-generated art (ChatGPT, MidJourney, DALL-E, Stable Diffusion, etc). While banding is a risk when increasing the contrast of such a source, I have yet to see it – these images tend to work very well.
HDR technologies
- Pros:
- High peak brightness (for greater HDR headroom, especially under bright ambient conditions)
- Sufficiently deep blacks for a great HDR experience.
- Cons:
- Does not offer true blacks (subject to blooming/haloing around bright pixels)
- limited range of viewing angles
- slower response time may limit frame rates for gaming
Various sub-types or marketing terms associated with mini-LED:
- FALD (Full Array Local Dimming). Mini-LED is a type of FALD (this term just suggests a higher zone count for greater precision).
- QLED (Quantum Dot LED). This adds a quantum dot film to achieve a wider color gamut, but is still a backlit technology with imperfect blacks.
OLED (Organic Light Emitting Diode)
Some computer displays and many TVs offer this. These use color filters to turn a white light source into the red, green, and blue sub-pixels. There are several newer variants of OLED discussed below which use different approaches.
- Pros: Emissive (true blacks) allow extremely high contrast ratio for excellent HDR in dark viewing environments.
- Cons: Limited peak brightness means that you may not have much HDR benefit if ambient lighting levels are not very low. Newer variants of OLED (including QD and MLA) may help significantly overcome this.
Note that you may read about “burn in”, which refers to potential ghost images if pixels are lit the same way for a very long time (such as the logo you see at the bottom of most news networks). This isn’t a big issue with modern OLED displays (thanks to various compensation strategies), though it may not hurt to set your dock to auto-hide to avoid continuously showing the same content on the screen.
QD-OLED (Quantum Dot OLED)
Instead of color filters (which reduce light output significantly), uses quantum dots (nanoparticles which convert UV light to various colors based on the size of the quantum dot) to convert a blue OLED light source into other colors. This offers great improvements in both color and peak brightness. You’d probably only find this in a premium TV at this time. Note that this technology is so significant the three scientists were awarded the Nobel prize in chemistry for it.
MLA-OLED (Micro Lens Array OLED)
MLA adds little hemispheres to help increase brightness by directing more of the light to shine out of the OLED (rather than being lost internally). You’d probably only find this in a premium TV at this time.
WOLED (White OLED)
This is OLED with white pixels in addition to RGB. LG and Panasonic offer TVs with this technology. You may hear this referenced as WRGB due to the 4 sub-pixels it uses. This technology is used in some excellent TV monitors like the LG C2, which makes it a commonly used technology for mastering HDR movies and something to consider as an external monitor for photography.
- Pros: Enables brighter displays than typical OLED.
- Cons: Lacks saturation in brightest values, calibration is more complicated (CalMAN supports), not necessarily optimized for computer use.
AMOLED (Active Matrix OLED)
An “active matrix” means a pixel is lit continuously (thanks to electronics that help keep it lit). That is in contrast to a “passive matrix” where the pixel is lit while the display is refreshing a given line in the display. A “passive matrix” OLED (PMOLED) is a simpler design where the pixels are driven very bright briefly and then fading or off until the next refresh (this is over a very fast period of time and would not appear to the naked eye to be flickering). You may also encounter “Super AMOLED”, which just means that touch screen sensitivity is built into the AMOLED display.
I’m only including this here because you’re likely to see some smartphone or laptop screens described as using AMOLED. This is not an important distinction because any OLED you use for HDR photography will have an active matrix if it isn’t for some small display with low resolution (like a fitness tracker on your wrist). So you can generally think of AMOLED as being the same as generic “OLED” for our purposes.
Stacked (or “tandem stack”) OLED
The M4 iPad Pro has significantly raised the profile of this technology. The general idea is that a second OLED layer is added, and it is transparent (no backing to block light from the lowest OLED layer). This helps overcome some inherent limitations of OLED by using the dual layers. The result is higher brightness, longer life for the display, and (I believe) lower energy consumption. The extra brightness is a big deal. The new iPad offers both 1600 nits peak brightness (1000 sustained full screen) and perfect blacks, making it the best XDR display Apple has offered yet. I have not seen any better consume display, it is truly stunning. As a tablet, it is only available in 11 and 13″ sizes. Perhaps we will see monitors take this approach, though the technology is costly to make and therefore mini-LED is likely to remain a key technology for bright HDR monitors in general.
Micro-LED
This is analogous to OLED but with an inorganic construction which promises many benefits over OLED. While these are several years from production for a computer display, they promise to deliver the best possible results. You may find them appear in small screens like camera view finders, smart watches, or VR headsets before they are common in smart phones, tablets, or computer monitors.
- Pros: Promises to potentially offer many benefits over both LED and OLED including higher peak brightness (including better visibility in sunlight), better power efficiency, wider color gamut, wide viewing angles, faster response times (for high refresh rates in gaming), and an improved ability to work in extremely hot/cold temperatures.
- Cons: Future technology, no consumer offerings at this time. Likely not available on consumer TVs and computer monitors for many years, and will probably have premium pricing when available.
How many bits are required for HDR?
If you are not familiar with bit-depth generally, please see this article I posted on the topic. You might think 32-bits means HDR (since that’s how we edit HDR in Photoshop), but only 10 or 12-bits are required to show even the most challenging HDR images.
Bit depth can get a bit confusing with HDR because we need more bits to encode working files than finished images. For example, you probably have numerous 16-bit TIF files which are only SDR, whereas the HDR images on this page are 10-bit HDR AVIF files (which were exported from 32-bit TIF source images). With the caveat that details matter, the following will generally be true (with possible rare exceptions):
- Photoshop natively supports HDR in 32-bit images. 8 or 16-bit images (in common color spaces like Adobe RGB and ProPhoto RGB) are normally limited to SDR (Lumenzia v11 can convert your images to 16-bit HDR to use tools like liquify, frequency separation, selective color, etc which are not available in 32-bit PS).
- The AVIF image format support HDR images 10 or 12-bit depths. These file formats can encode SDR images in those same bit-depths as well (for example, a 10-bit AVIF can avoid banding that might occur in an 8-bit JPG).
- HDR monitors will typically reference a 10 or 12-bit specification. Cheaper monitors may use 8+2 FRC (“frame rate control” uses temporal dithering to intermediate shades by rapidly toggling between two 8-bit values), which can work quite well but may at times show some shimmering or other generally minor issues.
The important thing to know is that more bits can help avoid the risk of “banding”, which just means that the jump from one value to the next is so large that we can see it. There’s no inherent reason couldn’t create HDR at any bit depth. As an extreme example, we could make a 1-bit HDR image if we defined 0 as pitch black and 1 as the brightness of the sun. Obviously that would be useless, but it illustrates the point.
10 (or sometimes 12) bits are enough to export an image which will not show banding on even the most capable HDR displays. Editing inherently needs more bits, so 16 is the minimum you want for HDR and 32 can be beneficial (20 or 24 would do just fine, but that’s not an option in the software we use).
What is the dynamic range of HDR?
- Experts generally say that SDR displays offer up to 8 stops of dynamic range. HDR on a good display (such as the M1 or later Apple MacBook Pro) offers an additional 4 stops, and there are some TVs which would provide 6.5 stops of benefit. That means that HDR offers 12-14 stops of dynamic range, which makes it perfect for properly displaying the full dynamic range of our RAW files (which tend to offer around 14 stops of dynamic range).
To say that SDR is 8 stops and HDR is up to 14 stops is the easiest way to think about things, but it does over-simplify things a bit. It’s largely an argument based on the improvement in highlight brightness, but there are often benefits in the shadows as well with a good HDR display.
You may hear others say that HDR offers 17-20 stops of dynamic range. Standards for Ultra High Definition TV consider HDR as offering 13 stops or more of dynamic range (see 4.1 Phase A). This puts you in the ballpark of 10,000 : 1 contrast ratios. TVs may quote as much as 1MM : 1 (implying ~20 stops fo dynamic range) or even “infinite. I believe that’s a valid perspective in a way, but vastly over-promises things based on the limits of human vision or practical considerations for the viewing environment.
The reality is that the actual useful dynamic range depends on several factors:
- How bright your pixels are. For reference, photography editing is ideally done with SDR brightness set to 80-120 nits. HDR displays offer up to 10,000 nits (with 600-1,600 being most common today).
- How dark your black can be. With an OLED, but mini-LED does not get as dark. SDR monitors tend to have fairly grey black values, so there is often loss of dynamic range in the shadows on an SDR display (but not necessarily, you can get an SDR OLED for example).
- How dark you can see. Human vision can only distinguish grey values so far. Beyond a point (especially with our vision adapted to the room or screen overall), you simply won’t be able to distinguish darker shadow values. So again, there are limits to what you can appreciate.
- Ambient light and the reflectiveness of your screen. Anything darker than reflections on the screen is meaningless, you won’t be able to appreciate it.
- How you set the SDR white point (brightness) of the display. Technically, this does not change the dynamic range of the display at all, but it does affect how your image is mapped to the display. Ultimately, brightness should be set based on ambient light, so this point is quite similar to #4.
Considering all the above, there really is no simple way to reference the dynamic range of a given monitor. Even if you used a very scientific approach considering points #1-3, your ambient lighting could easily limit the useful dynamic range in your viewing environment.
Human vision can accommodate about 14 stops in a still image (more under dynamic conditions if you give your eyes time to adjust, but that’s not how we typically experience photography). This leaves room for more artistic benefit with even brighter screens in the future (further increases in dynamic range would be useful), although I believe the primary benefit of going above 1600 nits will be a better ability to preserve HDR detail in brighter ambient conditions. In other words, a 10,000 nit display will be amazing for viewing outdoors or in a bright room – but you probably won’t often want to use that full range if the SDR content is set for 100 nits.
So, we could certainly debate the numbers, but I think the key takeaways are:
- SDR displays have vastly lower dynamic range than what is captured in our RAW files.
- HDR displays offer vastly greater dynamic range, at a level which is very well matched with our RAW files and offer an experience much closer human perception of real-world light.
What supports HDR, what doesn't?
Apple has done a fantastic job of releasing supporting hardware for years, and now with support from major software like Photoshop and Chrome we have some great ways to create and share HDR. But as you’ve seen above, support varies widely. So here’s a quick summary of notable hardware and software which does or does not support HDR.
What’s supports HDR photography well now?
- Nearly all browsers:
- Safari, Chrome, Edge, Brave, Opera, Arc, and Vivaldi all support gain maps with AVIF or JPG (Safari v26 also supports JXL and HEIC).
- As the base SDR image in an AVIF or JPG gain map is supported by the latest version of all relevant browsers (including FireFox), it is safe to share images in these formats (everyone will be able to see the best result possible in their browser).
- Nearly all modern Apple laptops, Pro XDR Display, iPhone, and iPad hardware (iPad HDR is limited to the last two 12″ Pro models).
- Nearly all modern smart phones later running Android 14+ or iOS 26+ have excellent support (including mobile browsers).
- Nearly all TVs.
- Lightroom (including edit, exporting, web galleries, iPhone, iPad, and Android)
- Adobe Camera RAW (including support to export JPG gain maps and HDR AVIF)
- Photoshop
- Instagram and Threads. See full size images in my IG account and tutorial on how to share HDR on these platforms.
- Affinity photo (for editing).
- Pixelmator Pro for MacOS (v3.5+).
- Google Chrome / Edge / Brave / Opera. Both HDR AVIF and HDR JPG gain maps work beautifully in these browsers on a computer or Android.
- Multiple Apple apps in iOS 18 / MacOS 15, including Photos, iMessage, Preview, and Quick Look. There are also developer APIs for supporting HDR photos.
- All your existing photos. I’ve gone back to my oldest RAW files from 2004 and found detail I could never see before. And any SDR image can be converted to a beautiful HDR image – nearly all your existing edits stand to benefit (with the exception of images which are deliberately low contrast or low key).
- WordPress: HDR works great when you use “full” size in the media library (but the other derived sizes lack support after uploading).
What’s missing? (I’ve put the most important needs towards the top of the list, in rough order)
- Social media support for HDR images. We have great support from Instagram and Threads now, but ideally we’d also have support on Facebook, Flickr, 500px, SmugMug, Pinterest, etc.
- Adobe Portfolio (myporfolio.com sites). This is a website building tool included with all Lightroom subscriptions and integrates directly with Lightroom. It would be an outstanding platform for sharing HDR. Please vote to add your voice in support of HDR support in Adobe Portfolio.
- PC laptops. There are a growing number with HDR OLED displays, but it isn’t universal like Apple.
- Simpler Windows support. HDR support in MacOS just works (with the minor exception that you have to enable it for external HDMI monitors). Windows is more complicated and is not enabled by default (even in laptops where the display could be closely integrated).
- Adobe Bridge: No support.
- Behance supports HDR when you click to view a single image large in a browser. But it does not show HDR in a grid, before clicking to view large, or in the mobile app.
- Affinity gain map support. It already has great support for editing HDR, but for opening or exporting gain maps. That limits its usefulness for sharing or working with smart phone captures. Please vote for gain map support in Affinity.
- FireFox: HDR does not render properly, it is effectively unsupported.
What does HDR look like on an SDR display?
If you try to view HDR content on an SDR display, one of the following results will occur:
- The HDR content be clipped (so bright highlights will generally get blown out to white). This leaves you with accurate SDR content, but would look terrible because the HDR content is not useful.
- The entire tonal range will be “tone mapped“, which means that it is adapted to the limitations of your screen. It’s basically a complex curve that limits the maximum brightness to fit your screen. Generally this will leave SDR shadow minimally changed, but the highlights will get compressed into a very tight range. This darkens the SDR content a bit so that you get a general sense of the image (including the HDR content), but it is not an accurate HDR display and certainly not as stunning. But it is helpful to ensure anyone can see something useful (and often still very attractive).
- Or some combination of both approaches. You might see some HDR content tone mapped into a range your monitor can handle and still have some of the brightest HDR highlights clip.
If you view this web page or my HDR videos on an SDR display, YouTube will use tone mapping. That’s why you can get a sense of the HDR benefit when viewing those videos on an SDR display (though the visual impact is substantially greater if you view the same video on an HDR monitor).
Note that tone mapping is the general approach older HDR technology worked, it would compress an HDR source into SDR. In this case, it’s a fixed algorithm (unlike the much more complex controls you get with software like Photomatix for tone mapping).
There’s also some cross-over between these HDR technologies – tone mapping can be used with bright HDR displays. Every HDR screen has its limits. When you exceed those limits, your browser or photo editing software may try to tone map the content to fit your HDR display. This is particularly useful for 400-600nit HDR displays, but even a 1600 nit display may have some tone mapping if the content was mastered for DolbyVision (which targets 4000 nits). The results are much better here because you are compressing the much less. For example, 4000 nits is 20x brighter than SDR (203 nits) but only 2.5 times brighter than 1600 nits. Human vision is also less sensitive to brighter light, so you are unlikely to notice tone mapping on any decent HDR display, even if it’s used to adapt the content to your screen.
Can I print HDR?
A standard monitor has more contrast that a print (especially with media such as matte or canvas that lack deep blacks). We aren’t about to discover whiter paper or blacker ink. Sure we might see some little gains, but prints can’t match the dynamic displays of monitors as is and we aren’t going to see HDR prints. They will never be the same, a screen emits light and a print only reflects light.
We’ve used to unprintable (out of gamut) colors. But the gap between screen and print capabilities is growing with HDR and it’s something to consider. The extra brightness of HDR is unprintable and would likely show terrible clipping in the highlights. We may see some automatic tone mapping in the future (probably likely given HDR imaging in consumer phones), but you’d get better results taking control of any such conversion. You should not expect good results when printing directly from an HDR image.
So what should you do? There are several options:
- Process for SDR first (which gives you a printable image) and then create an HDR derivative for display on screen. This is very easy to do and looks great.
- Web Sharp Pro has a full tool set designed to manage everything to support both print and HDR. It has an automated “enhance SDR to HDR” option to automatically generate the HDR version (with support to customize the result), as well as the ability to save the output as a gain map. Click the “tutorials” button in the panel and review the HDR sections for more details.
- Using Lumenzia, you can add an L1 or L2 mask to some kind of adjustment which brightens the image to give the existing highlights a nice pop.
- And my NYC and Milky Way courses includes a couple of bonus videos on how to use WSP or Lightroom.
- Process for HDR first. This lets you work from the RAW (using ACR 15) to get the most out of your RAW to produce an optimized HDR image. You can then convert the HDR to SDR as needed for print (or for digital display meant to represent the image as it will print).
- Process the image twice: once for SDR and once for HDR. This clearly creates more work and might create important differences between the images, but it could allow you to optimize both in unique ways for special images.
- Use HDR selectively. Most images are never printed, even for those of us who print a considerable amount. HDR can enhance many images which will never be put on the wall, and HDR can often simplify the workflow for your secondary images.
- Don’t use HDR at all. Your images won’t look as good as they can on your computer, iPhone, iPad, social media, website, email, etc. But your screen will better match the limitations of the print, and you won’t have to learn any new skills or do any extra work. I appreciate the merits of this approach for those who only use screens as a way to ultimately get to a print, but I think there is probably a more inspired middle ground. You might choose to process only 1 stop or so into the HDR range to make your images more compelling, while not deviating too much from a print.
I use a mix of #1 (which is simplest and supports my older edits) and #2 (which can extract unique highlight color or detail from many RAW files).
Will HDR offer other benefits for printing? Possibly, but probably not. If it could, the old HDR tone mapping techniques would have let us do that long before we got enhanced monitors. Camera RAW has already been very well optimized to tone map an HDR source to SDR display. The exception might be for images which are lit from behind, which ultimately makes them emissive like a screen.
What HDR mean for exposure blending?
Whenever a new technique comes along, it’s natural to ask whether it displaces other techniques. Many people associate exposure blending with luminosity masks with the idea of managing dynamic range. It can certainly help with that, but that’s actually not the main benefit of blending. If you’ve taken my Exposure Blending Master Course, you already know that the majority of my blending work uses a single RAW exposure. Even when I use Lightroom’s merge to HDR feature to combine images, I ultimately send that new RAW file into Photoshop for blending. Blending allows for much better control over sunset color, artistic control over tonal detail, combining different moments in time, and numerous other enhancements to the image which are unrelated to the dynamic range of your screen or RAW file.
Rather than displacing blending techniques, HDR will let us better process RAW images for even more better exposure blends. See the video below on 32-bit exposure blending.
HDR standards
- Name confusion. The vastly improved HDR displays we’re discussing here are going to frequently get confused with the completely separate “HDR” tone mapping techniques used by software such as Photomatix. Adobe refers to it as HDRO (“High Dynamic Range Output”) to try to differentiate it from tone mapping methods.
- Mixed search results. If you try to Google information on the topic, most of your search results are going to be about that other HDR. Try narrowing your search by looking for terms like “HDR10” or “32-bit Photoshop”.
- Competing standards. TV makers refer to HDR10, HDR10+, and Dolby Vision. Apple refers to HDR, EDR, and XDR. Computer monitors may reference the DisplayHDR standard. And so on. The ideas are similar, sometimes the same, and yet often have substantial differences.
- Various levels of support. Support for a given HDR encoding in one app does not imply support elsewhere. It can even vary within an app (MacOS Finder shows HDR in QuickLook for most formats, but usually won’t for thumbnails).
- Marketing terms muddy the water. You’ll have no problem finding a cheap monitor which claims to be an HDR monitor. That monitor may offer nothing more than the ability to process an HDR signal for its SDR display, or it might only support a very limited peak brightness. Don’t be fooled, the details matter.
The following standards come up frequently in discussions involving HDR:
- DisplayHDR: This is a test standard from Vesa to help compare different monitors with a numerical measurement of peak brightness. 400 would work in a darker environment, 600 is better, and 1000+ is the ideal. If a monitor isn’t listed here, it doesn’t mean that it isn’t HDR and you should look at the peak sustained brightness as the most comparable number. For example, Apple’s XDR monitors are excellent but not on the list, but knowing they have 1000-1600 nits peak brightness ought to tell you they are solid.
- EDR (Extreme Dynamic Range): This is Apple’s name for its software support for HDR in MacOS. You probably won’t see this term much if you aren’t a software developer.
- XDR (eXtreme Dynamic Range): This is Apple’s name for its best /brightest HDR monitors. They also have some less-capable but true HDR displays which don’t get the XDR brand name.
- Gain maps: A file standard for including both the SDR and HDR rendition of an image in a single file, so that the artist is able to optimize the image for both types of displays. This is a critical technology for transition to HDR, as it removes the loss of quality associated with using “tone mapping” to automatically generate the SDR version when HDR is not supported.
- Tone mapping: The process of compressing the dynamic range of an HDR image to display on SDR or a less-capable HDR display (without clipping) through an automated algorithm. The result is a usable but much less impressive image. There are numerous methods of doing this, it is not a fixed standard. The opposite of this (up-converting SDR to HDR) is known as “inverse tone mapping” (Web Sharp Pro offers this via its “enhance SDR to HDR” option).
- HLG (Hybrid Log-Gamma) and PQ (“Perceptual Quantizer”, aka ST2084): These are the two primary electro-optical transfer functions (EOTF) which is used to encode HDR data. These are analogous to “gamma” we’re used to hearing related to SDR images. HLG is a relative standard using no metadata (everything is relative to the brightest value possible for your display). HLG is very nice for live sports or events, as it avoids the delays that would be required to generate metadata for PQ. HLG allows encoding up to 12x reference (SDR) white, ie about 3.5 stops of headroom.
- PQ is an absolute standard measured in nits. However, tone mapping is applied by the viewing software based on metadata (so you’ll have an accurate display rendering the image as intended when possible, and tone mapped as needed – at least when proper metadata is stored in the photo and used by the viewing software). PQ with metadata offers video which should be more consistent/optimal, and theoretically would provide better future proofing for quality if we ever get HDR displays exceeding 5000 nits (this won’t be a factor for a long time, if ever). PQ allow encoding of roughly 5.6 stops of headroom (assuming the 203 nits standard SDR for photography).
The following standards come up frequently in discussions involving HDR video, but aren’t directly relevant or necessary for still HDR photos:
- HDR10: This is an open standard for encoding HDR video, and probably the most common. It uses 10-bit PQ, D65 white point, and is mastered for 1000 nits. Tone mapping is not standardized. Metadata is static for the entire video, which can limit the quality of tone mapping for movies with a wide range of light.
- HDR10+: This is HDR10 with dynamic metadata to help optimize tone mapping for scenes with different brightness.
- DolbyVision: This is a proprietary standard from Dolby. Due to licensing costs and minimum requirements, you’ll tend to find it only on higher end TVs. Apple products using Safari support it. Seeing support for DolbyVision is generally a good indicator of quality and concern for HDR support. (Some notes on it for video use: It uses 10 or 12-bit PQ, D65 white point, and is mastered for 1000 or 4000 nits. Tone mapping is standardized for more consistent playback on different devices, dynamic metadata is used to help optimize tone mapping for scenes with different brightness, and it has numerous other features for creating better video.)
HDR video
You would assume that HDR video and photography are quite similar as the only real difference is the image constantly updating in a video. However, there are some very real and practical differences, including:
- HDR video support is different and varies by platform. In general, there is greater support for HDR video playback than HDR photos right now because the video content has been around much longer (probably due to a combination of Hollywood budgets/resources for creation and a wide range of HDR TVs). So you can watch an HDR video on FireFox with YouTube and Vimeo, but you can’t yet view my HDR photos on this web page.
- As rough as HDR photo creation is currently, HDR video is even more challenging in my opinion. The learning curve is very steep and color management is a mess with video.
- HDR video tends to be mastered by professionals for 1000 nits. Most TVs probably adapt 1000 nits content effectively to use the full range on brighter TVs, so this probably wont’ be much of a limiting factor for video.
- Video tone mapping can be done scene by scene or frame by frame, but in general is going to have more compromise trying to find values that work across multiple images. Photos can be optimized in a more controlled way, which will likely prove to be more ideal when we have tools for gain mapping.
- Video is edited primarily for P3 (or Rec2020 limited to P3), whereas prints can benefit from gamuts wider than P3. It’s a niche consideration and easy to manage with proper color management.
- RAW source material is common for photography, but not video (log footage offers great results, but isn’t the same as RAW video). This may have implications for fieldwork. Video is simply vastly more data and it creates the need for some compromises.
In the near term, HDR video is a bit more established. But the standards which are be developed suggest that HDR photography may be a bit simpler and more uniform in a few years. Unless a free alternative to DolbyVision emerges, it is likely that photographers will have greater creative control over SDR / tone mapped versions of their HDR work.
Please see this HDR video playlist for some outstanding examples of HDR. Make sure you see the red “HDR” over the gear icon on the playback screen. If you don’t see it, you are viewing the SDR version of the video. If you have two monitors (or can set your HDR monitor to SDR only), it is very interesting to watch these same videos in both HDR and SDR to compare.
Further learning & podcasts
I’ve been a guest on the following podcasts, where we discussed HDR in great detail:
- F-Stop Collaborate and Listen with Matt Payne
- Lakescape Photography Podcast with Nicholas Albert
- This Week in PHOTO with Frederick Van Johnson (HDR discussion starts at the 19:00 mark).
- Photo Taco podcast with Jeff Harmon
HDR standards, libraries, and other info for developers
This section is meant for developers who may be looking to incorporate support for HDR photos into your website, etc.
My advice would be to try to leverage libultrahdr or a library which uses it. There are great solutions already available, and you’ll be able to avoid some mistakes I’ve seen in various implementations over the past couple years.
Here are some critical resources:
- The FREE HDR e-book includes a test image you can use to confirm that transcoding does not break an HDR image or cause unwanted changes (loss of color, artifacts, etc).
- Be sure to read this post on gain maps vs tone mapping
- Gain maps are the default HDR image capture format for smart phones, so failure to support them in transcoding will result in loss of HDR (ie the image is significantly degraded).
- Gain maps should be preserved when doing simple transcodes (resize, crop, compress). They are critical to supporting high quality, even with high bit-depth formats like AVIF or JXL.
- If you are editing the image content (ie going beyond a simple transcode), then the output may be a gain map or a simple HDR based on your objectives and user input to support a high quality base SDR.
- Open-source libraries:
- libultrahdr is a Google-backed open-source C++ library and CLI tool which supports encoding and decoding JPG gain maps (AVIF / HEIC apparently planned per discussions in the repo).
- It also supports transcoding (resize, crop, mirror, compress), making it a critical library or dependency to support transcoding for images uploaded to websites.
- Helpful functions in the codebase: probe() can test if a file is a valid gain map.
- libvips v8.15.0 added support via libultrahdr.
- wasm-vips 0.0.17 added support.
- This library supports fast client-side transcoding. It is WASM built with libvips.
- See https://gregbenzphotography.com/test/wasm-vips-hdr-demo/ for a fully-functional demo to transcode an uploaded JPG. Note that it exposes options you should avoid (such as sub-sampling, luminosity-only maps, and low resolution maps). The sample images can help illustrate some of the quality problems those options create (you’ll need to view on an HDR display).
- Sharp (a Node.JS library built on libvips) adding support in v0.35.0.
- This library supports fast server-side transcoding. It is a Node.JS library is built on libvips.
- The keepGainMap() method is being built to support transcoding and in time will be used by default on JPG gain maps (after the current release is confirmed stable). The withGainMap() method allows decoding a gain map to a simple HDR for processing beyond simple transcoding (such as if you wish to apply a filter to the image).
- ImageMagick has added support for libultrahdr (you need to enable a flag when compiling, see here for details)
- libultrahdr is a Google-backed open-source C++ library and CLI tool which supports encoding and decoding JPG gain maps (AVIF / HEIC apparently planned per discussions in the repo).
- WordPress media library does not currently support JPG gain maps (other than “full” size images, as that avoids transcoding). But there are several potential pathways for support to be added:
- (1) via ImageMagick once some additional PHP updates (for hosting environments which support ImageMagick) are in place,
- (2) via the default GD library, or
- (3) WordPress Media Experiments (which would leverage WASM-vips).
- Important standards:
- ISO 21496-1 is the standard for gain maps.
- ISO 22028-5 is the standard for HDR metadata (this would apply for images encoded to support HDR, which may be a standalone image without a gain map or the base image in a gain map).
- ISO 23091-2 is the standard for CICP (“Coding-Independent Code Points”), which are ideal way to encode colorspace information in newer formats such as AVIF (but is not supported with JPG gain maps – other than the potential to write a CICP tag into an ICC profile). CICP requires only 4 bytes, vs typically 500-1000 for an ICC profile.
- ICC gain maps: Adaptive Gain Curve Tag (ADGC)
- This specifies a method to adapt an image by using a parameterized curve or LUT rather than an auxiliary image.
- This approach allows for a smaller file size (but significantly limits image quality compared to a gain map as there is no local adaption or artistic optimization).
- This approach is probably most likely to be used for native HDR capture with a mobile phone, where image size may be prioritized over quality (and the benefits of gain maps are not likely fully realized due to a lack of artistic input from a photographer). As with gain maps, it provides a standard which would help avoid the variability caused by generic browser-specific tone mapping.
- There is no standard at this time which might support profiling of an HDR display (calibration in the hardware is possible for ASUS Pro / TVs, and MacOS supports some options for any XDR-branded display). ISO 15076-2 appears to be a potential vehicle for adding official HDR tags in ICC profiles.
- There are ongoing efforts to support the use of ICC profiles for tone mapping. This may emerge as a middle option between tone mapping and gain maps for applications to allow a small file to render consistently across browsers (ie smaller than a gain map, but lacking its improved SDR base image quality). I expect this is a non-issue for many platforms/libraries. Just preserving profiles should retain the tone mapping benefit during simple transcodes, and more advanced edits would work from the HDR only (and therefore not need this SDR-related data).
- SMPTE ST2094-50 is being developed to offer standards for dynamic tone mapping of video. This does not directly concern HDR photography, but the potential benefits for consumer HDR video may help support HDR in general. (Note that ST 2094-40 is used in HDR10+ and ST 2094-10 was used prior to DolbyVision)
- If you need to mix SDR and HDR content on the same page (such as a grid of old and new images), you have the option to limit dynamic range for HDR images in order to match SDR via CSS.
- This should where possible, but may be helpful to manage the difference between different images edited to old vs new standards when viewed side by side.
- The dynamic-range-limit may be set for your images to a limited level of HDR which is generally too low (about 1 stop). Targeting support of 1.5 or even 2 stops when the goal is to minimize variability is probably more ideal. That allows enough HDR to show benefit, while keeping it from varying too much from surrounding SDR.
- To achieve that, set it to dynamic-range-limit to “dynamic-range-limit-mix(constrained 70%, no-limit 30%)“.
- See the CSS HDR limit demo in the tests above.
Note that using JavaScript to query the display’s bit depth is not a reliable test for HDR support. For example: FireFox reports 10-bits per channel but does not support HDR photos, and Android / Safari 26 report 8 per channel and do (these systems may only be using 8 bits, 8+2 FRC, or perhaps this is a bug in the JS data).
A more reliable JS test would be:
If you’re going to write your own code for transcoding, here are a few pitfalls to avoid (issues I’ve seen):
- As a general rule, DO NOT CHANGE color encoding or HDR metadata unless you are confident that your approach is valid and well tested. The assumptions we normally make for a simple SDR image often do not apply to the auxiliary image (the map) as it is not a real image, just math encoded in an image format.
- Do not change the map scaling.
- If the source has a 1:1 map (ie the map is the same resolution as the base image), transcoding the map to 1:2 will produce a terrible result. The HDR image will be significantly degraded (it will often look soft and show artifacts).
- It is ok to downsample the image, it’s just important to do so proportionally for both the base and map. If reducing resolution, whatever scaling factor is applied to the base image should be applied to the gain map.
- The best results would come calculating the full SDR / HDR, scaling both, and then recalculating the map (rather than rescaling base and map as if they are unrelated). This will minimize artifacts.
- Do not subsample a gain map encoded as 444.
- The gain map itself is not an image, and therefore does not have color and luminance. The reasons 420 color make sense in a real image do not apply to the gain map, which is just math and not actual image data.
- For example, I have seen extreme artifacts in open blue sky where the red channel of the gain map had significant variability (there is no red in the blue and this does not affect the image, but the red gains vary a lot due to the base being near zero). When the 444 map was transcoded to 420, this caused the green and blue map channel weights to be significantly reduced, resulting in dark splotchy / noisy artifacts in the HDR sky because the gain map was no longer correct for those channels.
- If you wish to compress the map to 420, try recalculating it from the HDR / SDR, rather that directly subsampling the original map. This would minimize error and may be suitable in your application.
- When doing basic transcoding an existing gain map (to resize, compress, or crop), do not change the gain map metadata.
- This will almost always degrade the result, often making the image unusable.
- The HDR min/max capacity values should not be changed (even if you crop the image), as there are artistic reasons they may be set which cannot be inferred from the image data.
- The only scenario where the data would change would be if the gain map image were recomputed for editing (not just cropped, rescaled).
- Watch out for ICC profiles in the aux image:
- There are a few ways ICC profiles may be used in a gain map. They can describe the base image (just like any normal SDR). They can also be used per the ISO spec to optionally describe the HDR color values.
- Adobe encodes JPG gain maps without an ICC profile in the aux image and I believe this is ideal (the quality looks great and there is no confusion / complexity for downstream transcoding). However, libultrahdr adds a small linear ICC profile (when encoding for ISO) and Apple’s camera app adds a larger LUT-based PQ profile.
- When transcoding, avoid adding a profile if there isn’t one and avoid changing color space (at least without appropriate testing using a variety of different source encodings to ensure your approach is valid).
- I have seen an example where a P3 profile was added to an untagged map during transcoding, and this resulted in desaturation in the final result.
- These comments are fairly specific to JPG gain maps, as gain maps in formats like AVIF are likely to use CICP (at least when the map encodes for linear or PQ EOTF of the HDR, which are the only uses I’ve seen – though I’m less clear on what we may see when formats like AVIF encode the base as HDR and the map therefore likely describes the transform to derive the SDR – though I would think the same EOTF as the base HDR is probably safe and ideal).
- Watch out for values near zero in the transcoded SDR base image. If the source SDR pixel is non-zero, do not go below 1 (8-bit). Otherwise, the HDR will be clamped to 0 (since 0 times anything will be 0). This can often cause severe artifacts or hue rotation in the transcoded HDR result. Try testing images with wide gamut color in a smooth gradient to validate success or failure here.
- If you need to rescale the decoded image: merge the base / 100% map BEFORE resizing to something other than native resolution. Resizing those two inputs has shown visible artifacts in a least a couple of different implementations. The order of operations matters (though this is an edge case which would only impact a high frequency HDR edge such as a sunset behind a building).
Troubleshooting HDR display:
If you do not clearly see HDR benefit or have problems with the tests above, please check the following:
- For the latest and more comprehensive info, see HDR Setup & Troubleshooting.
- To view HDR, you need support for in the display, software, and the content. You need:
- HDR content (plenty on this page)
- You likely need to enable HDR mode in the operating system (Apple displays support by default)
- Do not use a custom ICC profile (HDR will clip as there is no standard yet, see the setup page for more info on calibration / profiling).
- an HDR-compatible monitor supporting a peak brightness of at least 400 nits and the brightness must not be set to the maximum if it does not offer >600 nits
- Software which supports HDR and the file format of your image:
- Nearly all browsers support HDR under the latest version (FireFox is notable, and Safari support comes in v26).
- Win11 has better support than Win10 (required for HDR in Photoshop and AVIF)
- Apple Photos, Camera, iMessage, Preview, and QuickLook have support (includes ISO JPG gain map, HDR AVIF)
- Tools like Windows Explorer do not yet have support.
- If your monitor’s brightness is set too high, it may no longer show HDR benefits even if it is an HDR monitor. For example the 400 nits peak brightness of the 2020 M1 MacBook Air won’t show benefit at full brightness (HDR headroom will be reported as 0 in the tests above), whereas the 1600 nit peak brightness on the 2020 M1 MacBook Pro will still show significant HDR headroom.
- If you are using a TV and see that your mouse moves slowly, this is because the TV is doing some processing and therefore creating a delay. Try setting the TV to gaming mode or turning off features which may cause lag.
- If the images look extremely dark, your browser is not rendering them correctly (FireFox currently does this).
- Make sure your operating system is set to optimize for the correct monitor if you have multiple. If viewing a website mirrored on a mix of monitors, the display is optimized for only one display when many are mirrored (so you may see clipped HDR content on a mirrored SDR monitor, for example).
- If you are unsure what HDR should look like, try viewing this page with Google Chrome on an M1 MacBook Pro. It can be hard to troubleshoot when you don’t know what you should expect.
- If you are able to pass test #1 above (confirmed headroom), but the display is clipping to SDR, you may have a conflict with custom profiles or 3rd-party software. See the section on profiles / calibration above.
- If you are using Windows:
- Right-click the desktop to view display settings, go to the HDR section and make sure the HDR toggle is on. If you do not see a toggle, then you need to alter some settings or may not have proper hardware. In the HDR settings (you can click the arrow at the far right of that line), you need to see Display capabilities / “Use HDR” says “Supported”. The toggle is not shown when this value is reported as not supported.
- Note that the shortcut to toggle “Use HDR” on/off is <Win><alt>-B
- If you have set “duplicate these displays” to mirror screens, there is no way to choose a specific screen to optimize for (unlike MacOS) and the lowest common denominator will limit you. If one of the screens is not HDR, then you see see display capabilities reported as “not supported”. You should either switch to “Extend these Displays” or “Show only on ###” (and select the monitor number for your HDR display).
- If you cannot toggle “HDR” on (it keeps switching back off), check your screen refresh rate (in System / Display / Advanced Display). Try using a lower rate like 30 or 60 Hz. Higher refresh rates may not be supported with HDR by your ports / cables / drivers / video card.
- You can look under System / Display / Advanced Display to see the reported “Peak brightness” (I’ve seen this reported inaccurately in one case – a 250 nits screen report itself as 1499, and suspect this may cause other problems with HDR editing or at least the reported HDR headroom).
- In Advanced Display, a properly configured HDR monitor should list the color space as “High Dynamic Range (HDR)”. The bit depth may show as 8-bit, so don’t worry if you don’t see 10 or 12 (though higher bit depth is ideal to avoid banding in the display).
- Note that in Advanced Display you may find an “HDR certification” listed. Most valid HDR displays currently say “not found”, so having a negative result here really doesn’t tell you anything.
- Watch out for external HDMI displays. I’ve seen some awful results (such as very light SDR shadows that look washed out). If the SDR content looks bad, the HDR content certainly will.
- Check that you don’t have low battery power, which can turn off HDR features. Or go to System / Power & Batter / Battery Saver and turn off “lower screen brightness when using battery saver.
- If the shadows of the HDR content looks substantially darker than the corresponding SDR and you’re on Windows, go to System / Display / HDR and make sure “SDR content brightness” is between 0 and 50. On less capable displays (such as 400 nits), this slider can make a huge difference. Test #8 above will generally show 0 or very little headroom if this is an issue.
- If you use the “Windows HDR calibration” app (from the Windows app store), you’ll see a dropdown for profiles you’ve created under System / Display / Brightness & Color / Color Profile. These profiles use the MHC2 and lumi tags in the ICC profile and will affect HDR headroom and the brightness of SDR content. I saw the headroom of my external monitor change from a correct 3 stops to 7 stops after calibration. I’m not sure using tool this is beneficial / accurate for photography, but encourage you to try for yourself. But if you do try it, be aware that you’ll need to manually remove the profile if you won’t want to go back to the default/factory preset. The profile you create will be placed in C:\Windows\System32\spool\
drivers\color. You can delete (or just move) any unwanted profiles. Then to refresh your options, go into “Use HDR” and back out to refresh the list. - MS guide for HDR: Getting started
- Be wary of in-store displays.
- I’ve seen some with horrendous color in Windows computers in a store due to improper setup (I’m not quite sure why). This affected SDR JPGs as well as the HDR images, so if the reference JPG looks bad you should assume the system needs calibration or other changes to display content properly.
- Be sure to check details on a manufacturer website because there is a lot of bad info out there (most people just don’t know about HDR yet). I had several sales guys at a large store tell me they only had 3 HDR displays on the floor, but then I found at least 10 in the store. I also found a 1000 nits monitor with a tag saying it only offered 250.
- See my FREE HDR e-book for more details, especially if you’re trying to use a TV as an HDR monitor.
Acknowledgements
I would like thank and acknowledge the numerous experts I’ve collaborated with at Adobe, Google, Apple, Netflix, Cloudinary, and other photographers for their support developing this HDR material.
HDR image gallery (with sliders)
This section is a duplicate of the gallery above. The setup I use for the sliders has a bug this won’t display consistently. So this area is just for testing and debugging.
Click and drag the vertical slider on these images to compare before and after converting to HDR. All HDR images here were derived from existing SDR images, and could potentially be further enhanced with editing for HDR from the start. Use the slider to compare before and after. If the image on the right isn’t clearly brighter and better looking (or won’t display at all), see the tests and troubleshooting sections below to see what you’re missing.