There seems to be a fair bit of interest and confusion around the idea of 16-bit luminosity masks, so I thought I’d do a head to head comparison to show how much of a difference it makes. But first, a little background.
What do “8-bit” and “16-bit” mean?
All digital images are is data. In computer speak, this is data is described in “bits”, or 1s and 0s, for every single pixel in the image. If you had a single bit, then all that data would be able to describe would be white or black. If you had 2 bits, you could add a couple shades of gray, but you still wouldn’t have a very pretty picture. If you get to 8-bits, things start to look pretty good. Actually, very good. The JPG images you see on the internet are 8-bit images (technically, they have 8 bits of red, 8 bits of green, and 8 bits of blue). The vast majority of computer monitors display data in 8-bits (there are some top of the line monitors that now display 10-bits, which is often marketed as >1 billion colors). It’s also important to note that every extra bit makes the digital file larger.
So if you can only display 8-bits and a 16-bit file is dramatically larger, why would anyone care about 16-bit files? Well, aside from the possibility that you have a 10-bit display now or the likelihood you’ll have one in the future, it turns out that editing in 16-bits produces a much better final image, even if you save that final image as 8-bits when you are done (which is what you are doing when you save as a JPG). Without getting into technical details, every edit you make in 8-bits causes a little loss of quality, or loss of subtlety. One place where this issue is likely to show up is in gradients (such as the sky), where you’ll start to see “banding”, or big jumps from one color to another (ie, you loose that smooth quality).
Why should we care about bits when using luminosity masks?
So we already know that 16-bits are better for editing and we can just use luminosity masks on 16-bit images, right? Unfortunately, no. While Photoshop supports 16-bit layers and layer masks, it only supports 8-bit selections. Since manual creation of luminosity masks and most scripts/actions work by repeatedly loading channels as selections are effectively downgraded to 8-bit data. For a simple mask such as L1 (or the first lights mask), this is pretty much imperceptible. But for a complex mask such as L5 (a highly selective fifth-order lights mask), the mask is visibly degraded. The reason is very simple, the mask has been created by intersecting an 8-bit mask five times, so the loss of quality is greatly increased.
There are now a few panels (including my Lumenzia panel) that create luminosity masks with a 16-bit process. So this is a huge deal and we should all be excited that these newer panels can help us make better images, right? Well, to be frank, no. There is almost no real scenario where this theoretical advantage actually makes a noticeable difference in the final image. The reason is very simple, even though a 16-bit mask might look better than an 8-bit mask (and it does look better), that mask isn’t the image – it is only used to control the degree to which some layer impacts the image. The underlying subtlety of the image dominates the image, not tiny little variations in the degree to which the mask is adjusting the image.
Confused? Let me demonstrate with the following image.
This is a great test case, as the sky here is a smooth gradient that could stand to use a decent amount of adjustment (the more extreme we adjust the data, the more likely any 8-bit artifact would show up in the final image). The source image was a RAW image loaded into Photoshop as a 16-bit smart object.

To help visualize the issue, I’m going to zoom in on a portion of the sky where we are likely to see banding.

First, I created an L5 mask by using my free luminosity masking panel, which uses an 8-bit process. There is a significant amount of banding visible in this mask. In fact, it looks pretty awful.

Next, I created an L5 mask with Lumenzia (which uses a 16-bit process to create masks). There is almost no banding visible in this mask, the quality is indistinguishable from the source.

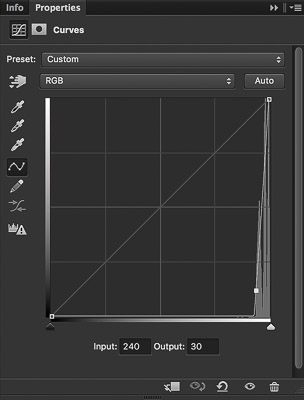
So we can see a substantial difference between the 8-bit and 16-bit mask, but lets see what happens when we actually use the mask (afterall, we aren’t trying to make masks, we’re trying to make great images). I used the following adjustment curve on both images. It’s the sort of significant, but realistic, adjustment that I routinely make when working with Luminosity masks.

But when we compare the image that results from the 8-bit and 16-bit masks, there is no visible difference in quality. Remember, the mask is just controlling how much the curve is applied, so the minor banding/blocking of the 8-bit mask produces results that are just as good as the 16-bit mask here.


Ok, but what if we want to take it further? Personally, I wouldn’t further adjust this single exposure sky through a curve, because it’s too big of a move and you’ll see the sky start to turn purple and strange in the examples below. My personal approach would be to blend a 2nd exposure via a luminosity mask or blend a blue solid color adjustment layer via a luminosity mask (either of which would be a less extreme adjustment of the data and even less noticeable than the example above). But just to see what happens, let’s look at the results we get when we use the extreme adjustment curve below.
With this extreme adjustment, we do start to see banding in the final image (particularly on the far right, and to a lesser extent in the soft clouds on the left). So, it is possible to see a difference between and 8-bit and a 16-bit mask if you make extreme adjustments of the data (note that blending multiple exposures is actually not an extreme adjustment, as you are just making the layers visible through a mask, not changing the actual data in the layers through some adjustment such as this curve). I doubt you will ever see a difference on a real image regardless of using 8 or 16-bit masks.


At this point, you might ask “what about shadows, don’t you know that shadows have less data than highlights?” It is true that highlights contain more data than shadows in digital files (due to technical details in the way the data is encoded). That’s why there’s a benefit (with most cameras) to “expose to the right”, or to use the brightest exposure you can without clipping the highlights. That’s also why shadows show more noise than highlights. (And noise is also where you’d be more likely to see 8-bit issues, as smooth gradients aren’t nearly as common in shadow areas). But the same principles I’ve demonstrated above still apply – the quality of the mask only matters so much in the final image. The natural feathered nature of a luminosity mask ranging from white to black matters a lot, but the subtle variations from one shade of gray to the next in a luminosity mask really isn’t that important.
An alternative solution
To the extend that we care, we can see that 16-bit luminosity masks can avoid banding. But is this the only option? No. Adding noise can actually enhance an image in many situations (here’s an unrelated example of when adding noise can help mask problems created by stretching a background). How would noise help with banding? Banding is only obvious where there is a clear transition line. By adding random noise to the mask (either all of the mask or just the area where we have banding), will create subtle variation in the blended image that looks great and doesn’t show any banding. Even if you have a 16-bit luminosity masking tool, this is a helpful trick to have up your sleeve if you ever encounter a photo that has banding in the data (since a 16-bit workflow will only preserve what you have, it won’t help undo an existing problem).
To add noise to your mask:
- You may wish to <alt/option>-click the mask so you can see it in the first step
- Choose: Filter/Noise/Add Noise: Change distribution to “Gaussian” and set the amount to a value that is enough to obscure the banding. 5-10% is probably a good choice. You can overdo it a little here, since we’ll dial it back in the next step.
- You may wish to <alt/option>-click the mask again so that you can see the real image for the final adjustment
- Choose: Edit/Fade Add Noise: Set mode to “overlay” or “soft light”, and dial back the opacity as needed.
So, to sum up the answers to our original questions:
- Should we edit images in 16-bits (or more)? Yes, definitely. I personally use 16-bit TIFs for nearly all my Photoshop work. Even if your source image is 8-bit, working in 16-bit can help prevent further loss of quality if you need to make significant adjustments.
- Should we care about 16-bit luminosity masks? No, the chances that we would see a difference are extremely low. However, if you just feel better knowing you’re getting smooth masks, Lumenzia has you covered already. And you can always use the technique I describe above to add noise to a mask that shows banding.
A note for any Lumenzia user who wants to do this same test on their own images: Lumenzia’s default masking is designed to provide a more optimal selection of saturated colors than what you would get with a channels-based approach (channels tend to somewhat ignore bright, saturated colors that we would typically perceive as being “light”). So Lumenzia’s default masks would not be quite so directly comparable on a color image. However, Lumenzia also offers a “traditional” mode which offers an identical color response as a channels-based approach. To create these “traditional” masks in Lumenzia, simply hold the <ctrl/cmd> key while clicking on the mask of interest (you’ll see a pixel layer created instead of a BW adjustment layer in Lumenzia’s orange preview layers).

