Lightroom now has luminosity masks?
There’s been some buzz the past few weeks around the new range masking feature in Adobe Camera RAW. While I haven’t seen Adobe refer to it as “luminosity masking” a few others have, and it seems to be causing some confusion. Is it a great new feature? Yes! Does it replace the need for luminosity masking in Photoshop? No, not even close. But that wasn’t the intent, and it’s a nice addition to Lightroom. Let me explain…
The general idea of “luminosity masking” is that you can create a mask based on the luminosity values in the image. There is no real definition of the term, but most users of this technique would probably include masks/selections based on luminosity and other pixel values (such as saturation or color). Beyond that, there’s probably no real agreement on what is required to be considered “luminosity masking”, and that’s where the confusion sets in. In a way, Lightroom always had luminosity masks. When you adjust the shadows, you are essentially adjusting exposure for a certain range of tones.
The range of capabilities within that vague definition is massive. Don’t get confused by the name. Comparing different “luminosity masking” tools based on that generic description is like comparing a paper airplane to a jet plane because they are both “planes”. Or in this case of luminosity masking in Lightroom vs Photoshop, it would be more appropriate to compare an SUV vs a sports car. Like an SUV, luminosity masks in Photoshop are built to do almost anything, but they may not be the fastest way to get you to every destination. And a bit like a sports car, luminosity masks in Lightroom are only built to do a few things, but they can get you there very fast. If you only need to transport two people. With no luggage. And your destination is on a smooth asphalt road.
One isn’t necessarily better than the other, both approaches have merits. Just like my iPhone is very convenient, while my Nikon D850 usually takes better pictures – and I’m glad I have both of them. So what exactly is new in Lightroom?
“Range Masks” in Lightroom
The new “range masks” are an option at the bottom of the brush, radial filter, and graduated filters. It limits the effect you apply to certain colors or luminance ranges. In a nutshell, it isn’t adding new tools, instead it lets you protect certain areas from being damaged by the tools you already had in Lightroom. It makes the old tools more precise.
There are two types of range masks. The luminance range tool is lot like BlendIf in Photoshop (but with less control over the sliders). The color selection is like a simplified version of the “color range” tool in Photoshop. Either can be great for more advanced application of certain RAW tools in Lightroom. For example, you can now apply a warm yellow color to the highlights in the clouds with a gradient filter. Or apply clarity to midtones in your subject with a radial filter or brush. That’s a great way to quickly apply those RAW edits more precisely. For photos were almost good enough in Lightroom before, you might be able to simplify your work in Photoshop or skip it entirely. However, there are some huge differences that still make Photoshop the best tool for highest quality results.

How to use “Range Masks”
If you want to use a range mask globally across the image, you’ll need to hack it a bit. Create a gradient filter that is completely off the edge of the image. That will cause the gradient to affect the entire image. Since range mask works only with adjustments, you cannot use them with Lightroom controls like curves, split-toning, complex sharpening or noise reduction, etc.
Otherwise, look at the range mask as a way to erase part of a brush, gradient, or radial filter in Lightroom. You can protect pixels based on their luminosity or color. Decide which is most appropriate, as you can use only one or the other for a given filter.
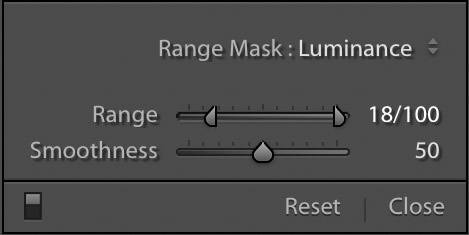
For luminance range masks, bring in the shadow and/or highlight slider until you best remove the effect from the pixels you wish to protect. Then move the “smoothness” slider to tweak the results. Watch out for detail and texture, as it is easy to flatten details with range masks. Consider when using the eraser may be a better approach to remove a specific area from the adjustment, rather than using aggressive range settings across the entire adjustment.
For color range masks, use the picker to select a target color. To select a range of colors, click and drag. To select multiple colors, <shift>-click them. After selecting the color to protect, use the “amount” slider to tweak the result (amount is the tolerance). The logic here is the opposite of the luminance tool. Instead of declaring which pixels to protect, you are actively selecting the colors you want to adjust. So if you click on a blue object, you will only be adjusting pixels with a similar blue value.
So how are Lightroom and Photoshop different with regards to “luminosity masks”?
There is not a single feature/adjustment using range masks in Lightroom that cannot be duplicated in Photoshop. But the reverse is not true. Photoshop can do a lot of things with “luminosity masks” that Lightroom cannot.
What do you still need Photoshop for? The list is very long…
- Luminosity selections. This is the most important, as it is the foundation of creating high-quality masks used for:
- Exposure blending. Lightroom can do HDR, but nothing comes close to the quality of manually blended exposures for creating dramatic sunsets and other high contrast scenes.
- Dodging and burning
- And any thing else that requires precise local control.
- Better organization and visualization. Photoshop lets you clearly see the masks and name layers. A typical image edited with luminosity masks might have anywhere from 5 to 20 or more adjustments. Good luck navigating Lightroom when you get more than a few pins. And you’ll have to click through the three different adjustment types (gradient, radial, and brush) to see the pins.
- Advanced custom masks. The range tool in Lightroom is the equivalent of less-capable BlendIf and Color Range tools. Luminosity masks in Photoshop offer:
- Much greater control over tonal-selection
- Control over feathering of the mask. The entire premise of luminosity masks is that they create natural transitions. Those transitions are based on the feathering of the mask. Lightroom’s tools are pretty simple, even BlendIf in Photoshop offers more (with its split sliders).
- Advanced local targeting. In Photoshop, you can add a group masks and paint through selections to target a mask. Lightroom just allows you to knock-out part of an adjustment created with a brush or gradient.
- More advanced color-selection (though Lightroom’s Range Mask does pretty well in this regard)
- Saturation masks
- Work with layers of any kind. This includes:
- Adjustment layers that support features that cannot be applied locally in Lightroom, including: curves, vibrance, a much better HSL tool (without the banding often found in Lightroom), specialized color effects (selective color, advanced color balance, photo filter, lookup tables)
- Filters (like Smart Sharpen), complex effects (like Orton Effect), or 3rd party plugins (such as Nik Color Efex Pro)
- Advanced image blending, such as focus stacking, perspective blending, or time blending (such as adding city lights to a sunset exposure). The list could go on quite a ways here.
- Work with advanced Photoshop tools, including: cloning, healing, and content aware fill. Luminosity masks can be a great way to target these tools as well, such as for repairing blown-out highlights with the clone stamp.
As you can see from this list (which is by no means exhaustive), there are an enormous number of reasons why Photoshop is still relevant. The new range masks in Lightroom are a great way to quickly make some refinements to its legacy local adjustment tools (gradient, radial, and brush), but they are not intended to replace the need for luminosity masks or Photoshop. They are simply intended to help you use local adjustments more precisely in Lightroom.
So go check out the new “range masking” feature in Lightroom, it truly is a great new tool. Just don’t get confused into thinking that it compares to luminosity masks in Photoshop. Or that the label “luminosity masks” makes anything really comparable. There are a lot of great editing tools these days, but there is a very good reason why Photoshop is the most universally used tool for high-quality post-processing.
In the end, most Lightroom users have access to Photoshop, so it’s probably more a question of how far you should push Lightroom until you use Photoshop. That depends on your artistic goals and the amount of time you’re willing to spend learning Photoshop. As has always been the case, Photoshop the potential to do much more, and Lightroom offers a faster and easier path to certain results.

