Version 8 of the Lumenzia luminosity masking panel for Photoshop is now available as a free upgrade for all customers. This is by far the the most ambitious update ever, with over 350 new features, updates, and bug fixes in total. It’s never been easier to create the perfect luminosity mask or selection to make beautiful photos. And the updates have been designed to avoid changing any existing workflows, so you can jump right in. Be sure to see the highlights and initial demo videos below (more to come in the months ahead).
Lumenzia v8 is featured extensively in my new Dodging & Burning Master Course. This comprehensive course goes well beyond simple “dodging and burning” to help you learn how to add dimensionality, movement, and depth to your images through a deep understanding of artistic principles and novel techniques to apply them.
My Exposure Blending Master Course also includes a new section to highlight ways you can take advantage of new features in v8. And at the same time, the panel design and workflow has been carefully designed so that you don’t have to change any of the workflows you’ve learned. You get new capabilities without a new learning curve.
New features in Lumenzia v8 include:
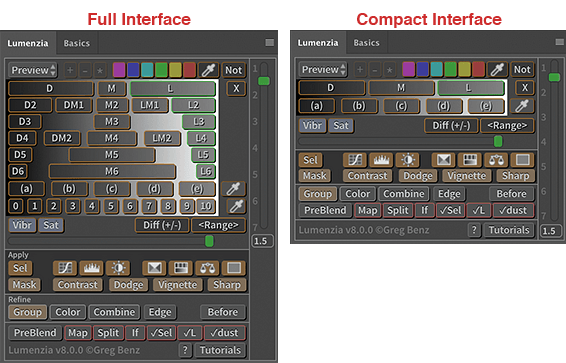
- Compact interface mode. Will the new slider capabilities in v8, you can now hide 34 button in Lumenzia to simplify the interface and save substantial space on your screen, while retaining the full capabilities of Lumenzia. This reduces the height of the panel by 35%, which is enough to show approximately 3 more layers in the layers panel on a typical laptop if you doc Lumenzia above layers like I do in my videos.**
- Dramatically faster performance! Panel performance has been optimized in numerous ways, especially when using previews and the sliders.
- New slider capabilities, including**:
- Sliders for BlendIf! You can now create highly customized BlendIf masks quickly and without opening the layer styles dialog in Photoshop. This allows you to target intermediate values (such as L1.5), as well as a greater range with options such as L0 and L7.
- Slider for Smart Filter Mask feathering.
- Slider for Mask Density. This helps allow you to easily bleed adjustments through.
- <ctrl/cmd>-click “Mask” to convert any Lumenzia preview into a layer. This gives you new ways to create black and white art, as well as use blending modes for creative effects.
- Wider value slider for more precise control.
- Continuous full-screen previews when adjusting feather via precision slider.
- Workflow enhancements (double-click to reset feather/density, more text input options, improved tooltips, etc).
- Improved Dodge and Burn:
- Luminosity-only (color neutral) gray or transparent dodge/burn layers! This makes it easy to dodge and burn on a single layer using familiar techniques while working on portraits or other images that where color shifts should be avoided.
- Edit “Dodge” visualizations. This makes it much easier to create precise / high-quality results, as you can easily ensure that brush strokes are consistent and do not spill outside intended areas.
- Revise the brightness/color of your dodging/burning paint at any time. This makes it incredibly easy to revise your results, especially when trying to find the perfect color to mix for desired results.
- Painting sunlight into bright highlights with the new “Extreme” blend mode. This helps easily add color to near-white pixels.
- Improved workflow for visualization and working with multiple dodge/burn layers. You now have a single interface to create visualizations or new dodge/burn layers, keep the active selection when visualizing, visualize dodge layers using BlendIf, etc.
- Improved selections:
- “Sel” has been updated to allow you to visualize saved selections before loading or combining them. [Note: this feature is not available in all versions of Photoshop].
- “Sel” can now load saved selections to a layer mask.
- “Sel” can now add, subtract, and intersect saved selections with a layer mask.
- “Color” can now be used to refine an active selection. For example, you may use this to target highlights in the blue sky (without adjusting the white highlights of a snow-capped mountain).
- Use Adobe Camera RAW (ACR) to modify the preview when creating a selection (<ctrl/cmd>-click “✓Sel” while viewing the orange preview layers).
- Expand and feather selections as you create them.
- Use any channel when loading or combining selections.
- Improved BlendIf support:
- Convert any BlendIf to a layer mask (for both “underlying” or “this” types of BlendIf). This allows for custom refinement, as well as being an excellent way to help better understand how BlendIf works. This includes support for BlendIfs targeting underlying layers, this layer, and even color BlendIfs created with Lumenzia.
- <shift>-clicking “Vignette” will automatically add a BlendIf for advanced control and results.
- Apply or remove BlendIf from multiple layers simultaneously.
- Multi-channel BlendIf. This is helpful for advanced targeting (such as using L2 Red with Not L2 Blue to target the warm colors in the sunset for increased saturation, without adding more blue to the sky).
- Improved sharpening:
- Automatically generate edge/lights masks to avoid sharpening noise.
- Improved and simplified options to avoid sharpening halos along high contrast edges.
- Enhanced BlendIf masks to help avoid clipping highlights and shadows, especially loss of color in highlights.
- Improved High Pass sharpening can now avoid color fringing (sharpen luminosity only) and offers gray visualization to help choose the ideal radius.
- Edge and Surface masks via “Edge”:
- Create an edge mask from a Quick Selection or luminosity selection to help target and fix halos!
- Automatically create edge or surface selections and masks for better targeting of sharpening or noise reduction.
- Create beautiful line art with one click.
- Workflow enhancements, such as:
- Use Content-Aware Fill on Smart Objects.
- add more layers to an existing stack via “PreBlend”.
- create an independent Smart Object by <shift>-clicking “PreBlend”.
- use “Split” when multiple documents are open.
- improved tooltip appearance and performance.
- and many more enhancements to subtly improve the speed and experience of luminosity masking.
- These are just some of the highlights. There are over 350 new features, updates, and bug fixes in all.
** Note for CS6 users: While Lumenzia v8 includes hundreds of enhancements for CS6, several new interface updates require CC (such as compact interface mode and BlendIf sliders). This is unfortunately due to limitations of the >7-year old CS6 platform. Differences are primarily in appearance or workflow. Functional capabilities generally remain nearly the same. And of course, you automatically have access to the CC panel if you ever update to Photoshop CC. See the release notes for full details.
Existing customers can download any time via the links on this page (which is also linked from the bottom of all my newsletters).

