- 1.1 Quality = RAW for best quality.
- 1.2 Bracket Settings: -0+ order, which I find makes it much easier to group brackets when post-processing.
- 1.2 Bracket Settings: 2 sec self-timer when coupled with Drive Mode = Continuous Bracket. Note that the delay only applies to the first image (which helps get rid of any motion you may cause by manually pressing the shutter button), but there are no options to delay the subsequent frames in the bracket for continuous bracketing. In my quick and unscientific testing, I did not see loss of detail due to vibration from the rear shutter. I personally would not hesitate at this point to use continuous bracketing.
- However, if you want to eliminate all camera-induced vibration (especially when shooting long lenses), I recommend using 0 sec self-timer coupled with Drive Mode = Single Bracket and the Neweer shutter remote release. 2 second delay is still ok here; it just wastes time if you’re using a remote release. Note that in reality, this is no more cumbersome than shooting high-quality brackets with the D810, which also requires a remote release and single shot (because mirror lockup mode is the only way to get electronic front curtain shutter on the D810; electronic front curtain is not used on the D810 when using exposure delay).
- Note that certain drive modes (such as continuous) can disable the “bulb” timer option. If you cannot see “bulb” next to 30s, be sure to check drive mode (and 2.5 silent shooting).
- 1.6 Long Exposure Noise Reduction = Off. 30 second exposures are noisy, so I may use this occasionally, but I can rarely afford the double length exposures when shooting in quickly changing sunset/sunrise light. Ideally I would program this into the custom functions menu, but that is not an option.
- 1.8 Color Space = sRGB, to provide more accurate histogram/display in camera (but I convert my RAW images as Adobe RGB or ProPhoto RGB in Lightroom, which is not adversely affected by this setting).
- 2.5 Silent Shooting = Off most of the time because this causes loss of 1 stop of dynamic range.
- 1.5 DRO (dynamic range optimization) = Off because I can do a better job when post-processing.
- Additionally, I put several options that I tend to adjust into my custom function menu for quick access. The items above almost never change for me.
For exposures longer than 30 seconds, you’ll need to use the bulb timer in manual mode. There are many options on Amazon; I’ver personally ordered this intervalometer from Neweer that cost $21. It plugs into the micro-USB multi-function port on the left side of the camera, and you can set it to take exposures of any specific duration (which is much easier than trying to time bulb exposures manually). Unfortunately, the cover for this port also exposes the camera’s HDMI port, so you may wish to consider how you should protect that open slot if you are near rain, salt water spray, etc. I plan to cut off the end of an HDMI cable and use that as a protective plug.
- 2.5 AF w/ shutter = Off. I don’t want the camera to refocus every time I take a picture. This is a recipe for missed shots, and makes it harder to pre-focus. Instead, I set the custom buttons below for “back buttton” focus. This approach requires some patience as you learn to always focus with the back button (you will forget to focus some shots), but dramatically increases your speed and the number of properly focused shots once you get the hang of it.
- 2.2 Peaking Color = Yellow. This is easy for me to see, as I rarely focus on yellow objects (but red tones are more common in my landscapes).
- 2.3 Pre-AF = Off. This avoids AF adjustments that defeat the purpose of back-button focusing.
- 2.4 Priority in AFS/C = AF (be in focus)
- 2.5 e-Front Curtain Shutter = On. This eliminates internal vibration caused by shutter movement to create sharper images and is one of the most significant enhancements in the a7Rii. I strongly recommend leaving it on whenever possible. However, shen shooting faster than 1/1000s (ie, large apertures in bright light), you may wish to turn this off to ensure even exposures. You should also turn off when using 3rd party lenses. Ideally, these exceptions would be automated by the camera or this setting could be put into the custom functions menu – just know that it’s here in case you need to turn it off because of uneven exposures across the frame.
- Additionally, I put several options that I tend to adjust into my custom function menu for quick access. The items above almost never change for me.
I use the custom buttons for things I would need to be able to change quickly, and the function menu as a holding area for all other settings. My goal is to never dive into the camera menus again after setting up.
- Center Button = Standard (this lets you click the center of the wheel to quickly made changes to the focus points).
- AF/MF Button = AF On (as someone who has shot many weddings and small kids, there is no better way to ensure you always get the shot with moving subjects than to get comfortable with “back button” focusing).
- AEL Button =AF On (I always want that back button to focus)
- C1 = Focus Area.
- C2 = Focus Mode. AF-C works really well, and I tend to use it quite a bit. AF-S is great for low light. And I recommend manual when on a tripod and you have the luxury of zooming in to check critical focus.
- C3 = Eye AF (I use this in the same way I use my programmed AF-ON button, but this is specifically designed to focus on people’s eyes or faces)
- C4 = Deactivate Monitor (while this doesn’t actually turn off the monitor, it stops displaying the live display, which I find desirable when I’m shooting the same composition over and over on a tripod).
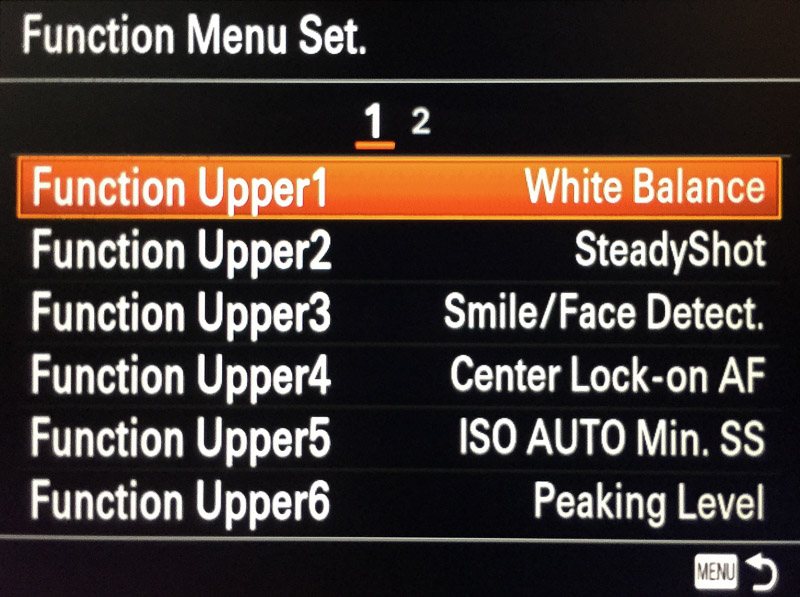
I set my function menu to let me quickly adjust focus, exposure, and video settings. I’ve ordered them in groups of related items to keep things quick and simple to find.
- White Balance = I personally use 5600K most of the time. This gives me consistent daylight-balanced color which can easily be corrected in Lightroom, but I will sometimes use cloudy or tungsten white balance when appropriate. I often shoot with a grey card to correct white balance in Lightroom. However, if you want the most accurate histogram while shooting, then you should do your best to get good white balance in camera (as the histogram is built from an internal JPG and depends on white balance). This can have a particularly large impact on the color channel histograms.
- Steady Shot = On (when shooting handheld) or Off (on a tripod, where it softens the image, reduces battery life, and reportedly contributes to overheating with 4k video)
- Smile / Face Detect = Off for landscapes. I use C3 programmed to Eye Focus when I want critical focus on closeups, or instead of my AF-ON button when I’m taking one-off shots of people. I turn Face Detect on if I’m shooting lots of people, such as at an event.
- Center Lock-on AF
- ISO Auto Minimum SS = “Fast” for best sharpness in landscapes, “Slow” or “Slower” when using stabilization and am not worried about maximizing all 42 megapixels, or set to a specific value for shooting fast subjects. Auto-ISO function can help give you the lowest possible ISO, while still ensuring the shutter is fast enough for a sharp image.
- Peaking Level = Mid most of the time, but it is helpful to tweak the amount of focus peaking assistance for manual focusing.
Lower row:
- Metering Mode = Multi most of the time, but I like Spot for portraits (especially when backlit, which I do often to keep the face in shade).
- Zebra = 100+ This puts stripes on the LCD preview to show you any blown highlights, which I find to be extremely helpful, in conjunction with the histogram, to determine proper exposure. However, I might turn this off for back-lit portraits (when I’m intentionally blowing out a good portion of the frame.
- Silent Shooting = Off. While I want this off to keep maximum image quality (and the shutter sound is ideal for shooting portraits), I do occasionally want to be more subtle.
- Audio Rec Level to adjust for best sound when shooting videos (which should set peak sound just below clipping).
- Audio Level Display = On most of the time.
- Picture Profile = Off (to see stills in proper color on LCD, even though this does not impact the RAW file) or P7 (video for sLOG2 to capture more detail and color for post-processing)
- 1.1 Grid Lines = Rule of 3rds (I personally tend to compose using the golden ratio, but the 3rd lines are also a good reference for that as well).
- 1.3 Flash Mode = Rear Curtain. If I need to minimize the duration of a shot at night, I’ll typically switch to manual exposure mode, rather than turning off the slow sync. If I’m shooting wireless, I’ll be using my PocketWizard Plus 3‘s.
- 1.4 AF Illuminator = Off (chances are your lens hood blocks it, and the orange light is annoying – consider manual focus or a hand held light if focus is challenging)
- 1.5 Display Rotation = Auto (see vertical images)
- 2.2 DESP Button = histogram and level for both Finder and Monitor. This lets me quickly check that I’m exposing properly and shooting with a level horizon. I don’t see value in the other options (don’t need the clean version as the histogram doesn’t impact composition, and you can click the display button to show other camera settings if needed).
- 2.4 Release w/o lens / card = Off to ensure I don’t forget to put in a memory card or accidentally touch the shutter while cleaning with the sensor exposed.
- 2.7 Lens Comp: Shading Comp = Off, Do this with vignette adjustment in LightRoom, etc as this apparently gets baked into the RAW file.
- 2.7 Lens Comp: Chro. Aber. Comp. = Off. Do this with chromatic aberration compensation in LightRoom, etc as this apparently gets baked into the RAW file.
- 3.1 Airplane Mode = On (save battery). The only time I want to use WiFi is to send images to my phone for immediate sharing.
- 6.1 Audio Signals = Off (don’t need all the distracting beeps, especially when I’m using the self timer for brackets.)
- 1.2 File Format = XAVC 4k for 4k resolution or XAVC HD for highest quality HD. However, not all users will have the software required to play/edit these files and you’ll need to use a 64+ GB SDXC Class 10 memory card. Final Cut Pro X users may need to update to be able to edit XAVC files. AVCHD is a good (high def) option to work with many video players, though MP4 probably offers the most compatibility (while giving up a little more quality). Ideally, I would put file format into the custom function menu, but that is not an option.
- Setting Picture Profile to PP7 will record using “sLOG2” to capture maximum dynamic range to keep maximum detail in the highlights and shadows. Shooting with overexposure (+2ev) and using a LUT (look-up table) in post-processing may help achieve best results when working with sLOG2. See Alister Chapman’s excellent post on sLOG2 with the a7S for more detail on the key concepts. And check out DaVinci Resolve (the free version is pretty powerful for color grading sLOG2 files).
If you’re looking for more information on these or other settings, here are links to Sony’s “how to use” help guide and the manual for the a7Rii.

