Lowest price ever for Black Friday! Save $400 off ASUS PA32UCDM.
ASUS just launched a very exciting new HDR monitor: the ASUS PA32UCDM. This level of performance has never before been offered at this price point.
This monitor offers:
- 1000-nits peak brightness to support up to 3.3 stops of additional dynamic range over standard monitors (certified DisplayHDR™ True Black 400)
- OLED for perfect blacks
- ∆E < 1 and hardware calibration for high accuracy (this is critical for HDR, as there is no standard yet to create ICC profiles for HDR display)
- 99% P3 coverage
- 4k resolution
- Connect your laptop with a single cable: 96W USB-C power delivery and three downstream ports (Thunderbolt 4, USB 3.2 Gen 2 Type-C, and USB 3.2 Gen 2 Type-A)
- Dolby Vision, HDR10, and HLG support
- It also offers up to 240Hz refresh rates and 0.1ms response times for those of you interested in gaming.
- All for only $1,699-$1,899 (comparable alternatives to this monitor are typically $2-$3k).
There is nothing else like this currently on the market. Other OLED monitors either lack the brightness or the color accuracy for HDR. As an OLED, it will naturally offer superior shadow detail compared to mini-LED alternatives. And this is the lowest price point I’ve seen for a monitor offering such a great level of HDR support.
[Disclosure: This post contains affiliate links. I rarely endorse other products and only do when I think you would thoroughly enjoy them. By purchasing through these links, you are helping to support the creation of my tutorials at no cost to you.]
Conclusions: Who should buy this OLED monitor and what are the best alternatives?
This article goes into significant detail on performance, setup, calibration, and comparisons. To help make the bottom line clear, let’s start with the conclusions.
The ASUS PA32UCDM is an excellent monitor which I can highly recommend***. It fills an important role as a high quality HDR OLED monitor at a price point that bridges the gap between budget HDR and professional mini-LED. It features the ability to calibrate in HDR mode, 1000-nits (up to 3.3 stops HDR headroom), 4k resolution, and overall high quality. Setup is important to achieve these results, so be sure to review the details below if you purchase this monitor.
As with almost any current OLED monitor, the peak nits should not be compared directly to a mini-LED. This display is rated at DisplayHDR 400 as it can only achieve 1000 nits in small percentage of the screen simultaneously. It’s an excellent display, but a 1000 nits mini-LED will have an advantage for working in a bright room or displaying images with a lot of bright pixels. On the flip side, shadow detail is outstanding and achieves perfect blacks which are not possible with today’s mini-LEDs. So this is a monitor which will naturally excel in a darker environment.
The ideal HDR monitor for you depends on your working environment and budget. Here are my recommendations:
- If you work in an environment with controlled lighting or have a ~$1,700k budget: this OLED ASUS PA32UCDM is an excellent choice (budget $200-$300 more if you need to purchase a colorimeter).
- If you work in a bright environment or want a full 4 stops of HDR and have a ~$3k budget: ASUS PA32UCXR mini-LED is ideal (see my review).
- If you use MacOS and money is no object ($6k new), the Pro Display XDR is ideal for its simple setup, 6k resolution, customer support, and absolute silence (no fans). Unless you can find a used one to lower the cost, the first two options offer much better value for most photographers.
- If you have a more limited budget, there are many good alternatives:
- If you are willing to use a 42″ TV as a monitor, the LG C4 is an excellent option for $900 (while inventory lasts, the C5 has no advantages here but the price has increased).
- If you are interested in a 32″ HDR monitor for ~$1k: ASUS PA32UCR-K mini-LED (see my review for caveats and tips on local dimming with this older model, the PA32UCDM is well worth the extra cost for its better image quality).
- The Gigabyte AORUS FO32U2 appears very promising as a 4K, 1000-nits OLED monitor for $800 (I have not had the chance to test it, and it does not support HDR calibration).
- If you have a very tight budget (~$350), the Xioami G Pro 27i offers a 1000-nit, 27″, 2K resolution mini-LED with moderate color accuracy (see my review).
- An external monitor is just one option. All of the 14-16″ M1 and later MacBook Pros include an outstanding 1600 nits mini-LED. See my review of the M4 MacBook Pro. Highly recommended!
- See my full list of recommended HDR monitors for much more detail on the key specs to consider and other great options.
*** Note: Per the comments below, I have received a report suggesting a possible concern connecting this monitor over Thunderbolt to a MacBook Pro. I do not have any data to confirm or refute the reported detail (other than it would seem likely to be very rare if there is a conflict or quality issue with either Apple or ASUS based the information I have seen and general history with these brands). But I think important to at least note it given the seriousness of the question which has been raised. I will update this post if I am able to learn more. If you have any concerns, using the HDMI port would be a way to avoid a power delivery connection between the monitor and computer.
How is the hardware quality?
The PA32UCDM has a nice metal exterior and stand. It looks very attractive. It also feels like a product built to last, though I cannot evaluate quality by testing a single unit for a week. The stand feels solid and offers smooth and precise control over height and tilt (there is no swivel, but you can easily just turn the whole stand to achieve the same result). The ports on the back are clearly marked and much easier to read that previous ASUS models. The controls for the on screen display are easy to find and reach from the front.
Connection options are good. It has 96W charging and passthrough Thunderbolt 4. So you can connect the display and a downstream hub via a single cable. It also has a 1 downstream USB-C and 1 USB-A, which might meet your needs without a dock. For video input, I recommend using the Thunderbolt input, but it also supports HDMI 2.1.
This monitor does have a fan. It is fairly quiet, but definitely audible. Using the Decibel X app on iPhone, I measure 26 dB sound in front of the monitor when turned on and 23 dB when the monitor is off. I hear it if the room is otherwise dead quiet, but cannot hear it at all if I turn on music on my laptop at even a relatively low volume. The fan will often run continuously once the monitor is warm.
The sound quality of the speakers is very basic (like most monitors). The max volume is modest and the sound is limited, but it does offer useful sound. Most people will probably prefer to use external speakers or their laptop audio.
There is no web cam built into the monitor.
Image Quality
Like any OLED, it offers superior shadow detail compared to even the best mini-LED displays. I wouldn’t put too much weight on this, as high end mini-LED displays are excellent at the level needed for editing photos. You can see significantly better detail in extremely dark shadow detail. However, this doesn’t affect many photos and you wouldn’t be able to rely on your audience to see the benefit at this level (either because many may lack OLED or not be viewing in a suitably dark environment to appreciate it). So it’s beautiful and very nice to have, but I place more emphasis on headroom, sustained brightness, and color accuracy than the risk of blooming of shadows in photography.
On MacOS, HDR headroom ranges between 1.9 to 3.3 stops, depending on how high you set the (SDR) brightness slider in System Settings. You’d achieve that maximum when you set SDR brightness for 100 nits. This means that 3 stops is very reasonable in a darker room, but you should only expect 2 stops of support in brighter environments.
One of the key advantages of the ASUS ProArt lineup is its ability to calibrate in the hardware. There is no other option for HDR at this time, as there is no ICC standard for HDR. If you try to use a conventional custom profiling approach, the HDR content will clip (for any monitor on Mac or Windows). Unlike the other ASUS monitors I have reviewed, no colorimeter is included with the monitor and you’ll want to budget an extra $300 for one if that’s important to you and you don’t have one you own or can borrow. I did not find an official list on ASUS’s website, but their calibration software supports Calibrite Display Plus HL (which I own and used for my testing), Calibrite ColorChecker Display Pro, or Calibrite ColorChecker Display Plus.
With its 4k resolution, text is easy to read. I prefer the higher clarity of 6k on my Pro Display XDR, but only slightly. I find this 4k works quite well and have no concerns. Note that I set MacOS scaling to the 2560×1440 equivalent for both monitors.
The display has a glossy finish. There is no matte option for those of you who might work in an environment which may cause reflections.
How does OLED compare to mini-LED?
Actual monitor results are what counts, but there are some key differences between OLED and mini-LED which tend to hold true. In general, OLED excels in dark content and mini-LED excels at bright content. Which is best for you depends heavily on how bright your ambient light is, as well as your goals for HDR headroom.
It is important to remember that the peak brightness of an OLED is not directly comparable to mini-LED. You can see this clearly in the test data above. While this display can truly achieve ~1000 nits, that only applies when a small percentage of the image pixels are fully lit. If you try to show 1,000 nits on just 10% of the screen, you’ll find the actual brightness drops to about 450 nits. By the time you test a 100% window, brightness is down to 240 nits. This is caused by ABL or “automatic brightness limiting” (which nearly all OLEDs currently due to prevent burn in, protect electronics, to achieve energy efficiency targets, etc).
By comparison, many mini-LED displays (such as ASUS’s flagship or Apple’s XDR laptops) can 1,000 nits across 100% of the pixels. These are fundamentally different technologies, and mini-LED is much more capable of high brightness. When you attempt to show too many bright pixels on an OLED, it will tone map to the content down to a brightness range it can handle. You’ll never come close to such dramatic limits in a photo, but there is a difference in real editing.
With a properly edited HDR, you should have only a small number of pixels hitting such high values. So an OLED should work very well for editing HDR under proper ambient lighting conditions (your SDR brightness should ideally be 80-120 nits even for print work). However, there is a loss of highlight contrast and the accuracy (in terms of brightness not color) will depend on how bright the overall content on the display is (known as APL or “average picture level”).
The biggest downside of this peak brightness limitation probably applies to photographers who are new to HDR and prone to pushing the brightness too high in which case the dimming might convince you to edit the content too bright. You can easily check your work on another display (such as your phone), Web Sharp Pro has HDR soft proofing features to warn you around excessively bright editing, and you can easily test your image with overlays or measurement tools in Lightroom, ACR, and Photoshop.
If you were to compare my ABL test (#15) on a mini-LED vs this OLED, you would see that the HDR images get brighter while the page background is set to black. This is because the surrounding white (even though it is just diffuse/SDR white) creates enough brightness to trigger the ABL. The result is that the images lose a bit of punch against the white background on the OLED, while a mini-LED would show the images the same way with either background.
To put all this in context. The PA32UCDM is able to achieve high levels of accuracy (deltaE < 1) and will continue to show accurate color even when the ABL may cause some loss of contrast in highlights that mini-LED would avoid. There’s no standard for an objective test here, but there are a few things you can look to for confidence. This display is certified to DisplayHDR 400 True Black, which should give you a sense of the comparative performance. And it has a “typical” (aka “sustained”) brightness of 250 nits. That’s helpful to know, since it’s much higher than the roughly 100 nits you should use for SDR content like the background of this web page. Overall, the performance for this OLED is great, but a mini-LED would be more able to show the true full brightness under more conditions. If you’re concerned with accuracy, you could set this monitor to the 400 nits limit and have confidence that you’re seeing 2 stops of HDR with greater accuracy. Or you could allow the full 1000 nits with 3.3 stops of headroom, but less certainty that you’re achieving the target brightness. I think most people would most appreciate the full 1000 nits, just check a few images elsewhere (such as your phone) if you’re new to HDR to make sure you aren’t editing the images too bright (as a monitor that darkens make it harder for you to see your mistake).
OLED offers perfect blacks and therefore much better detail in deep shadows. However, mini-LED cannot achieve perfect blacks becauseuses a shared backlight which causes blacks to show a bit of grey around lit pixels (known as “blooming”). While older mini-LEDs (with low zone counts, limited backlight control, and more basic processing) tend to be prone to this issue, it’s much more controlled on newer models. OLED will show better detail in deep shadow areas when viewed under suitably dim ambient light. In very dark content with a suitably dark room, this OLED will clearly show much better detail than even the best mini-LEDs. The classic demo for this is a video showing a moving star field (the blacks will get much darker on OLED).
This an advantage for dark shadow content when viewing OLED in a dark room. The level of deep shadow detail I can see on this OLED (when the room is suitably dark) vastly exceeds that of any mini-LED I have ever used. If I put grey text over a black background in in 32-bit Photoshop, it is perfect at the darkest color you can pick (0.0001). On the Pro Display XDR, the text is legible but quite fuzzy when you set the text color 10x brighter (0.001). At the same time, it’s more of a nice benefit for watching content than a critical ability for editing photos. The OLED advantages are modest for most photographers, especially as much of your audience will be viewing under bright ambient conditions or a non-OLED display. This is probably more of a benefit for editing movies, where your audience is more likely to have OLED and watch in dark conditions.
OLED also offers very fast pixel response times. This primarily matters for gamers. Having support for 120Hz is beneficial for photographers to see smooth results when panning and zooming images, as well as scrolling text for general use. If you can only achieve 60-90Hz, that’s ok, but 120 will be appreciated by most users. Gamers will often appreciate much higher refresh rates, but photography won’t benefit from exceeding 120Hz. Nearly all OLED will hit this target, but mini-LED varies.
Today’s best mini-LED tend to be the optimal choice for most photographers. They can be used in brighter rooms, achieve higher HDR headroom, and will retain brightness more accurately even in images with more HDR pixels. However, OLED is an excellent choice, especially if you work under controlled lighting.
The PA32UCDM fits these patterns:
- It offers excellent image quality, but is best appreciated in a room where you can control the ambient light.
- If you need to raise it to maximum brightness in your room, you’ll have 2 stops of HDR headroom.
- When your screen contains a lot of bright content (even just the white background of this web page), you will likely see HDR images dimmed by the ABL.
- If you want to achieve 4 stops of headroom and consistent rendering of HDR, you should look to the ASUS PA32UCXR mini-LED (review).
- The clarity of shadow detail is incredible.
- You can clearly read text set to a grey value of 0.0001 in 32-bit Photoshop (this is the lowest level you can directly set in Photoshop colors).
- On the Pro Display XDR, the text is very legible at 10 brighter values, yet shows significant blooming. The ASUS mini-LED (PA32UCXR) does a clearly better job, but this OLED clearly outperforms both. It’s not even close in the most extreme dark shadows.
- Like any OLED, the black shadow detail is much better than mini-LED. This will allow you to appreciate extremely deep shadow detail on your display, but is a modest benefit for content creation as much of your audience will either lack OLED or view it surroundings too bright to appreciate the same detail.
On the whole, the image quality is amazing, but mini-LED still has an edge in today’s consumer monitors for HDR photography (as it can more fully and accurately display additional stops of HDR headoom, and the benefits of OLED shadow detail are a less important factor for HDR photography). OLED TVs have gotten much brighter in 2025, and hopefully OLED monitors follow suit over the next two or three years close much of that gap. If there were a monitor offering the performance of the M4 iPad Pro’s tandem stack OLED (sustained 1000 nits full screen plus perfect blacks), that would be ideal. Image quality will inevitably improve, but that’s likely well into 2026 and 2027 to achieve some of the next big gains. Today’s best mini-LED is ideal for HDR photography for most people with the largest budgets, and an OLED like this is an excellent choice which can easily save you up to $1000 and offers improved shadow detail.
What could be better?
If you want greater maximum headroom, a brighter display for a bright room, or 6k resolution – that’s another class of premium monitor and you should expect to pay more at this point. The PA32UCDM hardware performs very well for its price point. Some may be concerned that this model does not include a colorimeter, though I tend to prefer an external colorimeter and you may be able to borrow one or use it with multiple displays (such as your laptop or another future monitor). I believe the overall product offers good value and have no major concerns with the hardware.
However, that doesn’t mean there aren’t areas where ASUS could and should do better. In particular, I find that ease of use could be significantly improved, along with customer service.
There are several areas where the menus, software, or documentation could be easily improved to make this product easier to use:
- Firmware bug:
- The EDID (“Extended Display Identification Data”) appears to self report a 1,015 nits limit when the HDR display brightness limit is set to 250 nits (per Advanced Display info in Windows, as well as obvious clipping in MacOS at this limit). This is a serious issue as is causes significant clipping in the default mode (your web browser will not properly tone map HDR video and photos in this scenario). Thankfully, this won’t affect you when you configure the display per my recommendations. The higher limits are fine (when set to 400 nits, it reports 445 nits and max reports 1015 nits). I see this issue under firmware MCM104, and would assume some future update is likely to address this.
- Calibration software:
- The lack of clear error messages in the ASUS software should be addressed ASAP. You should be in great shape if you follow my guidance below, but I believe many people would be quite frustrated without better guidance and this almost certainly increases ASUS costs for technical support and returns. Here are a few examples where the ASUS calibration software could be improved:
- There are several settings which the user is required to set in the monitor. This should be completely automated by ASUS during calibration.
- Failure to turn off HDR mode (which is not intuitive) results in “error 4156”. A clear description of the most likely steps to resolve this common issue should be shown.
- If the colorimeter is not pointing at the screen without the diffuser, you see “error 1038”. A clear description of the most likely steps to resolve this common issue should be shown.
- The ASUS calibration software does not auto-detect the connected colorimeter, or even remember the last option you used.
- The monitor should be able to self report how long it has been on so that you can skip the warm up screen whenever possible.
- The ability to create a custom name for the user modes is great, but the names are hard to read as you cannot use underscore, dot, or space (all of which are used in the included modes)
- On the last screen before you start calibration, the middle grey background makes it very hard to see your mouse so you can click the button to start. A black background would be much easier.
- The color calibration tab (where you start calibration) does not show the date/time a given mode was last calibrated of if it was ever calibrated at all. You can infer this from the history, but it is cumbersome.
- When running multiple calibrations at once, the final screen shows only one result rather than acknowledging it ran multiple (you can find these in history, it just isn’t intuitive and it is unclear if clicking “apply” will program any failed calibrations).
- Calibration targets in K are not clear to those who know that D65 is more precise than “6500K”. This could at least be noted in the written manual.
- The “embedded calibrator calibration” is neither grayed out nor warns you if you click on it with a monitor like this which does not have the feature. It’s confusing if you don’t realize this only applies to a product you don’t own.
- If the calibration is highly successful (achieves <1 deltaE), there should just be an option to apply it. As it stands, the monitor stays fully lit until you accept the result and then you wait for it to apply. It would be faster if just done when you return if you let it run unattended.
- The MacOS color profile was incorrectly switched to sRGB after calibration (this may be a bug in MacOS itself, unclear).
- The lack of clear error messages in the ASUS software should be addressed ASAP. You should be in great shape if you follow my guidance below, but I believe many people would be quite frustrated without better guidance and this almost certainly increases ASUS costs for technical support and returns. Here are a few examples where the ASUS calibration software could be improved:
- Display Widget:
- The concept of the display widget (to let you control the monitor from the operating system) is great, but the implementation is too incomplete for it to be useful at this time.
- There is no MacOS app.
- The Windows app is insufficient for setting up the monitor.
- The app supports importing settings and I would love to give you a file to set everything up as below, but Display Widget simply lacks key options.
- There is no option to control “Uniform Brightness” or the brightness limit for HDR to properly enable HDR. You cannot control the HDR preview (required for calibration, though ideally the calibration app would take care of this for you).
- The options are laid out differently in this app vs the monitor and it creates confusion, as does some poor naming.
- For example, the app toggle under “system settings” for “Display HDR” seems to suggest HDR will be disabled when laptop power is low. The naming is a little vague and it is not clear that this is a setting which is only possible when driven from the computer (the monitor lacks this option as it does not know battery state or have control of the operating system HDR mode).
- Further down the same display is an option for “Power Saving”. This is an option on the monitor, but mixing it with other controls that are unique to the app creates confusion and ambiguity.
- Ideally, the software would list options controllable on the monitor up top and then clearly break out options which are specific to the Display Widget (such as “HotKey” and “App Tweaker” sections).
- Custom user modes do not show any custom name you set in the calibration software.
- The active mode can be confusing. There are so many modes that none of the default HDR modes will show in this app until you click to the right. Either shrinking the UI to show all or switching to a dropdown would be much more intuitive.
- Ease of use in monitor settings:
- When you use an Apple monitor, things are incredibly easy. It’s nearly impossible to get it wrong. You do not have to think about it. The ASUS setup (and nearly all monitors other than Apple) are very confusing. I often have questions, and I have much more experience with this than the average photographer.
- I would love to see ASUS eliminate or hide options which are not high value.
- For example, the presets should probably include just P3 (100 nits SDR) and P3 PQ. That’s all the typical user needs. Anyone who needs more can easily achieve it with custom modes, which are probably better anyhow (to achieve the ideal SDR brightness for either reference viewing or to suit their environment).
- Why is Dolby Vision a setting vs just automatically using it when providing in the input?
- It would be ideal if the HDR display options were shown at the top of the list of presets, given this is an monitor clearly built for HDR.
- More complete written support material:
- You should have no problem if you follow my recommendations here, but I believe the support material from ASUS could more clearly help guide users who are specifically interested in HDR (as the defaults do not really enable HDR performance).
- The written manual does not describe screen saver options clearly (Does not mention Proximity Sensor disabled in HDR mode next to the description of the options. What happens under the three levels of Panel Protection and Image Protection? What is “ISP”?)
Ultimately, the issues above should be no problem if you read this whole post and follow the guidance below. But the changes above would be helpful for all, and are probably critical to a good HDR experience for many who may not read the guidance below. Hopefully the MacOS colorimeter list is expanded with a software update in the near future.
As a side note, the Display Widget software (currently Windows only) from ASUS is a step in the right direction for ease of use. The level of simplicity for HDR on MacOS is so far ahead of anything I’ve seen under Windows. With a Pro Display XDR, you plug it in and it works with zero setup (even calibration is completely optional). Much of what makes that possible is Apple’s tight integration between the operating system and software (and unsurprisingly you can’t use that same monitor under Windows). Microsoft would do well to consider an open standard for display makers to better integrate into Windows (something offering great performance by default and an ability to control the monitor settings entirely in the operating system).
While I have not needed to contact ASUS technical support for any questions related to this monitor, I did last year when reviewing an older model and I found the support experience rather frustrating. The phone support experience was particularly frustrating for me. The phone system randomly disconnected on multiple calls and the call quality often had audible crackling and low quality that made conversations more difficult. The email support was higher in quality, though responses typically took 24 hours and there were several times when the response did not sound like the person had bothered to read my concern carefully and/or lacked sufficient expertise to resolve the issue. I don’t expect you’ll need technical support if you follow the guidance on this page carefully, but if you do, use the email option and be patient. Sadly, experiences like this have been fairly common for me with many similar electronics companies (Apple being a notable exception where technical support is usually fast and high quality).
Minor note: MacOS System Info reports 5120×2880 resolution (but does not offer it as a choice in System Settings / Display). This monitor has 3840 x 2160 resolution. I suspect this error is a MacOS bug (rather than another EDID bug) as I don’t see this 5K resolution when connected to a Windows computer.
How to setup the PA32UCDM for HDR photography:
Here are the most important things to know for setup:
- Use the 96W USC-C connection to connect the computer.
- The other USB ports are for downstream connections like a dock or keyboard.
- You may use the HDMI port and will get the same image quality, but you’re going to need a USB connection to do calibration or use the optional Display Widget software.
- Turn on the monitor with a long press on the round button on the back bottom of the display near the middle (just right of the joystick control when you’re facing the front of the monitor and can’t see the back)
- If the monitor does not offer auto-detect, manually select the Thunderbolt input
- Once connected, you must enable HDR mode in System Settings / Display
- This is written out as “high dynamic range” in MacOS
- You will likely need to reduce from the peak refresh rate to enable HDR.
- If you cannot enable HDR mode, reduce the refresh rate.
- On MacOS under Thunderbolt 4, I found I could use with HDR mode up to 240Hz with “larger text” (1920×1080) scaling, but that the max allow dropped to 60Hz by the middle scaling option and was supported at that level up to the maximum 4K scaling. I find the 2K scaling (2560×1440) looks best and supports 100Hz. Note that this is just scaling of the MacOS user interface, and your images are always displayed with the maximum resolution and no interpolation with any multiple of 100% zoom in LR, PS, etc.
- On MacOS over HDMI 2.1, I see greater support. This is odd, as Thunderbolt 4 should support higher bandwidth and I’m using a certified cable. Under HDMI, I was able to get 120Hz at 4K HDR, 100 Hz at 2560×1440, and the full 240 Hz HDR at 1080p scaling. I find that pattern odd (lowest refresh rate support at middle resolutions), unless somehow the M4 Max cannot internally handle its UI scaling in that scenario (and this does not improve if I only drive the ASUS display with no others active). I have reported this as a potential Apple bug via Feedback Assistant.
- On Windows (over Thunderbolt), there is no option for 240Hz, but you can use 120Hz all the way up to 4K (3840×2160).
- On Windows over HDMI 2.1, I still had 120Hz HDR support, but the color bit depth drops from 10-bit to 8-bit. So that’s one more reason to prefer the TB connection.
- I am unclear whether these differences in supported frame rate are an issue caused by the operating system or the monitor. The ability to select 120Hz on MacOS with 4K scaling on MacOS would be nice for scrolling text. This is a surprising result given I’m testing with an powerful M4 MacBook Pro and my cheap Windows laptop achieves 120Hz at the same scaling.
- I have no particular concern about the 120Hz limit I see on Windows. The lack of 240Hz support on Windows may very likely be related to my testing with a relatively cheap PC laptop that may very well not be capable of driving the display to its limits.
- If you cannot enable the toggle in Windows, make sure you are not using the monitor in a mirrored configuration (extended only) and check that your refresh rate is not set too high.
- The monitor should automatically switch to an HDR mode, but you can check as noted in the setting section below.
- When properly connected, you should see headroom >0 in my test #1.
- MacOS System Settings / Display should show the color profile as “PA32UCDM” (you might find it switched to sRGB after calibration).
- MacOS color management cannot be disabled, and therefore the profile in the system settings matters. The ASUS software calibrates in a special mode (uses an SDR sRGB signal) rather than in the normal MacOS HDR mode. As a result, it makes the monitor accurate, but does not guarantee you are using the right profile after calibration (since the calibration process is not in the same mode as normal HDR use).
- When I select the generic “PA32UCDM”, I get very good results, but not quite as good the test results I show in CalMAN below (which match very well with the results reported by the ASUS software). Some new HDR specific profiles are needed to get the best possible results (there is a support article detailing options for setting up profiles for SDR modes, and the profiles can be found under “see all downloads” below the main ASUS software downloads). Most users wouldn’t notice the difference here, but it would be ideal to get every last bit of accuracy possible and I’d like to see an update from ASUS on this.
- Once you’ve enabled HDR, you should set the SDR brightness slider in System Settings.
- MacOS shows a brightness slider in the display settings when HDR mode is enabled.
- Windows has an “SDR content brightness” slider hidden under the > icon on the far right of the HDR mode toggle.
- Set the SDR brightness at a level which would be comfortable for reading text in a browser. Do not try to set it darker to improve headroom, that will induce eye strain and result in editing images which are too bright.
- If you are measuring the SDR white level (“diffuse white), it should be set to 80-120 nits under controlled lighting (note that 1 nit is the same as 1 cd / m^2). If you need to set it brighter, your room is too bright and you should dim lights or use window shades. This will help ensure both better prints and HDR.
- At default settings, the default monitor settings will unfortunately limit the display to 250 nits (shown as “brightness” at the top right of the on screen display).
- This combined with the bug noted below where the EDID falsely reports 1015 nits support in this scenario means that you will have almost HDR support and HDR content will clip very badly because software like browsers will not be able to tone map to the correct limit. You’ll also see the Lightroom histogram and my headroom test incorrectly report 2 stops more headroom than you actually have. So this is a serious problem at default settings, but easily avoided with the correct setup.
- The solution is to use the monitor settings below to raise the brightness limit to “MAX” (1000 nits). But you can only choose this when Settings > Uniform Brightness is turned off.
- (Note: each time you change brightness, the monitor will briefly go black and exit the OSD, you’ll need to wait for the “HDR mode” notice to clear before you can go back in to go from 250 to 400 to 1000. This is tedious, but the only way to do it).
- DO NOT use any custom ICC profiling tool such as Spyder / X-Rite at this time.
- If you use a typical profiling approach, you will cause all HDR content to clip to SDR. There is no HDR standard for custom ICC profiles.
- If you have done this, you may see that my test #1 reports you have HDR headroom, but the content looks clipped.
- If you’ve already done this, revert to the factory profile
- in MacOS go to ColorSync Utility / Devices tab / Display, then select your display and click ⌄ by “current profile” and choose “set to factory”.
- Other watchouts (for Windows, these generally aren’t issues on MacOS)
- Do not use the Windows HDR calibration utility, it will only cause problems.
- If your computer comes with 3rd-party software which affects the display, you may need to uninstall it. In rare cases, I’ve seen such software cause conflicts.
Use the following settings in the monitor’s on screen display:
- If you’ve customized and are unsure of the defaults, you may reset to factory settings via Settings > All Reset. This will clear any calibration as well.
- Preset tab
- Select HDR_PQ BT 2020 (or HDR_PQ DCI)
- Choose PQ Clip for best accuracy. This will produce the most accurate EOTF (brightness) tracking. It is still subject to the ABL, but is perfect in a 2% window and very close in a 10% window.
- Skip PQ Optimized. It adds some intentional highlight rolloff, which makes it less accurate (deltaE ).
- Skip the Basic option (low accuracy, ).
- I recommend Rec2020 because the accuracy is excellent and this will let you see Rec2020 content.
- You will have excellent P3 accuracy under HDR_PQ DCI, but I saw no improvement in accuracy. Both had primary / secondary color deltaE <1.
- The only real error I’ve found is in EOTF tracking caused by ABL, and choice of colorspace target for calibration will not address that concern.
- Rec2020 is the ultimate target for HDR, but even more relevant for print work as many printable green/cyan values are inside Rec2020 but not P3.
- Therefore, Rec2020 is ideal to ensure support for the widest gamut available on this display (without the need for mode switching) and you will have accurate P3 support as well (as it is fully covered by Rec2020).
- Do not use the HLG or HDR_DolbyVision options when using with a computer. These would be potentially relevant if you are using another source such as a DVD player or your camera over HDMI. The PQ options are best for a computer.
- Select HDR_PQ BT 2020 (or HDR_PQ DCI)
- Palette
- Brightness must be set to MAX. [ VERY IMPORTANT ]
- This is a confusing setting name. This is not the SDR brightness (as you would typically control in an SDR mode on the monitor), this is really the peak brightness allowed. So when you set it to “max”, what you are really going is setting the maximum to the maximum (ie setting the HDR clipping limit to the full 1000 nits).
- You must first turn off Uniform Brightness in the Settings tab, or you will be unable to set the brightness above 250 nits.
- This is not a global setting: you must also set brightness to max in every HDR mode you use (ie HDR_PQ DCI, HDR_PQ BT 2020, user mode 1, etc all are set independently and all default to 250 nits).
- If you do not increase brightness to 400 nits or “MAX”, you won’t really have HDR support (and the default 250 mode has an EDID error in firmware MCM104 that will cause 2 stops of clipping instead of tone mapping to 250).
- I do not recommend the 400 level unless you prefer to limit your HDR to 2 stops (limiting the monitor does not improve accuracy if you limit your edits to 2 stops, it just helps you avoid the least accurate 3 stop range by eliminating it as an option). The primary benefit of this mode would be to help improve lifespan by avoiding risk of burn-in, which I believe is a small and necessary risk if you want great HDR from today’s OLEDs.
- Brightness must be set to MAX. [ VERY IMPORTANT ]
- Settings tab:
- enable HDR preview (this is required for ASUS calibration).
- Uniform Brightness must be disabled or will be unable to use HDR without seeing significant clipping. [ VERY IMPORTANT ]
- Update the language as necessary.
- It would be best to disable the sound, you’ll get better results from external speakers or your laptop.
- It is best to turn off the Light Sync options and focus instead on ensuring your ambient light is fixed if possible. Eliminating variability will help you achieve the most consistent results for editing photos.
- You may update the OSD (on screen display) timeout if you wish to change how long it stays on screen after using the monitor buttons.
- You may refine the proximity sensor settings if needed for your use. This feature dims the display if it fails to detect someone near the monitor (to help improve lifespan of the monitor).
- Screen Saver
- All of these options are used to control features meant to help prevent burn-in with an OLED monitor. They are not well documented, but what is clear is that your options here will not limit peak brightness or HDR display immediately. They will cause dimming over time or occasional display blackouts.
- Proximity Sensor:
- This option is disabled in HDR mode, but fine to enable for SDR mode if you won’t be viewing from far away.
- Panel Protection:
- This includes occasional tricks to help avoid monitor burn in, including dimming over time if there is no change on screen. This dimming is much slower than image protection and ok to use.
- If you have 100 nits SDR white and panel protection is “max”, you will see no dimming until the display has been static for 50s. At that point, it will dim slowly continuously and continuously until it gets to 5 nits at about 2 min 50s.
- If you have 100 nits SDR white and panel protection is in the middle position, you will see no dimming until the display has been static for about 1 minute 50s. At that point, it will dim slowly continuously and continuously until it gets to 25 nits at about 6 min.
- The “off sensing” is always enabled and runs a 6 minute blackout period that won’t be nice in the middle of your work. Min runs “off sensing” every 12 hours, the middle is 8, and the top/max position will be disruptive with blackouts every 4 hours
- I would pick the middle setting to allow dimming if you walk away, but without monitor blackouts every 4 hours.
- Image Protection:
- It is meant to help avoid potential burn-in from things like a continuously visible Windows task bar.
- I cannot comment on the long term risk of burn in here, but I would personally disable image protection.
- It will darken the display and therefore reduce accuracy.
- If you adjust your SDR brightness in HDR mode to 100 nits and then switch from image protection off to max, the diffuse white will drop to 80 nits.
- OLED longevity has improved significantly in recent years and I would be comfortable taking the risk. The tests I see generally indicate you need to abuse the display pretty heavily with continuous bright content. I would consider any risk here an investment in my art. In other words, I would prefer to take what I would consider a small risk that might replace the monitor in five years (when there are even better and cheaper options) than try to create great content on a dimmer and less accurate display.
- You can take steps to minimize static content, including letting your task bar / dock auto-hide, and using a darker theme in Photoshop.
- Avoid changing anything else
- There is no need to alter anything in the Image, PIP, or QuickFit tabs.
- In HDR mode, brightness is control in the operating system Display Settings (not on the monitor, see key setup above).
For reference, here’s a comparison of the EOTF when you select the different sub-options for the P3 or Rec2020 PQ modes:
- Clipped is most accurate and recommended for editing photos.
- Basic is the least accurate and shows significant highlight rolloff. If your computer were to send image data above the HDR headroom for the display, this would soften the highlights to preserve some detail and may be desirable for consuming content. But I do not recommend it for content creation.
- Optimized is in between.
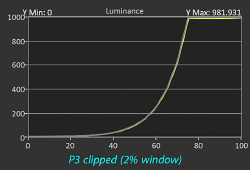
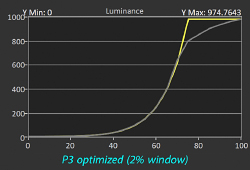
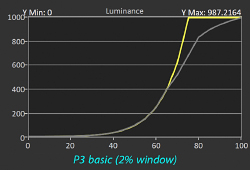
Note that the rolloff for optimized / basic is applied in addition to anything required by the ABL. I am showing 2% test windows here because it avoids the ABL. If you test a 10% window, you’d see both the ABL and this additional rolloff, which means a further loss of highlight contrast. The key difference between this rolloff and the ABL is that these mode choices help address content which may be above the headroom of your display, whereas the ABL does not attempt to address clipping (but cannot be avoided).
Once you’ve done the above setup, you may then proceed to use the ASUS calibration software to improve the accuracy of the display. You only need to calibrate the HDR mode you are using. There should generally be no need to use other modes or disable HDR. If you wish to optimize an SDR mode for print work, you might wish to calibrate that as well and set the custom buttons on the monitor to help toggle between the two modes (though ideally the monitor will just switch between your last SDR and HDR mode as you toggle in the operating system).
How to calibration the PA32UCDM:
- Install and launch the ASUS Calibration software
- Check that the monitor is set up as noted in the prompt in the calibration software:
- HDR mode in MacOS / Windows must be off
- Monitor Settings / HDR Preview must be on (this seems to be how the monitor converts the SDR signal to HDR during calibration)
- You can ignore the “ambient effect” setting, as it does not apply to this monitor from ASUS
- Make sure “true tone” and “night shift” are off in MacOS, as these will significantly distort the calibration
- Connect a supported colorimeter to one of the downstream USB ports on the monitor. The following colorimeters are supported on both MacOS and Windows (be sure to scroll down, may not be obvious there are more than 3 choices):
- Calibrite Display Plus HL (can handle up to 10,000 nits displays)
- Calibrite Display Pro HL (3000 nits is probably ideal, will be a long time before you need 4000+ in a monitor, though some TVs are there now).
- Calibrite ColorChecker Display Pro
- Calibrite ColorChecker Display Plus
- Datacolor Spyder X, Datacolor Spyder X2 Elite, Datacolor Spyder 5, Datacolor Spyder X2 Ultra, X-Rite i1 Display Pro, X-Rite i1 Display Pro Plus
- spectrophotometers (most accurate, ridiculously expensive): CR1-100, CR-250, Klein K-10, X-Rite i1 Display i1 Pro 2, X-Rite i1 Display i1 Pro 3
- Check the modes you wish to calibrate (ie include at least HDR_PQ BT 2020 or HDR_PQ DCI)
- Click “start calibration” and follow the prompts. If you see an error, check the steps above and the troubleshooting info below.
- If you created a custom user mode, go to the “device” tab and click the icon right of the name to set your own custom name (this will show in the on screen display of the monitor)
Accuracy after calibration:
I calibrated the display using the process below and a Calibrite Display Plus HL. I then confirmed results independently using CalMAN with their C6 colorimeter (the older 2000 nits red version) and G1 pattern generator. The results were excellent.
As with almost any OLED, brightness depends on content. You can see this in the nit measurements for various window sizes, and the section below on OLED vs mini-LED will go into much greater detail on why and what this means.
I found the following results (as measured by CalMAN):
- When using a custom user mode set for Rec2020 PQ targets:
- Average deltaE of 0.8
- Max deltaE of 1.6
- Peak measurements:
- 2% window: 919 nits
- 5%: 727 nits
- 10%: 442 nits
- 18%: 360 nits
- 25%: 326 nits
- 50%: 273 nits
- 100%: 228 nits
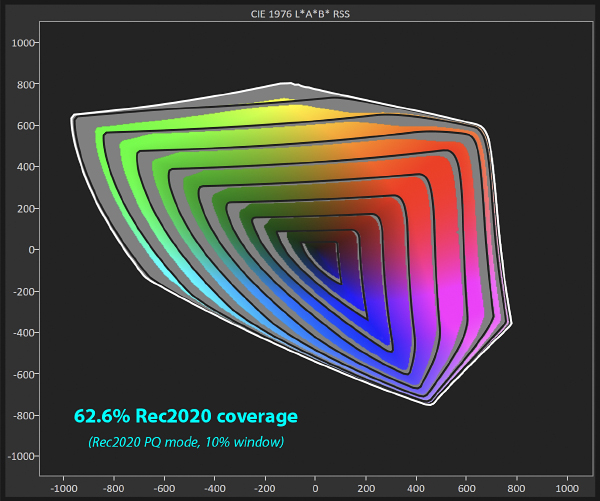
- L*a*b* coverage (relative luminance target):
- Rec2020: 75%
- P3: 112%
- Rec709: 168%
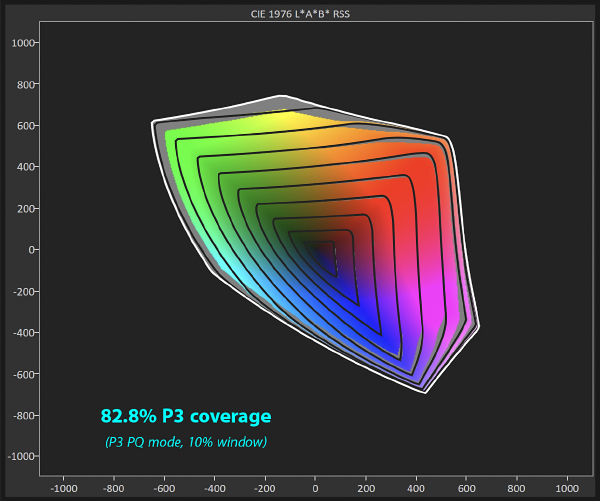
- When using a custom user mode set for P3 PQ targets:
- Average deltaE of 0.7
- Max deltaE of 1.3
- Peak measurements:
- 2% window: 988 nits
- 5%: 740 nits
- 10%: 444 nits
- 18%: 377 nits
- 25%: 342 nits
- 50%: 287 nits
- 100%: 240 nits
- L*a*b* coverage (relative luminance target):
- Rec2020: 66%
- P3: 98%
- Rec709: 146%
- Gamut ring:
- covers XX% of the Rec2020 PQ volume
- When using the HDR_PQ DCI mode:
- Average deltaE of 2.0 (this is very good, but results are better using the same P3 PQ targets in the user mode)
- Max deltaE of 8.6
- 2% window: 993 nits peak
These results show that ASUS’s claims are accurate. This is a 1000-nits capable HDR display with deltaE < 1. This monitor offers outstanding color accuracy after calibration with the ASUS software.
Note that display also supports calibration via CalMAN or Light Illusion ColourSpace CMS.
Gamut rings:
“Gamut rings” are a relatively new way to visualize color gamut. We are used to viewing 2-dimensional representations of colorspaces like P3. But color is really a 3-dimensional volume, as there is a luminance component. In other words, you want to make sure you not only get good color, but that you an also get bright color for HDR.
If you only look at a simplistic 2D comparison, you might not realize that one monitor offers much more wide gamut support in the brightest HDR ranges. For example, a WOLED panel includes a white subpixel and therefore lacks saturation in the brightest values – even though it can offer nice wide gamut support in midtones.
I have not done similar testing on other monitors and this is new for me. But here are my initial impressions of the data I see on the PA32UCDM:
- Color gamut is excellent.
- The biggest gaps are in green/cyan/blue, which is where P3 has the biggest gap to Rec2020.
- In other words, you will see a gamut as wide or larger than what your audience will see for HDR display (as P3 the the target for most HDR devices and Rec2020 coverage is limited).
The plot shows CIE L*a*b* where each ring is a change of 10 for Lightness (where the inner ring are the darkest 0-10 and the outer ring is 90-100). The area is grey is where the monitor failed to achieve the target gamut (which is Rec2020 PQ in the test result images here). Here’s a video with more detail:
And here’s a great article on gamut rings from Nanosys (the key manufacturer of “quantum dots”, ie the QD in QD-OLED for significantly improved color gamut).
I am unaware of a standard for gamut rings in HDR at this time, so I want to be explicit about my test parameters as you might see someone else post results which cannot be directly compared to mine. It would be easy to get confused, and I would love to see standards work their way into tools like CalMAN to help minimize variability that would create confusion or prevent direct comparisons of different displays.
My test parameters:
- gamut target = BT 2020 when testing the monitor in its Rec2020 PQ mode and P3 when in P3 PQ mode.
- I believe Rec2020 is the best maximum target as it fully includes P3 / sRGB and HDR display calibration and HDR content mastering will use one of these primaries.
- However, P3 is also very interesting for testing simply because it lets you directly compare performance to the most common consumer displays and content mastering. A gap in Rec2020 may not matter, but a gap in your P3 coverage is much more likely something that another display would support. And it’s most relevant if you’re going to use the monitor in P3 mode.
- There are other interesting test gamuts that are wider, but I believe not relevant to end consumer use of HDR.
- SDR content can exceed Rec2020 color volume in real (but not very important) ways. For example, Lumachrome can print blue-green colors beyond the limits of Rec2020 and these values would be preserved if your image was edited in ProPhoto RGB. I believe this is a niche consideration and not terribly important for HDR work, so I am not testing these SDR gamuts (each test run takes >30 minutes). All that really matters is that you might choose ProPhoto if you shoot subjects using this range (such as colorful ocean water) and plan to print it. I don’t actually think displaying it on the monitor is actually terribly important for editing in this niche scenario.
- EOTF target = ST 2084 HDR (PQ)
- This is the only target that makes sense to me. Your computer will use PQ to communicate with the display.
- Even if you use an HLG output from some other device, the monitor should handle it just fine. Both will achieve high HDR brightness (and PQ is generally more capable if we’re discussing highly capable TVs that exceed current monitor brightness).
- I do not see any value in exploring other EOTFs for HDR use.
- Pattern generator window size = 10%
- I am using 10% as CalMAN uses that as the default size.
- The size of the test patch shown on the monitor during testing has enormous impact on results, especially an OLED.
- For example, changing from a 2% to 10% window on the PA32UCDM causes peak luminance to drop by half and % coverage of Rec2020 to drop by 12% (absolute reported value).
- The 10% size seems reasonable to me, as it’s probably much more realistic for an image than 2%.
- Ultimately, the display’s tone mapping means you should get a darker version of the correct color and I believe this isn’t something for consumers to worry about too much.
Testing showed nearly full coverage of P3 in all but the brightest colors (where ABL became the primary limiting factor). Rec2020 coverage was very good. It expands gamut meaningfully over P3 with unsurprising gaps in green/cyan/blue, as well as in the brightest colors.
 .
. 
Helpful links:
- User Manual
- ASUS ProArt Calibration software and drivers
- Choose your operating system, and download the calibration software (Windows users might wish to install the driver, no need on MacOS)
- Click the Bios and firmware tab to check for any updates (see the version installed on your monitor via Settings > Information).
- If you need to update, be sure to follow the PDF instructions in the download very carefully (guaranteed pain if you don’t pay attention).
- Be sure to format a memory stick with FAT32, copy the bin to it, and insert the memory stick in the correct port on the monitor.
- You may wish to click “see all downloads” at the bottom of the list, but there’s probably nothing you need there.
- ASUS Display Widget lets you control many aspects of the monitor directly through the computer for convenience (currently only available for Windows).
- ASUS support article for calibration.
- Tech support. Note that it has been my experience that the phone system is flaky (poor connection quality). While online support is slower, I’ve had better results. If you follow the steps I’ve outlined here, you shouldn’t need it.
Troubleshooting:
- Cannot select HDR mode: make sure the refresh rate is set not too high
- You are able to pass test #1 to confirm you have HDR headroom, but the display looks clipped:
- make sure you set the monitor as noted above (brightness must be “max”, which is only an option after you turn off “display uniformity).
- do not use any custom ICC profile. This will break HDR. Switch back to the factory profile. You should only use the ASUS software (or CalMAN / ColourSpace) to calibrate in the monitor itself.
- If you fail test #1 (0 headroom) and/or see zero headroom in Lightroom but have HDR mode enabled in Windows:
- I saw this immediately after calibrating. The overall display looked bright and clipped in this mode.
- Simply toggling HDR mode in Windows system settings and the monitor did not help. But after I toggled HDR support on the internal laptop display and subsequently toggled it for the monitor (both in Windows settings), then it worked properly. I don’t know if it is a bug in the monitor or Windows, but I suspect it’s a Windows issue (given the involvement of other controls in the OS and no similar issues under MacOS).
- Color looks over-saturated after calibration:
- There appears to be a bug in either MacOS or the ASUS software which may set the monitor profile to sRGB after calibration. Just go to System Settings / Display and change the profile back to PA32UCDM.
- Display looks wildly incorrect:
- Make sure both the computer and display are in HDR mode (or both in SDR mode if that is your intent).
- HDR is dim or clipped.
- See the recommended settings above to ensure you disable uniform brightness and set palette / brightness to “max”.
- Make sure you set brightness to “max” for every mode you use (ie setting it in P3 mode won’t change the setting for Rec2020, etc – they can be independently set and all default to 250 nits).
- The monitor does not respond to an HDMI input
- I have seen this when using a FIBBR HDMI cable. MacOS shows the monitor, but the monitor is black and then goes to standby mode.
- I have never had a problem with these, but I tried two and both failed. It is a directional cable (end #1 should be in the computer) and I tried reversing it just to check and that failed. For reasons I do not understand, this monitor seems incompatible with this cable, at least under firmware MCM104.
- I recommend using Thunderbolt, but if you are going to use HDMI you may want to be careful with fiber optic cables here.
- An error occurred during calibration (may show as error 4156):
- Make sure HDR mode is OFF in System Settings / Display in the computer. This is true even when calibrating for HDR.
- Make sure Setup / HDR Preview is ON in the monitor settings (the calibration software appears to send a known SDR signal for the monitor to display as HDR during calibration).
- Make sure night shift and true tone are off (may not errror, but will certainly invalidate the results).
- Calibration quits with an error:
- Make sure MacOS / Windows HDR mode is off, even when calibrating an HDR mode (may show as error 4156)
- Make sure the colorimeter is right over the target and the sensor is facing the screen with the diffusor cover out of the way (may show as error 1038)
- Color looks over-saturated after calibration:
- Make sure System Settings / Display still show the factory PA32UCDM profile in use (I found MacOS switched to sRGB after calibration, changing back to the factory profile in MacOS settings then showed accurate post-calibration color).
- If the display starts cycling full screen blue, red, white, green, black (in that order, over and over):
- I ran into this by trying to connect both the TB4 and HDMI cables, also while using the ASUS calibration software.
- This is clearly an edge case, but one you should avoid as it makes the monitor appear like a broken product (does not respond to the power button, you have to physically unplug and replug it).
- I also found that MacOS showed two monitors (which is expected), but then would keep showing one even after both were disconnected. I had to reboot MacOS.
- So my sense is that both Apple and ASUS may show a bug when you connect both inputs from a Mac to the monitor.
- Avoid the issue by only connecting one cable or the other. If you prefer HDMI, you may consider using a dock instead of trying to use the TB4 for downstream use (including the colorimeter, which should connect to the computer instead here).
- If you run into this, power cycle the monitor and reboot the computer and all should be fine. It’s just a strange use case probably not fully considered / tested by the developers at one or both companies.
- See my main HDR troubleshooting page for additional things to check.
I’d like to extend a special thanks to B&H Photo for helping to facilitate access to a unit for testing for this review.

