If you’ve been following me for a while, you know I’m a fan of next-generation HDR displays. These displays are absolutely stunning – for the first time ever, we can truly see all the detail and color in our RAW files. I’ve just picked up a stunning external HDR monitor and wanted to write a quick review of my experience so far and how it compares to my Eizo and other displays I’ve used in the past.
For the past couple years, I’ve been using the “Retina XDR” display built into the M1 and M2 MacBook Pro. These are stunning screens that far surpass anything I’ve seen in any other laptop, but they are limited to 14″ and 16″ sizes. Most of the time in my office I’ve been using a 27″ Eizo (CG2730). It’s an incredible display, but does not support HDR at all. So I’ve been seeking a large external HDR display. After extensive searching, it’s clear that Apple’s “Pro Display XDR” is in a class of its own. These are also very expensive displays when purchased new, but you can save a substantial amount if you purchase one used. I picked up the Apple Pro Display XDR, Apple stand, and the Logitech 4k magnetic webcam designed for this monitor for $3000 on Craigslist. That same bundle would have cost roughly $6700 with tax new ($5k for the display, $1k for the stand, $200 for the webcam). So I got everything in mint condition (including original packaging) with more than 1-year remaining warranty for 55% off. It is still a lot of money for most budgets, but it is an excellent value.
Before we get into the review, a quick primer on HDR displays. Current HDR technology tends to fall into one of two camps: ideal in a dark room (modern OLED) and ideal for everything else (mini-LED). There are already newer, brighter OLED displays in phones, but it will likely take a while before we have external monitors which are optimized for both typical ambient conditions and extremely dark viewing. So you may find your TV looks amazing for movies at night, while being very hard to see in the daytime. Or you may hear a professional who makes movies in a controlled environment talk about how important an OLED or reference monitor is for their work. The key thing to understand is that we don’t yet have affordable technologies which are perfect for all ambient conditions, so the best technology for watching movies at night and best technology for editing photos in the day are often different. I own five different HDR displays and have tested them and many others in a variety of conditions. At this point in time, I believe most photographers will be much better served with greater peak brightness (1000+ nits) than perfect blacks in an HDR monitor for photography. For a deeper discussion on the various technologies, see here.
General impressions of the Pro Display XDR
The Pro Display XDR has some truly impressive specs: 32″ size, 1600 nits peak brightness for stunning HDR display, deep integration with MacOS, no fan noise, and gorgeous aesthetics. The image quality is absolutely stunning. If you have not see a proper HDR image on this monitor or a similar 1600 nits screen (such as the Apple Silicon MacBook Pros), it’s very hard to appreciate what a substantial improvement in image quality it offers. It’s the most significant improvement in photography display I’ve seen in decades. The display is truly stunning for both HDR and print-centric workflows. I’ll dive into that more in the comparisons below.
The Pro Display XDR was originally launched nearly 4 years ago and it would be natural to ask if it will be outdated soon. I don’t think that will be the case. In the next 5 years or so, we’ll probably start to see monitors offering better OLED (QD, MLA, tandem stack) or micro-LED. All of these technologies are emissive displays which offer true black (to eliminate blooming and offer much greater dynamic range in dark viewing conditions) while also offering very high peak brightness (in order to retain HDR benefit in bright viewing conditions). While I’m looking forward to those future technologies in a monitor, I suspect mini-LED displays like this will probably be the best HDR option for most photographers for several years to come. Unless you use a current generation OLED in an extremely dark room, you’re better off with higher peak brightness than true black pixels.
The treatment of resolution is very interesting. My friend Mark pointed out that whether you’re at the default 3k or the full 6k, the actual photo in Photoshop is 100% identical. If you set the zoom level to 100% at each resolution, you’ll find the image fills the same portion of the screen. If you take screenshots of each, you’ll find the lower resolution screenshot is 6016 x 3384. You can put the screenshots in difference mode (align as needed) and you’ll find they are completely identical. So you can use the larger interface and will still get the maximum image resolution. It’s very slick!
The $1k stand for this display is the target of a lot of understandable frustration and sarcasm, but now that I’ve used it I’ve been won over that it is also truly unique. The attachment mechanism is dead simple, just bring touch the monitor to the stand and a magnet pulls it into position and then a mechanical lock automatically secures it. You have bring the stand to full height and flip a switch to release it, so it’s very secure and yet very easy to detach when needed. Height and tilt is extremely smooth and precise – you could use a single finger to reposition the screen easily. You can rotate the monitor to a vertical orientation if desired (and MacOS will automatically adapt). The stand is very solid, substantial, and gorgeous. You can easily buy a cheaper stand if you prefer – but if these design features appeal to you, I don’t think you’ll find another stand like it.
What could be better? It would be very nice if it had a downstream Thunderbolt port, which would make it easier to connect everything with a single cable. Many users would probably like to see a high-quality web cam integrated into it as well, though the Logitech webcam works very well to address that need.

Pro Display XDR vs laptop Retina XDR:
The naming here can be a bit confusing as both are labeled as “XDR”, which is simply Apple’s hardware branding for “Extreme Dynamic Range”. This branding indicates that you’re getting the very highest level of HDR support available.
I’ve compared the internal laptop XDR display with this external Pro Display XDR and would say they are generally very similar. Both offer excellent 1600 nits peak brightness and mini-LED with local dimming for excellent HDR display. Both offer deep MacOS integration and detailed control over the monitor’s characteristics. You can set the HDR brightness anywhere between 50 and 1600 and SDR brightness anywhere between 50 and 500 nits. That’s very handy if you wish to simulate less capable HDR displays or easily set your monitor to fixed levels of brightness to manage print workflows. You can also also customize the color gamut, white point, and EOTF to a degree.
There are a few differences of course, including:
- Size, obviously. The Pro Display is 32″ vs 14 or 16″ for the laptop (I have the 14″ laptop for lightweight travel).
- Resolution. The Pro Display is 6k (6016 x 3384 max, with 3008 x 1692 as the default) vs (3024 x 1964 max, with 1512 x 982 as the default).
- Dimming zones. The Pro Display has 576 dimming zones vs 2500 for the laptop. A greater number of zones helps reduce “blooming”. I’m not entirely sure why a higher resolution display has fewer dimming zones, but assume pixel pitch/density has something to do with it (the larger display is 218 pixels per inch vs 250 for the laptop). Ultimately, I do not see performance differences as a result, which I’ll discuss below.
- The Pro Display XDR uniquely has an option to optimize backlight performance for color detail vs minimizing blooming/halos, but I stick with the default and find them similar.
- The Pro Display XDR has a higher contrast ratio (20MM : 1 vs 8MM :1), but I find them very similar.
- The keyboard controls for brightness only seem to control the internal display. It would be nice to be able to adapt the external monitor’s brightness with the keyboard, but you can easily do this via the control center at top-right if you go to System Settings / Control Center and set display to “always show in menu bar”.
- You cannot turn off the Pro Display without unplugging it, locking the screen, putting the computer to sleep or turning it off. You cannot simply slide the dimmer to the minimum to make the screen truly black. Using cmd-ctrl-Q to lock the screen is a good option. Not a big deal, but you may need to adapt a bit if you don’t like leaving the display on.
Ultimately both displays perform very similarly outside the size (and resolution, though both look great at the default resolutions which are well below their limits).
Like any transmissive display with local dimming, both will show “blooming” when there are bright pixels surrounded by dark pixels. This is because if any pixel within a given lighting zone is not black, then that zone’s backlight is turned on. That means that you can only see a truly black pixel when every pixel in that zone is black (or technically more than 20.5 stops below SDR white in my Photoshop testing). With brighter pixels in a zone, the backlight gets brighter and the minimum “black” increases, which is what creates this blooming effect. This is not something you’ll notice under most conditions. If you work in a room which is completely black or very dark, that’s when you’d likely notice it. That blooming also the reason why a professional color grading a movie (which takes place in a very dark environment) would opt for a $33,000 reference monitor or OLED instead of a mini-LED display like this. But if you’re like most people who work some lights on or window light, you’re unlikely to notice it. More importantly, you have much greater peak brightness to overcome ambient light, which is a major advantage over OLED for most users in general.
If you’d like to get a good sense of how much blooming there is with your display, you can easily test this in Photoshop. Create a new image and fill it with complete black. Then click “F” twice to toggle the screen mode to full screen with no menu bar. Then just move the cursor around. If the room is very dark, you’ll clearly see blooming around it on a mini-LED (whereas OLED will show none). But if you turn on the lights or light is coming in through the windows, you probably will not be able to see any blooming because of competing reflections on the screen and your eyes being less sensitive to very dark content in a brighter environment. When you’re done, click “F” again in Photoshop to get back to the default display.
Pro Display XDR vs Eizo CG2730:
 I would say my Eizo is a pretty good proxy for any great SDR monitor you might currently use for printing.
Both of these are excellent monitors, but they have significant differences (the first spec in each line is the Pro Display XDR):
- 1600 nits HDR vs 350 nits. The HDR capability here offers massive benefits for displaying the image. When it comes to SDR content and printing, both are fairly similar.
- Size: 32″ Pro Display vs 27″ Eizo. I don’t feel the extra size is critical for enjoying the images or making prints, but it has great workflow benefits. I can see much more of the image while zoomed in, show more tools, etc.
- Resolution: 6k Pro Display (6016 x 3384) vs 2k Eizo (2560 x 1440). The detail is clearly better at 6k. Some people would absolutely love the extra detail, to me it’s nice but not a huge deal (viewers with less than perfect vision or correction for viewing at computer distances probably won’t see a difference).
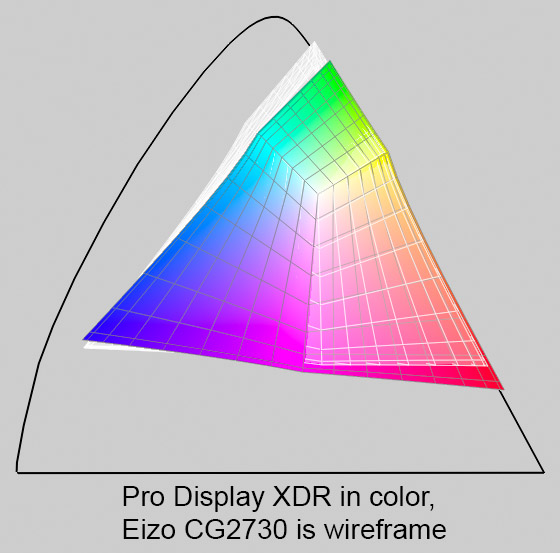
- Gamut: P3 vs Adobe RGB. On the whole, I don’t think there’s a clear winner here and they’re similar for most content. More details below.
My primary concern in replacing the Eizo was to make sure the Pro Display would work as well for printing. I wasn’t too concerned with gamut, but had a lot of questions on my ability to see shadow detail. Thankfully, the Pro Display holds up extremely well and I would say offers similar levels of shadow detail. The Pro Display is able to achieve deeper blacks and a bit more shadow detail, but this is likely offset by the reflective glossy display (depending on room conditions). The Eizo has more of an anti-reflective matte finish and it definitely helps minimize reflections, even in a room where I don’t have any strong lights behind me. If I were buying this XDR display, I would consider upgrading to the anti-reflective nano-texture glass if your budget allows.
When it comes to gamut, the Pro Display offers more vibrant reds (and a bit more orange/yellow/magenta) while the Eizo offers more green and cyan. So a sunset or flower photo may look more vibrant on the XDR, but both will look great. And green/cyan water and foliage can definitely look more vibrant on the Eizo. Overall, the Eizo is a bit better aligned with the gamut of vibrant print media like Lumachrome, but I’d feel equally comfortable proofing a print on either display. Unless your image content focuses primarily on a narrow range of subjects which fall into one color camp or the other, I don’t think both deliver great results for gamut.
Both monitors have very good uniformity visually. When tested with the Calibrite Display Plus HL, both showed some minor deficiencies from ideal – with the Pro Display being flagged in 2 corners and the Eizo in all 4. I have no concerns with either.
Conclusion
The bottom line for me is that the Pro Display XDR not only offers massive benefits for HDR display, but is also outstanding for making prints and any other photography work. The price will be outside the budget of many photographers, but it’s well worth it and you can probably find an excellent used one for substantial savings. I would consider the nano-textured option if your budget allows. If I couldn’t find the right used version of this monitor, I likely would have purchased it new. It’s an excellent product.
If you’re one of the few people who primarily use your monitor in a dark room, you may be better off with a bright OLED display (you will likely save some money and may achieve comparable or possibly better dynamic range – but only if the ambient light is very low). Note that I also have more information on key aspects of HDR displays and other high quality and budget HDR options on my HDR monitor recommendations page.
See the latest pricing for the the Pro Display XDR at Amazon or B&H.
If something like this is out of your budget, I highly recommend the M1 or M2 MacBook Pro. You can still get a M1 MacBook with the 16″ version of this incredible display and 1TB SSD for $1900 new at B&H. And I’ve seen several 14″ and sometimes 16″ M1 or M2 laptops on eBay and Craiglist for $1000-1500. These Apple laptops can be very budget-friendly, offer an excellent HDR experience, and are incredibly powerful computers even at the lowest specifications.
[Disclosure: This post contains affiliate links. I rarely endorse other products and only do when I think you would thoroughly enjoy them. By purchasing through my on this post, you are helping to support the creation of my tutorials at no cost to you.]
How to set up the Pro Display XDR
Setup for most people will be a simple matter of connecting the display to a thunderbolt port on your computer or dock. This monitor includes downstream USB ports, but no pass-through Thunderbolt. So you’ll either need multiple downstream ports on your dock or to use multiple Thunderbolt cables to connect your computer if you use other Thunderbolt accessories like a RAID drive.
Here is how I recommend you setup System Settings / Display:
- If mirroring, set the Pro Display as “main display” and make sure “optimize for” also uses that monitor. Even if you mirror to a Retina XDR display on your laptop, the secondary HDR screen will be clipped at a maximum 2.5 stops of HDR headroom (even if the display is set in a way that would show 4 or 5 stops if it were the only or primary display).
- Select the size that makes the interface feel comfortable for you. The image will always use 6k resolution, you’re really just scaling the surrounding interface with this choice (at least for Photoshop, I have not extensively tested this across all photography apps).
- Turn off “true tone”. This will cause significant color shifts (warm tones) which make the color less accurate and invalidate any profiling you may do.
- Leave the preset at the default “Pro Display XDR (P3 – 1600 nits)” unless you need to soft proof for less capable HDR displays or use a fixed reference brightness. If you wish to customize, click the dropdown and then “customize presets” at the bottom. You can then select the specific SDR and HDR brightness. See Apple support here and here for more info.
- Leave the refresh rate at the default 60Hz.
I also recommend going to System Settings / Control Center and setting Display to “always show in Menu Bar”. This gives you easy access at the top-right of your screen to change brightness (or custom presets if you use them).
Be sure to review Apple’s white paper on the XDR to understand the various preset modes.
You won’t find the maximum 6k resolution for the display listed in System Settings / Display by default (the “more space” icon only goes to 3008 x 1692). To access it, you need to click on “advanced” and turn on “show resolutions as a list”. Then you’ll see 6k as an option in the list (as 6016 x 3384). I expect very few people will want it, as it makes the interface tiny and offers no image quality benefit (you always get 6k quality for the image in PS).


