Photoshop now natively supports AVIF for 50% smaller files than JPG
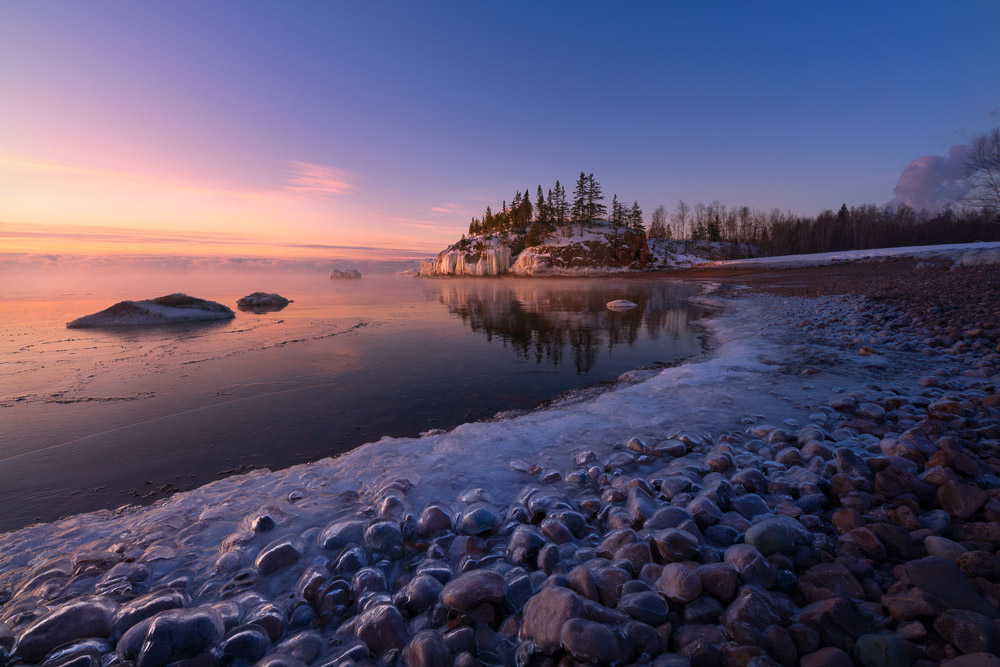
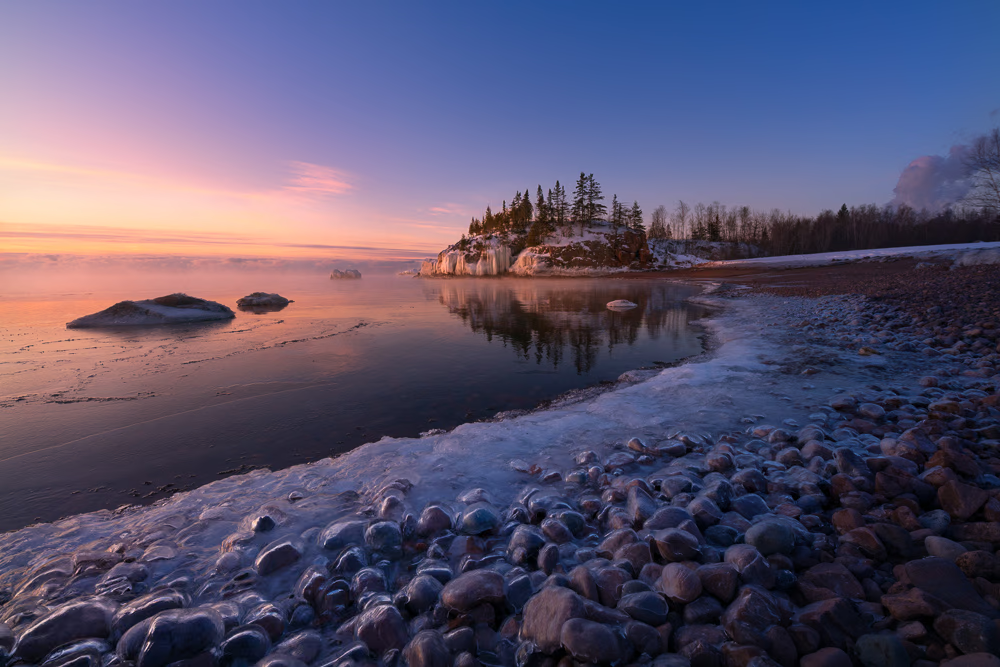
Note: the images in this post are all AVIF (uploaded normally through the WordPress media library).
JPG has been the most popular image format for over 30 years, but it’s days are numbered. There have been several attempts over the years to replace it, but none have broadly succeeded because they either offered too little benefit or didn’t get enough support from browsers and other critical support. We finally have a file format which seems very likely to start replacing in the coming years: AVIF (AV1 Image File Format). And Photoshop v26.8 beta just added support for it (as well as JXL).
AVIF is a vastly better image format and it’s supported by every modern web browser. It offers the following benefits over JPG:
- Vastly smaller files (averaging about 50% smaller in my testing, but 20-80% is typical depending on the image). This size reduction allows faster uploads, faster websites (potentially improving search engine rankings), reduced bandwidth costs, improved battery life on phones and laptops, etc.
- Improved image quality. AVIF supports supports up to 12-bit depth (vs 8 for JPG). That eliminates the risk of banding in smooth gradients like skies. It also means your images could survive a little bit more editing, which makes AVIF rather handy if you send your images to a lab to be printed (the file size reduction vs a 16-bit TIF is astronomical). And beyond bit-depth, artifacts in AVIF tend to be less obvious than in a JPG.
- Transparency. JPG doesn’t support it and PNG files are quite large. So this is great for product images, etc on websites.
- Native support for HDR. While gain maps are critical to ensure high-quality adaptation even with native HDR encoding, this helps further reduce file size (a gain map may be compressed more aggressively, or can be eliminated in cases where file size is more important than ensuring high quality across all screens). See here for more information on why gain maps are important for quality (even in 10+ bit-depth formats).
- Animation. AVIF offers vastly higher image quality than GIF, and in fact is a video standard at its core (AVIF photos are really just a single frame AV1 video).
How does AVIF compare to JPG, JXL, webP, and PNG?
There are several notable alternatives to JPG, how do they compare for photography?
First, a quick note that all the formats below support “gain maps” for HDR. There is a common mis-perception that gain maps are just a hack to allow HDR within the 8-bit limits of JPG. While they have that benefit, they serve a much more important purpose: they ensure that an HDR image looks great on any display (without it, less capable displays or screens in outdoor light will often show a significantly degraded result and will vary from one browser to the next). However, native support for HDR is very helpful as it allows for encoding smaller gain maps as well as the option to skip the gain map when file size is much more important than image quality.
JPG:
- Pros:
- The most widely supported image format for the web (100% compatible).
- Offers a safe and compatible way to share hiqh-quality HDR today (when using a gain map). This is likely to be replaced by AVIF gain maps in the future as support grows, but is very helpful in 2025.
- Accepted by all social media sites for uploads.
- Widely supported for smart phones / texting
- Cons:
- Files are much larger than newer alternatives
- Limited quality due to 8-bit depth and artifacts
- no support for transparency
AVIF:
- Pros:
- ~50% smaller than JPG (vastly faster page loads, better search ranking, less data use).
- 10 and 12-bit support and less distracting artifacts offer much higher quality than JPG.
- Supports HDR gain maps
- Supports HDR natively
- This gives the option to encode HDR at the smallest possible size.
- (a gain map always offers vastly higher quality, but this gives the option to compress a gain map even further or to eliminate the map if file size is more important than image quality)
- support for transparency.
- Widely supported on the web (by all modern browsers).
- Has excellent support in Adobe software. AVIF is royalty free and has great momentum, so support is very likely to expand further elsewhere.
- Supports CICP encoding to help reduce file size vs embedding an ICC profile.
- Cons:
- Support is excellent in modern browsers, but there are enough outdated browsers that social media support is limited at this time.
- Use of very old devices or slow updates means compatibility is ~95% today (but steadily increasing). This is the key reason its use is limited. It would be reasonable to use now in many cases, and you can set your website to serve a JPG fallback image if you want to ensure vastly faster page loads while ensuring 100% compatibility for all devices.
- Affinity can import but not yet export, Capture One has no support yet, GIMP support is available (if you install libheif or libavif).
- Not an ideal option for large prints (limited resolution, tiling can expand those limits but risks potential quality issues).
- 12-bits is great for a final image, but is not ideal for subsequent editing.
- Support is excellent in modern browsers, but there are enough outdated browsers that social media support is limited at this time.
JXL (aka JPEG XL):
- Pros:
- For web use, has benefits generally similar to AVIF (~50% smaller than JPG, high bit depth support, transparency, supports HDR and gain maps, well supported by Adobe)
- Additionally offers the ability to re-compress existing JPG to JXL with no further loss of image quality, making it very easy to migrate any website to much smaller images.
- Ideal for printing / subsequent editing due to nearly unlimited resolution and 32-bit support.
- Has excellent support in Adobe software (including 8-32bit exports from PS v26.8 beta). JXL is royalty free and has great momentum, so support is very likely to expand further elsewhere.
- Supports encoding color data in the code stream to help reduce file size vs embedding a full ICC profile.
- Cons:
- Limited support in web browsers (~14%). Chrome had support under a developer flag and removed it. If Google revisits that decision, JXL could become a very exciting option several years down the road (close to 80% of web traffic is based on Chrome or derivative browsers).
HEIF (HEIC):
- Pros:
- For web use, has benefits similar to AVIF (though may not compress quite as well)
- Well supported on Apple devices (native capture format on iPhones)
- Supports higher resolution than AVIF without tiling, so it could be often used for print-quality images.
- Supports color encoding as CICP to save space vs an embedded ICC profile.
- Cons:
- Limited support in web browsers (~14%). Due to royalty considerations, it seems unlikely support will expand significantly anytime soon.
- Lacks 32-bit support offered by JXL for subsequent editing (16-bit support is theoretically pretty good, but actual support for HEIF is often limited to 12-bits).
webP:
- Pros:
- ~25% smaller than JPG
- Widely supported on the web (by all modern browsers).
- Faster encode speed than AVIF, which is attractive for websites processing very large numbers of images.
- Cons:
- Like JPG, it is limited to 8-bit depth and lacks support for transparency.
- No support for HDR (either natively or with a gain map).
- Like AVIF, some old browsers lack support (webP support is ~96%).
PNG:
- Pros: Widely supported as a way to share images with transparency
- Cons: Very large files (PNG is likely to get replaced by AVIF).
How to create AVIF:
There are several tools which support exporting photos as AVIF:
- Photoshop v26.8 beta
- Web Sharp Pro v6.4 offers an AVIF option when using this new version of Photoshop.
- Lightroom (Classic, cloud, mobile)
- Adobe Camera RAW (tutorial)
Below are two copies of the same 1000 x 667 pixel image. The first is a 192 KB JPG, and the second is a similar AVIF which is only 96KB (50% smaller, but slightly higher quality!)
Where can you view AVIF?:
AVIF is well supported for viewing in:
- all modern web browsers (see “can I use” for the latest stats for old browsers).
- Apple Photos / Finder (iOS 16+ and macOS 13+)
- Android and Google Photos (Android 12+)
AVIF is NOT supported in:
- Apple iMessage (as of iOS 18, comes through as an icon you cannot view or save)
Note: please comment below on any software you feel is critical to add to this supported / not supported list.
Which social sites supports AVIF?
As social media sites emphasize support for a wide range of old devices, old apps, old browsers, and old operating systems; it is not surprising that support for a new file will be slow to arrive on social media. Most sites will not accept AVIF uploads, and the ones that do are generally going to transcode the upload to JPG to ensure support on legacy devices (ie it won’t improve the quality of what other see currently, but it will let you upload from a smaller source).
Sites that allow AVIF uploads:
- Bluesky
- Discord
- Threads
Sites that do not yet support AVIF (as of 05-26-24): 500px, Flickr, Pinterest, Reddit, SmugMug, Twitter, and WhatsApp.
Should you share AVIF now?:
You can use AVIF now on your own website if you are either
- unconcerned about a small number of viewers (mostly with very old devices) not having support
- Note that the gaps in support are fairly niche and probably not terribly important for most photography sites:
- 1.3% of browsing involved old iOS (mostly iPhones older than iPhone 8, as they can’t run iOS16). This is probably the only
- 0.5% Internet Explorer (mostly people running something older than Windows 10)
- 0.4% old Chrome, , QQ (Chinese browser, 0.2%)
- Note that the gaps in support are fairly niche and probably not terribly important for most photography sites:
- willing to batch export both AVIF and JPG and use the script below (which will offer the speed benefit of AVIF to 95% of your audience and ensure the other 5% can still safely see JPG).
However, you should probably otherwise wait a little bit longer if:
- you prefer simplicity of administering your site over speed / ranking
- you share everything through social media
- note yet supported for uploading to a given social media site
- texting via iMessage.
- sharing HDR until AVIF gain maps are better supported (a JPG gain map will produce much better quality overall than an AVIF without a gain map due to superior adaptation to all displays). It’s great that we have such widespread support in browsers and Adobe software, but the remaining gaps are still a reason to move slowly at this time.
So we are still early for many use cases, but AVIF is steadily moving towards critical mass and offers extremely compelling benefits over JPG. I encourage you to test it for yourself, try uploading AVIF to see where it works, and send a polite request for support to any services you use which do not yet accept AVIF uploads.
How to enable JPG fallback for any AVIF image on your website:
If you’d like to share AVIF now to help offer vastly faster page load times but also wish to ensure that even the ~5% of viewers who lack support still see your images, you can easily automate that. Just batch export both AVIF and JPG versions of your image using the same name, insert the AVIF normally on your site, and use the following script to have the page automatically replace all <img> elements using an AVIF with <picture> elements which use either AVIF where possible but fallback to JPG if not supported.